
So you’ve recorded all the tracks for your latest song, and now the time has arrived to begin the mixing process. But it seems like there is so much to learn, and so much information out there about how to mix a track. Where do you even start?
To start mixing, edit each track to remove unwanted parts and correct errors. Then get all your tracks to be roughly the same volume. Then start moving the faders to increase or decrease the volume of each track, such that the overall balance of each instrument sounds good in the song as a whole.
Mixing can be a complicated process, and can take years to learn and achieve a good level of proficiency in it. But the actual aim of mixing is very simple; it’s all the different methods that you can employ to achieve it that adds all the complexity. So let’s start by defining exactly what mixing is.
If you are interested in checking out the best recording gear such as audio interfaces, studio monitor speakers, microphones, etc., you can find them at Amazon by clicking here.
What is mixing?
Let’s assume you have recorded multiple tracks for your song in your DAW. My DAW of choice is “Reaper”, which all the screenshots in this article have been taken from. Check out this guide to recording if you need some help or need to know more about working with a DAW. Your song might be as simple as an acoustic guitar and a single lead vocal. Or it may be as complex as a full rock mix with drums, bass, several guitars, several keyboards, a lead vocal and several backing vocals. It doesn’t matter; the principle of mixing is exactly the same, regardless of how many tracks you have. So what is mixing?
Mixing is changing the volumes of the tracks in a song, such that the balance of the various instruments and voices sounds good to your ears. Some elements may be more to the foreground and therefore louder e.g. lead vocals. Other elements may be more in the background and quieter e.g. pad synths.
That’s it. Yes, it really is that simple. Mixing is setting the volumes of your tracks in relation to each other.
Mixing is often confused with another music production process you may have heard of – mastering. They are closely related; mastering is essentially getting your mix ready for commercial release, particularly ensuring the volume is at the right level. To learn more, I highly recommend checking out my article on the difference between mixing and mastering.
Here’s a brief summary of the main tools available to us in mixing…
- Moving the channel faders to balance volumes
- Compression to even out volumes
- EQ to control volumes of particular frequency ranges
- Automation to automatically change volumes
- Reverb (reverb tends to push things back in a mix, effectively putting them in the background)
Learning these tools and how to use them effectively is the essence of mixing.
Before we go on to lay out a simple process to get you started mixing, there is one important point that should be drilled into anyone making their own music…
Mixing starts at the recording stage!
You may have heard the phrase”fix it in the mix“. This tends to be used by people when recording, when there is some issue with whatever they are recording – a not-great sound, some background noise, a part not played very well, too much echo, etc. Due to laziness, they will say “Oh, we’ll just fix it in the mix”!
Don’t do that. Mixing starts at the recording stage! The better you do your recording, the easier time you will have when it comes to mixing. All you are doing with the “fix it in the mix” attitude is creating a lot of work for yourself further down the line.
Now obviously you need something to record! Writing songs is one of those activities that is quite easy to get started with, but can get pretty difficult pretty quickly. I highly recommend reading my article on why songwriting is so hard. You’ll learn the reasons writing your own music can be difficult, and hopefully pick up a few handy tips and tricks to make it easier for you.
Once written, get your tracks recorded as well as you possibly can. Eliminate or minimize background noise, record multiple takes until you get it right, make sure you get as good a sound as possible. Don’t record too loud; make sure when recording that the levels do not peak above -6dB; some prefer to keep levels under -12dB. It doesn’t really matter which limit you use as long as you leave some headroom i.e. the signal is not peaking right at the top of the meter. As a guide, aim for the signal to come up to about ⅔ up the meter.
To help you with this, an understanding of gain is essential. But what exactly is it, and how does it differ from volume? I have a whole article on that topic! Check out my article on the difference between gain and volume. You’ll learn exactly what the difference is, and how to use this knowledge to improve your own recordings and mixes.
Approach recording with a mixing mindset i.e. think about any action you take in recording and how that will affect what you have to do when it comes to mixing.
As a simple example, imagine dialing in a guitar sound on an amp you are recording – think how the sound is going to fit in the mix as a whole. It may sound great on its own, but what about when bass, drums and other instruments are added? You may well want to reduce the lower-end frequencies on the guitar amp, to make room for the bass and drums.
And a final point on this – fixing it in the mix doesn’t really exist. Any move you make at the mixing stage to compensate for a poor choice when recording is going to be a compromise at best. Get it right on the way in, and you will make life easier for yourself when mixing.
If you are still unsure as to why mixing is so important, take a look at this article on “Why mixing and mastering are so important“. It lays out the reasons why mixing and mastering are crucial in modern music production, and will give you a much clearer idea why so much time is dedicated to them.
Mixing – where to start? A simple process
Maybe you are approaching your first mix, and you have spent some time Googling and watching YouTube videos about mixing. Your head is probably spinning with technical information about EQ, compression, average and peak levels, gain staging, and a load of other confusing terms.
Remember what mixing is; setting the volumes of your tracks in relation to each other so they sound good. That’s all – that is the fundamental principle and ultimately all that we really care about. So this section gives you a very simple 3-step process for starting your first mix. There are no complicated tools used here; we are simply going to balance volumes. Here are the steps…
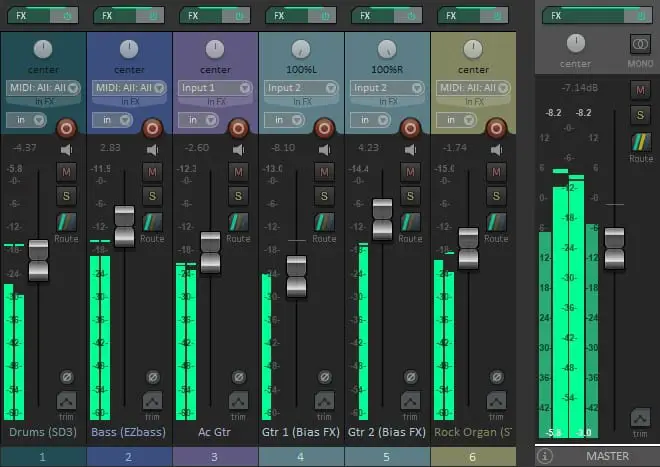
1 Get all your tracks to be roughly the same volume.
If you can do this without using the faders, even better. This might mean the use of a volume plugin in your DAW on each track, or using the volume in a virtual instrument you might have on the track. If you have to use the faders that’s fine; just make sure you leave enough room on each fader to turn it up later if you have to. Reduce the volume on all the tracks to mix at a lower volume if necessary.
2 Adjust the volume of each track using the faders
Start playing your track. As it’s playing, start adjusting the level of each track using the faders, until each instrument is nicely balanced in the mix. Start by concentrating on one instrument, then move on to the next, then the next, etc.
You will find that this is an iterative process i.e. you will come back to tracks you started with again and make further adjustments. Don’t take too long over this; listen through the whole song maybe 3 or 4 times. Any more than that and your ears start to get tired, and you will start making mistakes that you will later have to undo.
3 Adjust the panning of each track

Play through your song again and as you do, adjust the “panning” of each track so it sits where you want it in the stereo space i.e. how far to the left or right it is. Don’t get too creative here; there are a few conventions that are usually followed…
- Kick and snare drums in the center
- Bass guitar in the center
- Rhythm guitars panned hard left and right
- Lead vocal in the center
- Other lead instruments in the center
Aim for an effect pleasing to your ears similar to a favorite song in the same genre as your song. Similarly to the volume adjusting, don’t take too long over this so your ears don’t get tired.
This 3-step process is a great basic method to get you started in mixing. But there is a lot more you can do with mixing, and to learn it fully can take a long time. For more details check out this article on how long it takes to learn mixing and mastering. It gives you realistic timescales for learning mixing, and ideas for how you can best approach your mixing education to learn as quickly and thoroughly as possible.
Mixing Tips
Your mix should be “good enough”
Congratulations, you have just done your first mix! Do not aim for perfection; it does not exist. Aim for good enough. I guarantee that every time you come back to a mix, you will want to change it in some way. And then another time you’ll come back and want to change it in a different way. At some point, you just have to draw a line in the sand and accept it is good enough.
Mixing is a sea of compromises and trade-offs. What sounds great on one system may not sound that great on another. So try to develop the attitude of not getting frustrated when everything isn’t perfect. If you are a perfectionist, this will be hard! Take comfort in the following; the vast majority of musicians if you asked them about one of their releases will be able to point out flaws with it. Even ones that have sold millions of records!
The question of what makes a good mix can be somewhat subjective. But there are a few common characteristics of what most musicians would consider a good mix. That’s why I wrote this article on “What makes a good mix?“. I recommend you give it a read to learn the key things you should be aiming to achieve with your mix, and associated tips to get the best mix possible.
What order should you mix the tracks?
There is no right or wrong answer to this. Some people like to start with the drums, then the bass guitar, then rhythm guitars, then start adding in vocals.
Others like to start with the drums, then add in vocals straight away. Then start adding in bass, rhythm guitars, keyboards, backing vocals.
Others like to start with the vocals, then add in the bass and rhythm guitars, then add the drums.
None of these approaches is wrong – find a method that works for you and incorporate it into your process.
Should you start with all the tracks at zero volume?
The process outlined above suggests starting your mix by getting all your tracks at the same audible volume. This isn’t the only possible approach; you could start by moving all the faders right down so that all your tracks are at zero volume – i.e. your mix starts from complete silence.
You then take each track in turn and slowly start turning it up as you mix. You gradually add in each instrument one at a time, building up your mix from no sound at all.
Again, neither approach is wrong; it’s a matter of what you find works for you. My personal preference is the first method – to start with all the tracks audible at roughly the same volume level. But don’t let that stop you from trying the other method if you prefer.
Is it OK to mix on headphones?
You can mix on headphones effectively. Open-back headphones are preferred over closed-back as they give a truer representation of the sound. Headphones also give consistency when mixing, as they sound the same wherever you are – you don’t have to be in the sweet spot in your room for listening.
My answer to this one is perhaps a little controversial. Some people will disagree with this statement, and say that you should never mix on headphones. So I’d better justify why I say it’s ok.
The ideal system to monitor on is a pair of quality studio reference monitor speakers, in an acoustically treated room designed for listening to audio. Now, how many of us have that? Most of us are working in a multi-purpose room that is also a bedroom, or a study, or something else. Our rooms are not treated, and most certainly not designed specifically for audio listening.
So even with a quality set of studio reference monitors, in our rooms they probably won’t sound that great anyway. So for most of us, a quality pair of open-back reference headphones might actually give us the best listening platform we can hope for. You can also take your headphones when travelling, knowing that they will sound exactly the same to mix on in a hotel room as they will in your usual mixing location.
You have to be careful though. Make sure you take regular breaks – listening to headphones is more tiring that listening to speakers. I would suggest a maximum of mixing for 15-20 minutes at a time before taking a break. And make sure you audition your mix on other systems, as headphones can emphasize certain frequencies that you may not want as much of.
My article on recommended headphones should help you choose a good set suitable for mixing.
Mix your whole song, not individual tracks
It is important when mixing to only be concerned with getting the whole song to sound good, not individual tracks. The solo button is the most dangerous button in your DAW. Stay away from it!
The reason for this is an instrument can sound great on its own, but terrible when you put that instrument in the context of a whole mix.
A common example of this is an electric guitar sound. You might get a great sound from an amp that sounds fantastic when played on its own. But when you put it together with the drums and bass, it starts fighting with the bass for space in the low-end. You probably want to reduce the bass on the guitar amp. This will mean on its own it will probably sound a bit thin and weedy, but perfect once you put it into the whole mix.
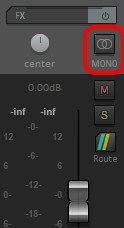
Mix in mono as well as stereo
Stereo is great. It gives us a means of positioning instruments anywhere in a left-to-right space, giving us a sense of instruments being in different places. This is just like if we were standing in front of a band playing live.
But stereo can also be misleading. It can make things sound like they can be clearly heard, when if you switched to mono that may not be the case. For this reason, it’s always advisable to do at least some of your mixing in mono, and balance the various levels of the instruments with them all effectively coming from the same space.
We listen to music in mono perhaps more than you realize. Listening on a phone’s speaker is perhaps the most obvious example. Any time where the speakers are close together and we are a distance away from them, effectively we are listening in mono. Think listening to a Bluetooth speaker while cooking in the kitchen for example.
Your DAW’s mixer will probably have a mono button on the master fader. Make use of this periodically to check your mix in mono.
Your mix still needs to be mastered
Mastering is the process of preparing your mix for release, and getting it to sound the best it can on every platform. Mastering increases the volume of your mix up to commercial levels. It also makes tracks in an album or E.P. sound consistent over the whole release.
Mastering is the last step in preparing a song to be released, after mixing. Check out this introduction to mastering for more information.
A complete mixing process
We’ve laid out a simple process for mixing above. This works great for getting a rough mix quickly, or as a great place to start if you’re a newcomer to mixing. Once you have done a few of those simple mixes, you are ready to move on to the next steps; using more of the common mixing processes and tools.
In practice, mixing engineers would normally follow a much more involved process. They would make use of gain staging, EQ, compression, automation, maybe some effects, maybe use a reference track. This is the type of process that is detailed in this section.
Notice that I called this section a complete mixing process, not the mixing process. There is not just one way to do this – there are many ways, and each mixer will have their own tried-and-tested way of doing things. But it is important to have a process to stop getting bogged down in details and to avoid going round in circles. This process is similar to one I have used for many years to mix my own songs. Feel free to use it, or to use it as a starting point to develop your own process.
If you are a beginner at mixing, I would advise you to not take all this on at once! Pick one part of it and practice just that for a while. Once you get a bit more comfortable you can move on to learning the next stage. Note that just like learning a musical instrument, it takes years to become truly proficient at mixing. And your first few attempts will probably suck. That’s ok! Accept the frustration that will arise from time to time, just like with learning anything new. As always the key is practice!
Here is my complete mixing process…
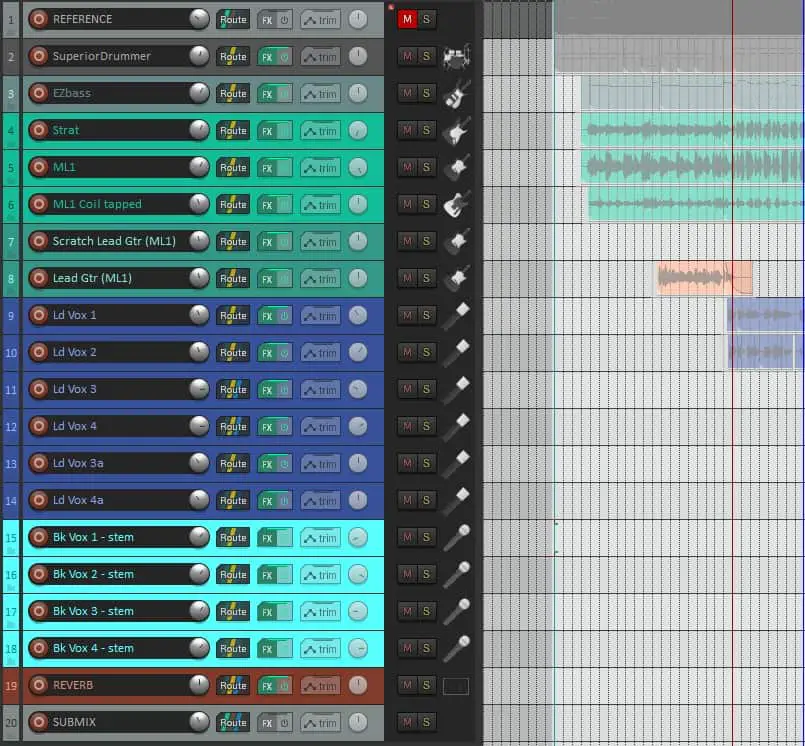
1 Organize your tracks
OK, so maybe strictly speaking this isn’t part of mixing, but I make no apologies for including it here. Organize your tracks! It will make your life so much simpler when you tackle all the subsequent steps. This will aid hugely in developing a productive workflow for your mixing tasks.
Get your tracks in a sensible order in your DAW. The order itself doesn’t really matter, as long as it makes logical sense to you. Here’s an example ordering that I often use…
- Drums
- Bass
- Rhythm guitars
- Lead guitars
- Keyboards
- Lead vocals
- Backing vocals
Feel free to use that order if you want, but you don’t have to.
Color code your tracks. All DAWs have the ability to set the color of a track. This lets you identify the track(s) you want to work on quickly when mixing, especially when you have a lot of tracks in your project. Drum tracks should be one color, bass another, rhythm guitars another, etc. The actual color scheme is unimportant; choose something that makes sense to you.
Label your tracks sensibly. Choose names that help you instantly recognize what the track is from the name. It sounds obvious, but I have seen track names like “v1”. What on earth is that? Choose names like “RhyGtr 1”, “KickDrum”, “Ld Vox 1”, etc. If you instantly know what the track is from its name, then you’ve done this right.
Group similar tracks together. For example, if you have 4 rhythm guitar parts group these together. Similarly for backing vocals. This not only makes sense for laying out your tracks, but also lets you use a group or a bus in your DAW so that you could control the volume of everything in the group with one fader. e.g. you could control all the rhythm guitars with a single “RhyGtr” group fader.
Develop an organisation scheme for all the above which you will use on all your songs. The more you mix projects the quicker you will get at doing whatever you have to do, when you are intimately familiar with the organization of your tracks.
With all this talk of tracks, you may be unsure exactly what a track is. That’s why I wrote my “What is a track?” article which will teach you what tracks are and how to use them. Closely related are something else you may have heard of – stems. People think tracks and stems are the same, but they are not. Check out my article explaining the difference between tracks and stems to impress your musician friends!
2 Edit your tracks
You could also argue that editing isn’t really part of mixing. I include it here as it is very important, and will save you time further down the line.
The idea here is that each track should be as good as it possibly can be before you start the mixing process. Listen to each track in turn, and edit anything that isn’t quite right. Some ugly background noise on a track before the playing starts? Cut out that part of the track. A glaring mistake on a track? Edit it out, or replace it with a correct version copied from another part of the track. A cringe-worthy timing error on a track? Fix it by nudging the offending section to the correct place, or copy another correctly-timed section over it.
It is also a good idea to cut out any “silence” on tracks. For example, if you have an electric guitar track where the guitar isn’t playing for a few bars – cut out those few bars. All that part is doing is adding hiss from the amp into your mix, so get rid of it.
You get the idea. At the end of the editing stage you should have your tracks as clean and tight as you can. This is so that when you start mixing you can concentrate on exactly that – the mixing – without having to worry about fixing any of your tracks.
3 Gain staging
The idea of gain staging is to get all your tracks at roughly the same volume, with all the faders in their default 0dB positions.
Imagine that during mixing you have had to turn a particularly quiet track up a lot. As you work, you decide that this track needs to be turned up even more…but the fader is already as high as it will go, so what can you do? This is the situation that gain staging is aiming to prevent.
Begin by setting all the faders to zero.
Using whatever method you can in your DAW (this might be plugin output volume, a volume plugin, EQ pre-gain, etc) but without touching the faders, go through each track and get them to the same volume level as each other.
What volume should you aim for? There are some common levels to aim for e.g. average level at -18dB and peak level no higher than -15dB. Some prefer -12dB or -10dB peak, with a corresponding increase in the average level. It doesn’t really matter as long as you are consistent and leave some headroom. Remember though that these are guidelines, not hard and fast rules. Trust your ears over meters; very transient instruments such as drums may peak higher than this, and that’s ok.
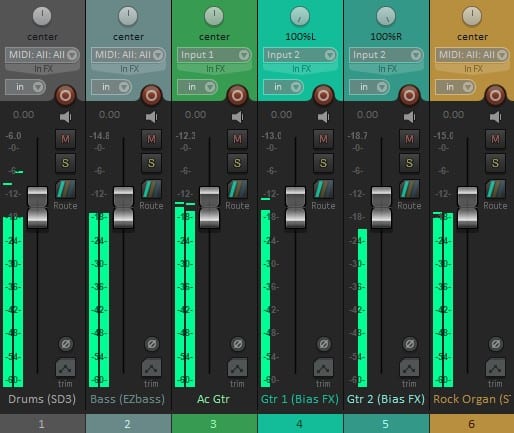
You should end this step with all your tracks at roughly the same level, with all your DAW mixer faders in a nice straight line at 0dB.
Gain staging is so important, that I have written a whole article about it. For a repeatable gain staging process that you can use again and again, check out my step-by-step gain staging tutorial.
4 Import a reference track
This stage is optional but it can be very useful, especially as a beginner.
The idea here is to bring a commercially released track into your project, so you can compare the sound of it with the sound of your mix. You want to choose a song that is in the same genre as your song, that you would like your song to sound like. This gives you a target for how to get your song to sound when mixing.
Note that you will have to reduce the volume of the imported track to be a similar volume to your song’s tracks. As the commercial song will have been mixed and mastered, it will always be louder than your tracks. Our ears perceive louder as “better”, so reduce its volume to stop it from having an unfair advantage in the comparison.
This is by no means a complete list, but here are some things to listen out for when comparing with a reference track…
- How loud the drums are compared to everything else
- How loud the bass is compared to everything else
- The panning of guitars – are they panned hard left & right?
- Is the lead vocal double-tracked, or just a single line?
- The use of reverb – is it quite dry, or is there substantial reverb used?
- Is the overall mix bass-heavy, or is it more biased towards the high end?
5 Perform an initial static mix
You could argue that this is the first actual mixing step – setting basic levels by performing a quick static mix. “Static” in this context means you are purely setting levels using the faders; you are not using any automation tools here – where you set the fader is where it will stay for the whole song. You can also pan your tracks at this stage. This is similar to the simple starting mixing process outlined earlier in this article.
The idea here is to quickly get a rough mix of your song where each instrument sounds good for maybe 80% of the song. Don’t take too long over it; I would say 2 – 3 complete listens of your song the whole way through. Obviously how long this takes depends on the length of your song, but I would aim for no more than 15 to 20 minutes.
Favor pulling the faders down rather than up. Pan things hard left, hard right or straight up the middle – keep it simple. At the end of this stage you should have a mix that you are quite pleased with, but probably needs a few tweaks here and there to get it sounding really good.
6 EQ
From the previous step you should now have a rough mix that you are pretty happy with, but could probably do with a few improvements. You may have sections where several instruments seem to be fighting for each other for space, or where the mix seems muddy. Maybe your whole mix sounds just a little bit flat, and could do with a bit of high-end sparkle to liven it up a bit. Maybe there is an unpleasant frequency that you’d like to get rid of in one of your recorded tracks. These are issues that EQ can be used to solve.
If you have ever used treble and bass or tone controls on a hi-fi or stereo, then you have used EQ. The EQs that we have available to us in the form of DAW plugins are super controllable, super precise versions of the same thing.
Now EQ is hard. It takes a long time to learn to do it well, and a lot of practice. I think it is the most difficult thing in mixing. For that reason, use EQ sparingly to start with. It is easy to destroy a mix with bad EQ. Don’t EQ everything in your mix just because you can; only when you think something needs it. You may find this article on whether you should EQ everything in your mix useful.
Here are a few common EQ moves. Don’t apply all of these automatically; only if you determine that your mix needs it…
- Use a High-Pass Filter (HPF) to cut everything below 50-80Hz to remove unnecessary low-end rumble
- Cut somewhere between 1kHz-5kHz on guitars to give vocals some space
- Cut between 2kHz-3kHz to soften a harsh vocal sound
- Use a Low-Pass Filter (LPF) to cut everything above 6KHz on bass guitar
- Boost somewhere between 6-10KHz to add air or breathiness to vocals
This is by no means a comprehensive list, just a few examples.
Find a tutorial on the stock EQ plugin that comes with your DAW, and work your way through it. Then try it out on a few of your tracks. Find a more general EQ tutorial, and practice using the examples on your own tracks, listening for the effect each move you make has on the overall sound of your song.
If your mix is sounding muddy, you might want to check out this article on reasons why your mix can sound muffled.
And here is a general EQ tutorial that is a good starting point for learning how to EQ…
7 Compression
Compression effectively evens out the volume of your tracks. It makes the louder parts quieter and the quiet parts louder, giving a more consistent volume over the length of a track. It can be applied to individual tracks, or to the mix as a whole.
This article is not a tutorial on compression; it’s a large subject and I couldn’t do it justice here. The key point to know is where compression can be useful. Perhaps you have a track where sometimes you can hear it fine and other times it’s a bit too quiet. Or maybe a track where it’s mostly OK, but occasional parts are a little too loud. These are tracks that may benefit from compression. It’s also commonly used on the master fader to smooth out the volume on the whole mix.
At a basic level you use compression by…
- Setting the volume above which the signal volume will be reduced using the threshold control
- Use the make-up gain control to increase the overall volume of the track
Your DAW will have a stock compression plugin, and this is a good place to start. It will most likely have some presets built into it e.g. maybe for acoustic guitar, backing vocal, etc. Try out some of these presets, and listen to the effect it has on your track. Experiment with the threshold control which changes at what volume the compression kicks in, and listen to the effect of changing it.
This is an excellent video tutorial that explains what compression does and how to use it…
8 Effects
Adding creative effects can be part of the mixing process. This is very much your judgement call. It is entirely possible that your song doesn’t need any effects, so don’t use any.
Reverb is perhaps the most common effect used on a mix. It can be applied on individual tracks and on a mix as a whole. It adds a sense of space to a mix, but be careful; it is easy to overdo it. Swamping all your tracks in lots of reverb is a sure fire way to create a horrible muddy mess.
Delay is also a commonly used effect. There are many types of delay, and your DAW will have at least one stock delay plugin.
There are many, many types of effects plugins both free and paid. Just remember that just because you can, doesn’t mean you should! Because of the vast number of great software plugins out there for us to use, it can be tempting to use far too many in your mix. Favor subtlety; it is easy to destroy an otherwise great mix by getting too creative with effects!
9 Automation
By now you will be familiar with moving the faders in your DAW to increase or decrease the volume of a track. But supposing you don’t want a track to stay at the same volume for the whole track; there is a section where you want to pull the fader up, then bring it back down after that section finishes. OK, so you do that as your song plays. But suppose there are 5 tracks that you want to change the volume of at different points in the song. It’s going to get very difficult/impossible to do using the mouse.
That’s where automation comes in. This is where you can record your changes to the channel fader, then play them back. This means that once you have recorded the movement the fader will now move automatically, without you having to change it manually. You can do this to as many tracks as you want.
All DAWs have a slightly different way of doing automation, but it’s a feature that they all have. Find a tutorial for your DAW on how to use its automation, then practice the technique on your songs.
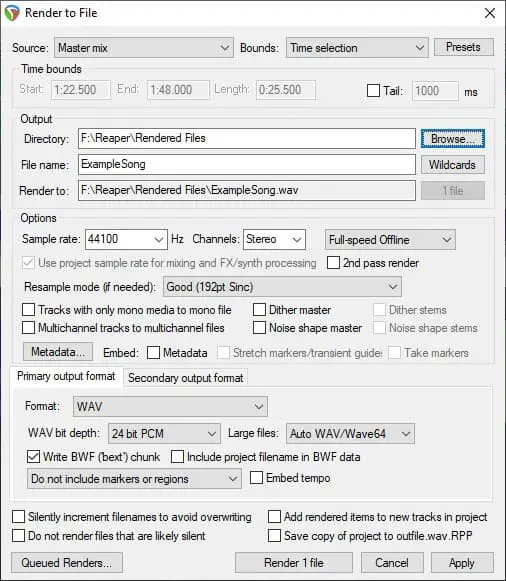
10 Export mixdown
You now have your mix! It’s time to export your mixdown to a single file, typically a stereo .wav or .aiff file. You can also export to compressed formats such as mp3 or ogg vorbis.
In your DAW there will a command called export or render. Use this command to set up the exact file format settings. Then click the render, export or apply button. The output of this step is a single stereo audio file which you can then use to listen on different systems.
Typical settings for the mixdown file are….
- Sample rate: 44.1 kHz
- Bit depth: 24 bit PCM
- 2 channels (stereo)
11 Take a break!
I make no apologies for including this here. Take a break! Mixing is very tiring on the ears, and very mentally draining.
Before moving onto the next step you may even want to take a break of a couple of days without doing any mixing activities. This lets your brain and ears recharge, and gives you the best chance of making good judgements and decisions when it comes to evaluating your mix.
12 Listen to your mix on different systems
Your mix may sound great on the system you mixed it on i.e. your computer connected to headphones or studio monitors. But people don’t typically listen to music on systems like that like that. They listen on…
- Phones (both through headphones and through the built-in speaker)
- Living room Hi-Fi systems
- Smart TVs
- Car stereos
- Kitchen bluetooth speakers
- Laptops (both through headphones and through the built-in speakers)
…and I’m sure you can probably think of a few more.
It’s important that you listen and evaluate your mix on as many of these systems as you can. You may be surprised at how different your song can sound depending on what it is played on. Make notes, as this exercise may reveal flaws or things you want to change in your mix that weren’t apparent when listening on the original system. Armed with these notes, you can then go back to the mix in your DAW and change anything you think needs changing.
Be aware though that you will never get your mix to sound perfect on every system. It’s always going to be a compromise between the systems. The obvious example is a phone speaker, which will have practically no bass response. So if you are expecting that booming bass line you recorded to sound huge on a phone, you are going to be disappointed.
It’s back to that thing about not aiming for perfection again; aim for good enough.
Summary
Thanks for reading this article on where to start when mixing. Although the principle of mixing is very simple, learning to use the many tools that we have available is challenging, and takes a lot of time and practice.
Don’t let that put you off though; the complete process of seeing your song through from the writing stage right up to the mixdown stage can be incredibly rewarding. And like with learning anything, the more mistakes you make the faster you learn.
So I encourage you to work your way through the steps in this article, and seek out other tutorials on all aspects of mixing. And practice, practice, practice. And don’t be afraid of making mistakes. Good luck!
Here is some of my favorite home studio gear…
Thanks for reading this article. I hope you found it helpful in your home music-making activities. Here are a few of the tools that I personally use in my home studio. These are affiliate links, so if you decide to use any of them I’ll earn a small commission.
Audio interface: My personal choice for audio interfaces are the Focusrite Scarlett series. I have been using these for years, and they have always given me great-sounding recordings. For a very reasonable price from Amazon you can buy the excellent Focusrite Scarlett 4i4, or if you don’t need MIDI capability the Focusrite Solo is a great choice.
Amp sim: Guitar amplifier simulator software has come on leaps and bounds in recent years, such that I record all my electric guitar parts using amp sims these days. One of the very best is the incredible Amplitube from IK Multimedia, which I have used on many of my songs.
Headphones for recording: My favorite headphones for recording are the Sony MDR-7506s, which I use for monitoring during all my recording sessions. They can also be found in many pro recording studios. Get the Sony MDR-7506 headphones from Amazon here.
General-purpose microphone: You can’t go wrong with a good ol’ Shure SM-57, one of the most versatile and ubiquitous microphones around. I’ve been using one in my home studio for as long as I can remember. Amazon offers the Shure SM-57 for a very competitive price.
To see all of my most up-to-date recommendations, check out this resource I made for you!