
Autotune or pitch correction software is something I use in my music productions in quite a subtle way, hopefully without it being too noticeable. But for many people, their use of autotune produces that very robotic, artificial sound we are all familiar with. Why does autotune software produce that robotic sound?
Autotune sounds robotic because it is a software algorithm that artificially changes the pitch of a note very quickly. This is not something a human can do, therefore it sounds unnatural. Autotune can be configured to sound less robotic, particularly by using a slower re-tune speed.
There are different ways to use autotune, depending on the sound you are trying to achieve. If the robotic sound is not what you want, there are certain things you can do to make it sound more natural and less artificial.
As you’ve shown interest in autotune by clicking on this article, you will probably also want to read my article on why autotune is considered bad. It should help you decide whether to use autotuning, and teach you the different ways it can be used without destroying the emotion in your music.
If you are interested in checking out the best recording gear such as audio interfaces, studio monitor speakers, microphones, etc., you can find them at Amazon by clicking here.
Autotune/pitch correction is a software algorithm
Let’s just clear one thing up straight away here; Auto-Tune is actually a proprietary product from a company called Antares. But there are plenty of other pitch correction plugins that do a similar job. I’ll refer to these as “autotune” or “pitch correction” software; umbrella terms to mean any software that is designed to automatically correct the pitch of notes.
This article refers to any of these plugins; the principles in using them are exactly the same.
An autotune or pitch correction plugin is a software algorithm. The software artificially changes the pitch of a note, moving it closer to the required pitch.
For example, supposing a singer sang a note where the pitch was somewhere between a C and a C#. She actually intended to sing a C#, which is a note in the key of the song. Here, autotune would move the note up to be an actual C#.
How robotic this change of pitch sounds depends on the settings used. The most important setting is the re-tuning speed. In Auto-Tune this setting is called Retune Speed. In Reaper’s pitch correction plugin ReaTune it is called Attack Time. Your particular autotune plugin will have a similar setting.
This adjusts how quickly the note is changed from the original note to the corrected note. The faster speed this is set to, the more artificial it will sound. This makes sense if you think about it…human beings cannot instantly adjust the pitch of a note when singing, so this is never going to sound real and natural if it occurs very fast.
If you use a slower setting, then this is mimicking something a human can actually do. How many times have you heard a singer not quite hit a note at first, but then slowly slide up or down to the correct pitch? I know I do that myself when singing all the time!
How far a note has to change pitch will also play a part in how robotic it sounds. The farther it has to change, the more artificial sounding it will be. If a note had to move by an octave, for example, it would sound very machine-like.
As a side note, since you are reading this article you obviously have an interest in recording vocals. To do that, you will need a microphone. Why not check out these articles on microphones for a home studio…
The two ways to use autotune software
There are two main ways to use autotune or pitch correction software…
Autotune used as an effect
We are all familiar with the very robotic sounding effect of an autotune plugin with all the settings turned up to 11!
This has been used creatively to great effect, the most commonly cited example being Cher’s “Believe”. This was one of if not the first commercial song to make use of auto-tuning in this way, and was quite revolutionary at the time it was released in 1998.
Autotune used to subtly correct pitch
The other use of autotune software is much more subtle. This is where it is used to correct variations in pitch, hopefully without it being noticeable.
This is typically used on vocal tracks, to correct an out-of-tune singer. But it can work on other instruments, as long as it is a monophonic recording i.e. only one note at a time. So single-note guitar lines would be fine, but chords would not.
It is this use where the robotic sound is not desirable. We want to set our pitch correction plugin to sound as natural as possible, and minimize any audio artifacts that may appear due to the changes in pitch.
One very common source of pitching errors for a vocalist is nervousness. That’s why I wrote my article on reducing nerves when recording singing. It gives you tips and tricks on how to calm the nerves before recording a vocal take, and is recommended reading if you want to get the best, most accurate vocal take possible.
Audio examples
Here are some examples of the different ways to use autotune plugins. This is a line from one of my songs, with me singing over a simple strummed acoustic guitar part.
The first clip is the original unaffected audio, the second is with the vocal autotuned subtly, and the third is with the vocal autotuned very heavily.
How to beat the autotune robots
When trying to use an autotune plugin in a subtle way to correct errors in pitch, the key is to use gentle, conservative settings. You should also use it only where you really need it.
These points are the key to making your autotune sound natural…
- Re-tune speed: should be set fairly slow. The faster this is set, the more robotic the sound will be.
- Use sparingly: only apply autotune to the part of a track that is out of tune
- Don’t force it: if a vocal take is out of tune all over the place, it may be better to record another vocal take, rather than trying to correct it all with pitch correction software
- Use “humanizing” settings: some autotune plugins have other settings which can help to give a more natural sound. e.g. Antares Auto-Tune has…
- Humanize : this slows down how fast a note is retuned during long notes
- Flex-tune : this gives a less agressive sounding retuning effect; it tries to make the changes smoother and less noticeable
- Use manual mode: Consider using manual mode (see below) instead of automatic pitch correction
You can of course try to eliminate or reduce the need for auto-tuning by recording multiple takes. For more information check out my article entitled “Should you record vocals in one take“? In there you’ll find tips on the different approaches available to you, and exactly when it is viable to only record a single take.
The two autotune modes
Pitch correction plugins often have two different modes…
- Auto Mode: tunes automatically once you have specified the key your song is in
- Manual Mode: in this you mode you manually draw in the pitch of the notes you want on a graph type display
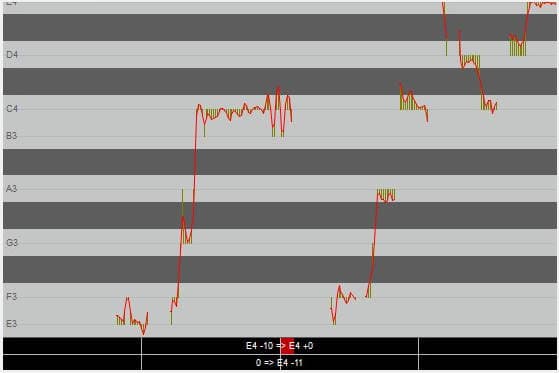
This is the manual mode in ReaTune, Reaper’s built-in pitch correction plugin…
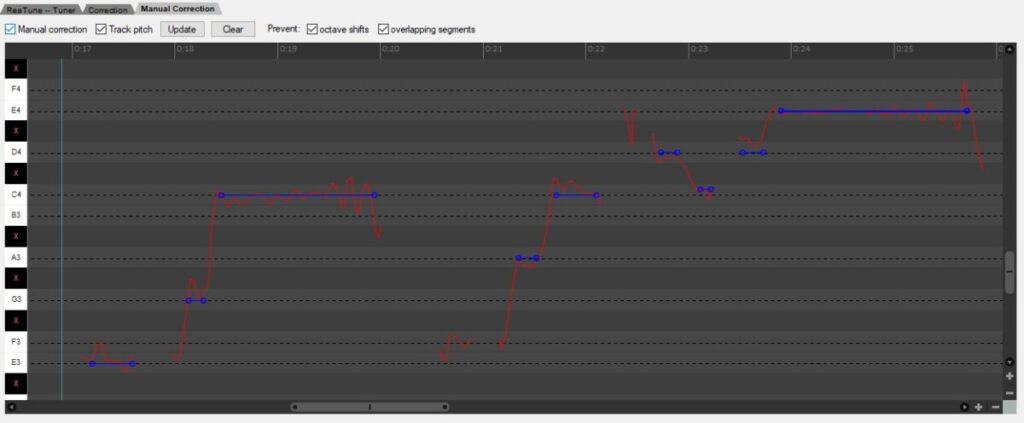
You can see the red lines are the actual pitch that has been sung. The blue lines are what I have drawn in manually using the mouse – this is the target pitch for each note.
This mode can be great for making very precise, targeted adjustments. Imagine you have a vocal take where only one or two notes are out-of-tune and need correcting. You can literally just change those notes by drawing in the target pitch for them, and leave the rest of the take completely unaffected.
Of course, tuning or pitching errors are not the only thing that can go wrong in a vocal recording. Distortion is a cause of many a ruined take. My article on how to prevent distortion in vocal recordings will help you locate and eliminate the sources of distortion, allowing you to obtain the cleanest vocal take possible.
Here is some of my favorite home studio gear…
Thanks for reading this article. I hope you found it helpful in your home music-making activities. Here are a few of the tools that I personally use in my home studio. These are affiliate links, so if you decide to use any of them I’ll earn a small commission.
Audio interface: My personal choice for audio interfaces are the Focusrite Scarlett series. I have been using these for years, and they have always given me great-sounding recordings. For a very reasonable price from Amazon you can buy the excellent Focusrite Scarlett 4i4, or if you don’t need MIDI capability the Focusrite Solo is a great choice.
Amp sim: Guitar amplifier simulator software has come on leaps and bounds in recent years, such that I record all my electric guitar parts using amp sims these days. One of the very best is the incredible Amplitube from IK Multimedia, which I have used on many of my songs.
Headphones for recording: My favorite headphones for recording are the Sony MDR-7506s, which I use for monitoring during all my recording sessions. They can also be found in many pro recording studios. Get the Sony MDR-7506 headphones from Amazon here.
General-purpose microphone: You can’t go wrong with a good ol’ Shure SM-57, one of the most versatile and ubiquitous microphones around. I’ve been using one in my home studio for as long as I can remember. Amazon offers the Shure SM-57 for a very competitive price.
To see all of my most up-to-date recommendations, check out this resource I made for you!
