
DISCLOSURE: This post contains affiliate links. If you buy through these links, I may earn a small commission.
When you’re working on a song, there is often a need to output the tracks or stems. This could be to give to someone else for mixing, to make a backing track or to make a remix of your song. Fortunately if you use Reaper, it’s easy to export stems.
To export stems or tracks in Reaper, select the tracks/stems you want to export in the Track Control Panel. Go to “File->Consolidate/Export tracks” and click the “Tracks: Selected” radio button. Choose a folder to output to, then click “Process”.
While exporting stems is easy in Reaper, there are a few pitfalls to avoid and a few things you can do to make the process smoother. Read on to discover more, and get yourself exporting stems and tracks in Reaper like a pro.
If you are interested in checking out the best recording gear such as audio interfaces, studio monitor speakers, microphones, etc., you can find them at Amazon by clicking here.
What are stems?
There is often some confusion around what exactly stems are. People use the terms “stems” and “tracks” interchangeably. But they are not the same thing! This is such a common misconception, I have a whole article explaining the difference between stems and tracks. It explains clearly the difference between stems and tracks and what they are each best suited for. I highly recommend checking it out.
I’ll briefly explain the difference here. Tracks are all the parts that have been recorded. e.g. you might have guitar 1, guitar 2, drums, bass, lead vocal, backing vocal 1, backing vocal 2, keys 1, keys 2, etc. All those are tracks.
A stem is a grouping of tracks. e.g. in the above example, you could group together guitar 1 and guitar 2 to make a “guitars” group. Output this to a single file, and this is a “guitars” stem.
Because tracks and stems are so commonly confused, I will cover exporting both tracks and stems in this article. The process is almost identical for both, with just a few subtle differences to bear in mind.
However you choose to use Reaper, you will need a good audio interface. I have been using Focusrite Scarlett interfaces for years, and they have always given me great sounding recordings for not very much money. They are also reliable, durable and built like tanks! You can buy the Focusrite Solo from Amazon (affiliate link) for a very reasonable price.
Preparing for stems/tracks export
There are a few things to do to prepare your project for exporting stems or tracks. These are not strictly necessary, but will make for nicer, easier to use exported tracks. If you’re working with someone else, they will thank you for doing these steps…
- Name your tracks appropriately. e.g. “Rhythm Guitar 1”, not “John” because John played this part.
- Start your track name with a number, e.g. “03 Rhythm Guitar 1”. This will ensure your tracks appear in the order you want them to if someone else imports them into a DAW.
- Organize your tracks – all guitars together, all vocals together etc. I like to use color coding in Reaper to make it easy to identify each group.
- Group your tracks – this is particularly important if you want to export stems e.g. a keys or a guitars stem.
There are actually a couple of methods you can use to export stems/tracks in Reaper. Which one you use depends on what you want to do with the exported files.
Clearly hearing what you plan to export is vital. A good pair of headphones is therefore essential for a home studio. I highly recommend the AKG K-702 Reference Headphones (affiliate link), which you can get at Amazon for a very reasonable price. I have been using these in my home studio for years, with great results.
Reaper’s Consolidate/Export method to export stems/tracks
This option will perform consolidation before you export your tracks or stems. This is an important step if you are going to give your exported files to someone else for them to work on in their DAW.
Consolidation ensures that all the tracks start at the start of the project (i.e. at zero on the timeline) when loaded into a DAW, and everything will sound at the right time in relation to each other. If you didn’t do this, the tracks would potentially all be in the wrong place in the timeline, and would play when they are not supposed to, all out of time with each other. Consolidation ensures everything will be in the right place for mixing, editing or recording more tracks.
Consolidation is so important, that I wrote an entire article on the subject. For more details on consolidation and why it is so important, check out “What it means to consolidate a track“. I highly recommend reading it if you are going to be sharing your tracks with anyone else.
Creating the stem tracks
If you want to export stems, group your tracks into the stems you want to export. e.g. if you want a “guitars” stem, create a folder track in Reaper, then drag all the guitar tracks into it. Then, select that folder track and select Render/Freeze Tracks->Render tracks to stereo stem tracks (and mute originals). You can then select this stem track in the Track Control Panel to be exported.
Consolidate/Export method steps
Here are the steps to perform this type of export in Reaper…
- Select the tracks you want to export in the Track Control Panel. You can select multiple tracks by holding down Ctrl (Cmd on a Mac), and clicking each track you want to select.
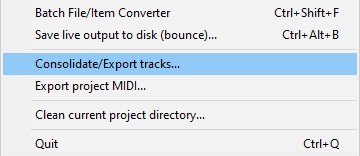
- Go to File->Consolidate/Export Tracks
- In the Consolidate Tracks dialog that launches, the following options are the most important ones to consider…
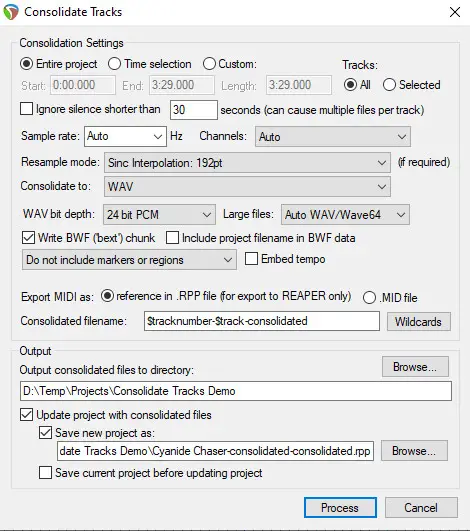
- Entire project/TimeSelection/Custom: Most of the time you’ll probably want to export whole track(s) from beginning to end (Entire project). But you can choose to export between the time selectors (Time selection) or a enter a custom start and end time.
- Tracks: Either export all tracks, or just the ones you have selected in the Track Control Panel.
- Output: Enter a folder to output your track(s) to in Output consolidated files to directory:
- Update project with consolidate files: Check this if you want the new consolidated files to become part of your project.
- Save new project as: Check this and enter a new project file name & path if you want a new project created with your new consolidated files in.
The other options can be left at their defaults. If you want to learn more about them, check out the Reaper User Guide.
- Click the Process button. This will export your stems/tracks into the folder you chose.
You will now have your exported stem/track files ready to give to someone else, or use for another purpose such as a backing track.
It’s important to note that Consolidation/Export in Reaper exports tracks without any processing. So no effects, no panning, etc. will be in the exported tracks. This is different from the File->Render method we will look at in the next section.
Consolidation/Export is the option you probably want to use it you are sending your song’s tracks to someone else using a different DAW for them to work on.
Reaper’s Render to File method to export stems/tracks
The Render to File dialog in Reaper is the one you use to export a stereo mixdown of your final song to distribute to streaming services, write to a CD, create mp3 for download, etc. Check out my “How to export a mixdown” article to learn exactly how to do this with the minimum of fuss.
It’s actually a lot more versatile than that, though. Similarly to the Consolidate/Export method, you can export whichever tracks you have selected in the Track Control Panel. And you can choose to export separate files for each track you have selected, rather than just one stereo mixdown file of the whole song.
Here are the steps…
- Select which tracks you want to export using Ctrl+click (Cmd+click on a Mac) in the Track Control Panel. Create any stem tracks you need as detailed in the previous section. One file will be exported for each track you have selected.
- Go to File->Render

- In the “Render to File” dialog, set the following options…
- Source: Most of the time when using the Render to File dialog, you would have this set to Master Mix when you are exporting a mixdown of your whole song. But to output stems/tracks, set this to Selected tracks (stems)
- Bounds: You don’t have to export the whole length of your song. You could select just a region, a custom start and end time, the section between the selectors in the arrange window, etc. For exporting stems/tracks, you probably want to set this to Entire project.
- Output: In here, specify the directory you want to export into, and the filename. You can click the Wildcards button to add tags that will be replaced by some metadata, such as the track name, track number, the date, etc.
- Options: There are a lot of options here, and I won’t go through them all. You probably want Sample rate to be 44100 Hz and Channels to be stereo.
- Primary output format: I recommend using WAV format, with a bit depth of 24 bit PCM.
For more details on all the available options, check out the Reaper User Guide.
- Click the Render X files button. The “X” value will depend on how many tracks/stems you are exporting. Your exported stem and track files will be in the directory you specified.
In contrast to the Consolidate/Export tracks method, The tracks are exported with processing, so the exported audio files will have any effects and panning applied.
I advise using WAV format here. But there are times when mp3 format might be desirable, for example if you want to keep the file sizes very small. I have an article explaining how to export to mp3 in Reaper. It’s recommended reading if you do want to use the mp3 file format.
When to use each of Reaper’s export methods
If you are going to give your tracks for someone else to work on your song, the consolidate/export tracks method is the one to use. This is because it will ensure that the tracks are all aligned and in the right place when they are loaded into a different DAW, due to the consolidation step.
If you want to export a stem to use as a backing track, use the Render to file method. Also if you want to send a track or stem to someone else just to get their opinion or some feedback on it, this method is best as it will automatically include effects and panning in the exported file(s).
Here is some of my favorite home studio gear…
Thanks for reading this article. I hope you found it helpful in your home music-making activities. Here are a few of the tools that I personally use in my home studio. These are affiliate links, so if you decide to use any of them I’ll earn a small commission.
Audio interface: My personal choice for audio interfaces are the Focusrite Scarlett series. I have been using these for years, and they have always given me great-sounding recordings. For a very reasonable price from Amazon you can buy the excellent Focusrite Scarlett 4i4, or if you don’t need MIDI capability the Focusrite Solo is a great choice.
Amp sim: Guitar amplifier simulator software has come on leaps and bounds in recent years, such that I record all my electric guitar parts using amp sims these days. One of the very best is the incredible Amplitube from IK Multimedia, which I have used on many of my songs.
Headphones for recording: My favorite headphones for recording are the Sony MDR-7506s, which I use for monitoring during all my recording sessions. They can also be found in many pro recording studios. Get the Sony MDR-7506 headphones from Amazon here.
General-purpose microphone: You can’t go wrong with a good ol’ Shure SM-57, one of the most versatile and ubiquitous microphones around. I’ve been using one in my home studio for as long as I can remember. Amazon offers the Shure SM-57 for a very competitive price.
To see all of my most up-to-date recommendations, check out this resource I made for you!
