What does it mean to consolidate a track?
There have been several times when working on my own music projects, that I have had to prepare the files to give to someone else to work on. When you do this, it is important to consolidate your tracks to make them ready to be worked on in a different DAW.
Consolidating a track is the process of combining all the separate items on a track into one big item. This single item will span the full length of the project. It will also start right at the very beginning of the project i.e. at bar/measure 1.1.00 or timestamp 0:00.000.
Every DAW has a way of consolidating all the tracks in a project, then exporting them to files in a standard format (usually .wav), one file per track. It is an essential step to take when multiple people are working on your project. Read on to see how exactly to prepare your files for someone else using consolidate and export.
If you are unsure exactly what a track is, definitely check out my “what is a track in music recording” beginners’ guide. You will learn vital information such as what tracks are, why they are so important and how to work with them.
If you are interested in checking out the best recording gear such as audio interfaces, studio monitor speakers, microphones, etc., you can find them at Amazon by clicking here.
Consolidated/unconsolidated tracks: what’s the difference?
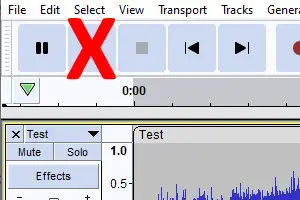
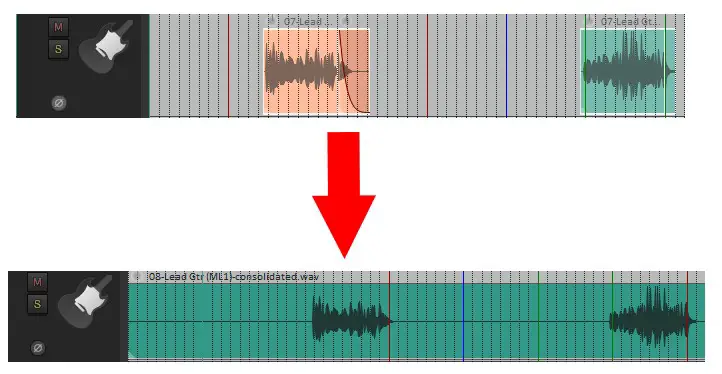
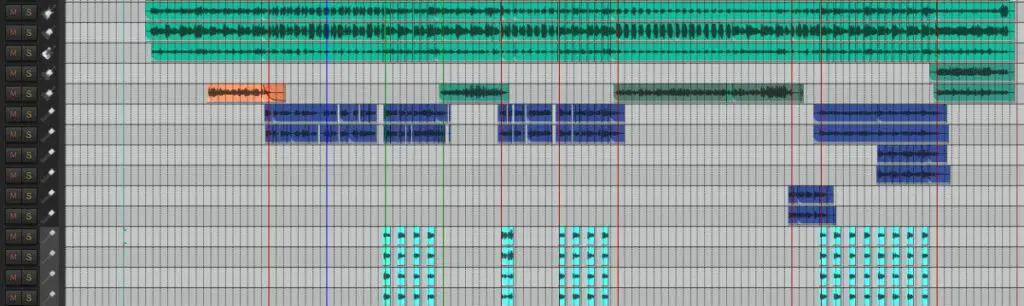
A track that has not been consolidated may have lots of separate items, spread out all over the track. Here is an example…

Note there are four separate items on the track, and the first item does not start at the beginning of the project.
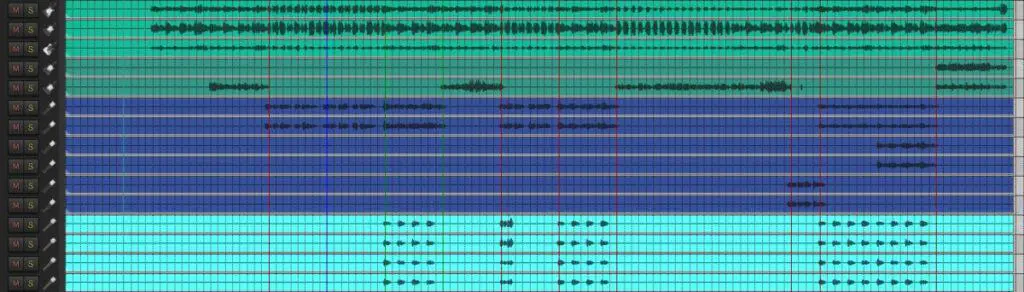
Compare that with the same track that has been consolidated…

Now you can see the four separate items have been combined into one big item. Also note that the item now starts right at the beginning of the project, at bar/measure 1.1.00 or timestamp 0:00.000.
Keep in mind that the sound of the track has not changed at all. If you play the consolidated track and the unconsolidated track, they will sound exactly the same. Consolidation is merely changing how the track is arranged, not how it sounds.
You may have many tracks in your project similar to the unconsolidated one above. This just tends to happen as you work on a song.
For example, your drums may start at 0.0, but the first guitar doesn’t come in until bar 4, and the rest of the band doesn’t start until bar 8. Then you might have some backing vocals only on choruses, then some lead guitar fills that are very sporadic throughout the track.
So it is inevitable that you will end up with tracks containing multiple items spread out along the track.
In addition to consolidating your tracks, another thing to understand when working with someone else on a song is stems. People think tracks and stems are the same, but they are not. Check out my article explaining the difference between tracks and stems. It’s essential reading if you are planning to collaborate with anyone on any of your songs.
When is it important to consolidate your tracks?
If it is just you working on your project, i.e. you’re the recording engineer, editor, mixer, producer, etc. then you do not need to worry about consolidation at all.
The problem starts when you pass your track to someone else to work on. A very common situation is you have recorded and edited your song, but you are giving it to someone else to mix. And the mixing engineer may be using a completely different DAW to you. Not to mention they might be using a different computing platform – Windows, Mac, Linux, etc.
Because there is no standard file format for DAWs, you can’t just give the mixing engineer your project files and expect them to be able to open them. For example, you can’t just save a project in Reaper, then load that project in Cubase. They are completely incompatible – it just won’t work!
But that doesn’t mean that you can’t record a song in one DAW (e.g. Reaper) and then mix it in another (e.g. Cubase) – you can!
As a side note, it can be tricky to decide what order to record your tracks in. That’s why I wrote my guide on what to record first in a song. I highly recommended you check it to find out common orders of recording tracks, and to help you find an order that works for you.
Consolidating & exporting tracks for someone else
You can export all your tracks to .wav format which is a standard file format used by all DAWs. These .wav files could then be imported into a new project in a completely different DAW.
But – and this is the key – if you do that with unconsolidated tracks, the tracks won’t be in the right place in the new DAW. All the tracks in the new DAW will all start at the beginning of the DAWs time i.e. at 0.0, even the ones that are not supposed to. So your track will sound a complete mess, and you would have to spend ages manually moving the parts to the correct place in time.
A mix engineer would not thank you for this! Imagine you had 50 tracks (not an unusual number for a commercial DAW project) all needing moving/aligning. You would have to spend hours and hours if not days! They may very well just refuse to work with your project until you sort this out.
So it is very important if someone else is working on your song project, that you give them your consolidated tracks.
Whether you are working with others or on your own, it’s important to aim for the best quality recordings possible. For some tips and tricks on getting the very best sound, you should check out my guide on recording professionally at home.
How to consolidate and export tracks in Reaper
All DAWs have a slightly different way of consolidating and exporting. I shall show you how to do this in Reaper, as it is the DAW that I personally know best.
- Select the tracks/time selection that you want to export.
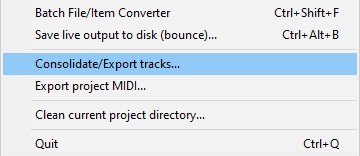
- Select File->Consolidate/Export tracks from the menu.
- Select a directory to output the consolidated files to in the “Output consolidated files to directory” section.
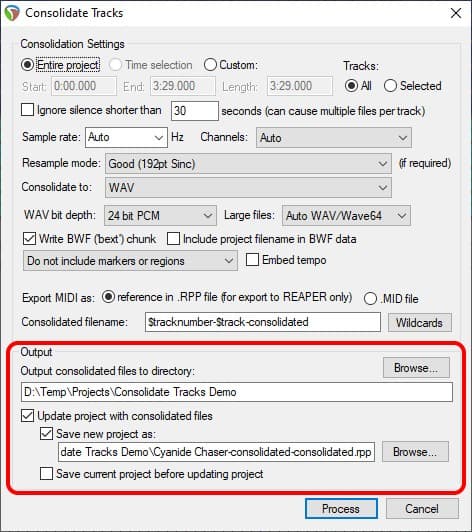
- Choose a new project file if you want to create a new project with consolidated files in.
- Click process.
The consolidated files will be exported into the directory you selected in step 3. You can now give these files to someone else to work on. When they import them into a new project in any DAW, you can be sure that they will all be aligned correctly and no moving around of items will be necessary.
Here are screenshots of the original project before consolidation, and a new project with the consolidated tracks imported into it for comparison…
Here is some of my favorite home studio gear…
Thanks for reading this article. I hope you found it helpful in your home music-making activities. Here are a few of the tools that I personally use in my home studio. These are affiliate links, so if you decide to use any of them I’ll earn a small commission.
Audio interface: My personal choice for audio interfaces are the Focusrite Scarlett series. I have been using these for years, and they have always given me great-sounding recordings. For a very reasonable price from Amazon you can buy the excellent Focusrite Scarlett 4i4, or if you don’t need MIDI capability the Focusrite Solo is a great choice.
Amp sim: Guitar amplifier simulator software has come on leaps and bounds in recent years, such that I record all my electric guitar parts using amp sims these days. One of the very best is the incredible Amplitube from IK Multimedia, which I have used on many of my songs.
Headphones for recording: My favorite headphones for recording are the Sony MDR-7506s, which I use for monitoring during all my recording sessions. They can also be found in many pro recording studios. Get the Sony MDR-7506 headphones from Amazon here.
General-purpose microphone: You can’t go wrong with a good ol’ Shure SM-57, one of the most versatile and ubiquitous microphones around. I’ve been using one in my home studio for as long as I can remember. Amazon offers the Shure SM-57 for a very competitive price.
To see all of my most up-to-date recommendations, check out this resource I made for you!