
DISCLOSURE: This post contains affiliate links. If you buy through these links, I may earn a small commission.
There have been many times throughout my music recording life when I have needed to send or receive a musical project to work on. When doing this it is usual to send either “stems” or “multitracks”. Stems and multitracks are not the same thing, and for many musical collaborations it is essential to know the difference.
Multitracks are all the tracks that have been recorded. Stems are combinations or groupings of those tracks. For example, if you have recorded 4 guitar parts you have 4 multitracks, but you could combine these to make one “guitars” stem. There are always more multitracks than stems.
Stems and multitracks are incredibly useful, mainly when collaborating with other people on your musical projects. Knowing the difference between them and when to use each one can save you a lot of time, and help you work more effectively with your collaborators.
Read on to learn exactly multitracks and stems are, how you create them, their applications and their respective advantages and disadvantages.
If you are interested in checking out the best recording gear such as audio interfaces, studio monitor speakers, microphones, etc., you can find them at Amazon by clicking here.
Multitracks and stems are not the same thing!
In recent times, the terms stem and multitracks have almost been treated as interchangeable. They are related, but they are not the same thing.
This can be a problem, as it can lead to people spending time creating stems when they didn’t need to. This could happen for example if a collaborator really wanted multitracks, but they actually asked for stems.
I will be referring to tracks a lot in this article, so it is important you know what they are. Check out my beginner’s guide to tracks if you are unsure what a track is in music recording.
Let’s take a look at multitracks and stems in detail, and understand exactly what they refer to…
What are multitracks?
When you record an instrument or a vocal part, you create a track. You can see this track in your DAW.

A corresponding audio file is also created on your hard disk, which contains the digital audio data which your track uses. You can see this file in your computer’s file manager application.

If you record another part, another track and corresponding file get created. Record another, and yet another track and file get added. You get the idea.
Each one of these is a multitrack. A multitrack can refer either to the track in your DAW, or to the file on your disk. Together, they are referred to by the plural – multitracks. It is worth pointing out that the term “track” and “multitrack” mean the same thing and can be used interchangeably.
So, after you record some parts, you have several multitracks. It is important to realise that no stems exist at this point! Just the multitracks.
Let’s look at a full example. Say you are recording a full rock band mix, with drums, bass, guitars and vocals. Say you record…
- Tracks for each of the kick drum, snare drum, toms, hi-hats and cymbals (5 tracks)
- Bass guitar (1 track)
- 3 guitar parts (3 tracks)
- 2 lead vocals parts, 4 backing vocal parts (6 tracks)
After all your recording has finished, you now have 15 multitracks in total.
If you are doing any sort of home recording, a good audio interface is essential. I have been using Focusrite Scarlett interfaces for years, and they have always given me great-sounding recordings for not very much money. You can buy the Focusrite Solo from Amazon (affiliate link) for a very reasonable price.
What are stems?
You create stems from your multitracks. You must already have multitracks recorded if you want to make stems.
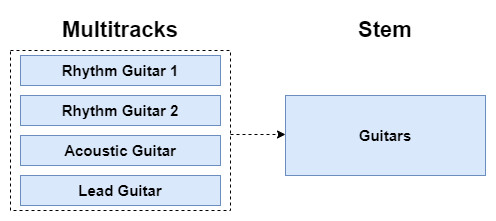
A stem is a combination of multitracks that have been mixed together. This is best illustrated using an example. Imagine you have recorded 4 guitar parts such that you have…
- A rhythm guitar track
- Another rhythm guitar track
- An acoustic guitar track
- A lead guitar track
You could combine these together to form a stem. You would probably call this something like “guitars“.
Stems are essentially submixes – not a mix of the full song, but a subset of the full mix. You will often find stems with names such as guitars, vocals, keyboards, drums, etc.
As stems are combinations of multitracks, you always have more multitracks than stems.
The relationship between stems and multitracks
It is useful to state the relationship between stems and multitracks
A stem is mix of some recorded multitracks. Which multitracks are included in a stem is up to whoever creates that stem. You can never have stems without multitracks, but you can have multitracks without stems.
If you’re still unsure of the difference between stems and multitracks, it can be useful to visualize their relationship in a diagram…
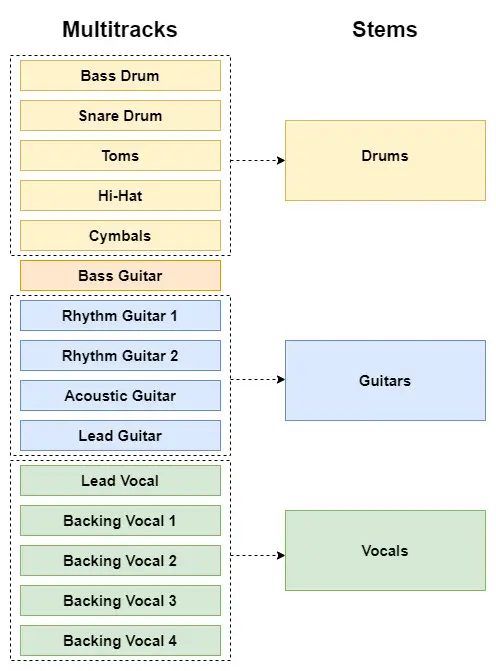
You can clearly see that each stem is a grouping of several multitracks. You could create a stem from any combination of multitracks, but they are often created from instruments of the same or similar type. For example, a “keys” stem could consist of a piano track, an organ track and a pad synth track.
Hearing your project clearly is vital, whether you are working with multitracks or stems. A good pair of headphones is therefore essential for a home studio. I highly recommend the AKG K-702 Reference Headphones (affiliate link), which you can get at Amazon for a very reasonable price. I have been using these in my home studio for years, with great results.
Multitracks: how to prepare and send them
Supposing you want to send your multitracks to a fellow musician who you’re working with on a musical project. You might think that all you need to do is send the files that were written to your hard disk when you recorded your tracks.
While these files do contain the required audio data, this is not the recommended method. The problem is that there is no indication of where in your project the audio data in each file should go. You might have recorded a guitar part that starts at timestamp 0:46, but the files don’t tell you that.
This is why you need to consolidate your tracks first, before you send them. This will ensure that all your tracks start at 0:00, i.e. at the beginning of your project. Any tracks that don’t will have silence inserted into them before the actual recording starts. This makes it much easier to load into a DAW and have everything playing at the correct time.
As consolidation is such an important aspect of collaborating using multitracks, I have a whole article on consolidating tracks. It details exactly what consolidation is, why it’s important and shows a method for how to do it. I highly recommend you read it if you are going to be collaborating using multitracks.
Once you have consolidated your tracks, you can then export using your DAW. This will give you the multitrack files that you can send to whoever you are working with.
Stems: how to create and send them
To create a stem, you have to do two key things…
- Group the tracks you want in the stem
- Render or export a file containing the group of tracks mixed together
That will give you a stem audio file in the output format you choose, ready to send to someone else. To create another stem, repeat the process with a different group of tracks.
These are the complete steps to create a stem in detail. These will vary from DAW to DAW, but I have based these instructions on the DAW I know best, which is Reaper…
- Ensure the time selection is set to the desired output in the tracks window
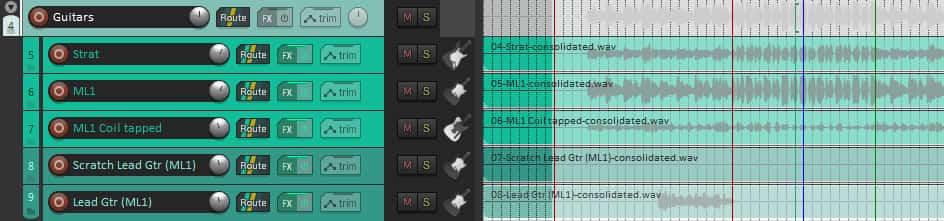
- Create a new group track, and name it appropriately (e.g. drums, guitars, keys, etc)
- Move the tracks you want in your stem into the group
- Make sure all the tracks in the group are routing their output to the parent group track
- Select just the group track and go to File->Render…
- Select the Source: to be “Selected tracks (stems)”
- Select the Bounds: to be “Time selection”
- Change the output file name to “$track”, and select the folder to output into
- Select the desired output format (you could have WAV, MP3, FLAC, etc)
- Click Render
You should now have a stem file in the folder you chose to output to.
Receiving multitrack or stem files
If you are sent multitrack or stem files, there are usually several very easy methods of getting those tracks into your DAW. Some common methods are…
- Dragging and dropping from your file manager application into the tracks area in your DAW
- Using your DAW’s Import or Insert menu command
- Importing the files from your DAW’s media manager window
Your DAW may have other methods; see the user manual for details.
Advantages and disadvantages of stems and multitracks
The decision on whether to send/receive stems or multitracks depends on what you are going to do with them. In the next section, we’ll look at the best choice for lots of different common applications.
First, we should understand the relative strengths and weaknesses of stems and multitracks, as these determine what each is best used for.
Advantages of multitracks
- Multitracks give you full complete control and granularity (important for mixing)
- You don’t have to specially create multitracks – they are created when you record something into your DAW
- Usually do not contain effects (this can be a strength or a weakness, depending on what you want to do)
Disadvantages of multitracks
- There are often a lot of multitracks – can be unwieldy to manage
- Lots of files to send when collaborating
- Can be difficult to find the part you want
Advantages of stems
- Fewer items to work with than multitracks
- Easy to find the stem you want
- Usually contain effects (this can be a strength or a weakness, depending on what you want to do)
- Small number of files to send for collaboration
- Stems are suited to more applications than multitracks, which are really only for mixing and editing
Disadvantages of stems
- Don’t give you the control that multitracks give you
- Can only make broad-brush changes e.g. cannot change the balance of the tracks in a stem, only the volume as a whole
What to use stems and multitracks for
There are various tasks that stems and multitracks can be used for, to share your musical project with someone else. Here are a few of the most common ones, including whether they are most suited to stems are multitracks.
Mixing
Multitracks are the most appropriate choice to send your files to someone else for mixing.
A mixing engineer needs all your recordings to be able to properly balance their relative levels. They will also most likely want your files without any effects on them, to give them full control over the overall sound.
Just make sure to consolidate your tracks before you send them, as detailed earlier.
Mixing is one of the most confusing aspects of home recording for novices. I have a whole beginner’s guide to mixing article dedicated to getting newbies up and running with mixing as quickly as possible. It should help clear up any confusion, and teach you all you need to know to make your first good quality mix.
Editing
Editing requires fine-grained control of each recorded track. Therefore multitracks are the appropriate choice.
Imagine you had one particular guitar part that had some annoying noise on it that you wanted to cut out. If this was mixed in with other guitar parts in a stem, you probably couldn’t cut it without affecting the other guitar parts. With multitracks, you could target just the offending track.
Mastering
Mastering is the process of preparing your final mixdown for release, particularly getting the volume up to commercial track levels.
You do not need fine-grained control for this, only broad control over the sound. Typically you will be using limiters and compressors on the mix as a whole, so stems are the appropriate choice here. You probably only need one stem of the whole mix for mastering.
Backing tracks
You might want to take some parts of your song to use as a backing track for live performance. For example, maybe you have some keyboard parts that you want to trigger on stage.
You only need the mixed parts as a whole for this, so stems are the best choice.
Re-mixing
If you are making a remix of a track, it is likely that you don’t need the fine-grained control that producing the original mix required.
You will probably only want to change a few parts of the song, and want to keep the overall feel of the parts in the original mix. Again stems are the way to go.
Collaboration on recording and writing
Finally, I have included a general “collaboration” category to cover working on the recording/writing of a song with a partner.
Imagine your fellow musician has written and recorded a few parts for a song. They send it to you and ask you to add a piano part and some backing vocals to it. This exact situation has happened to me many times.
You do not need the full multitracks to be able to do this. A few stems of the original work your partner has done loaded into your DAW should be sufficient. These will give you enough of a backing track to write and record your piano part and backing vocals to.
Stems win out for recording and writing collaboration.
Here is some of my favorite home studio gear…
Thanks for reading this article. I hope you found it helpful in your home music-making activities. Here are a few of the tools that I personally use in my home studio. These are affiliate links, so if you decide to use any of them I’ll earn a small commission.
Audio interface: My personal choice for audio interfaces are the Focusrite Scarlett series. I have been using these for years, and they have always given me great-sounding recordings. For a very reasonable price from Amazon you can buy the excellent Focusrite Scarlett 4i4, or if you don’t need MIDI capability the Focusrite Solo is a great choice.
Amp sim: Guitar amplifier simulator software has come on leaps and bounds in recent years, such that I record all my electric guitar parts using amp sims these days. One of the very best is the incredible Amplitube from IK Multimedia, which I have used on many of my songs.
Headphones for recording: My favorite headphones for recording are the Sony MDR-7506s, which I use for monitoring during all my recording sessions. They can also be found in many pro recording studios. Get the Sony MDR-7506 headphones from Amazon here.
General-purpose microphone: You can’t go wrong with a good ol’ Shure SM-57, one of the most versatile and ubiquitous microphones around. I’ve been using one in my home studio for as long as I can remember. Amazon offers the Shure SM-57 for a very competitive price.
To see all of my most up-to-date recommendations, check out this resource I made for you!
