What is a track in music recording? A beginners guide
DISCLOSURE: This post contains affiliate links. If you buy through these links, I may earn a small commission.
Since the invention of multi-track recording in the middle of the 20th century, tracks have been its fundamental basic component. Whether you are using DAW software on a home computer, you’re in a pro recording studio or you’re using some other digital recording device, an understanding of tracks is essential in creating your music.
In music recording, a track is usually a recording of one instrument in a song. The track could be, for example, a lead vocal, a guitar, a synth, or any other instrument. A song is made up of several of these tracks. The tracks are combined together or “mixed” to create the full song.
Read on to learn all about what tracks are, how to create them, and how to use them in your music.
More generally if you are completely new to home recording, I have written a beginner’s guide to recording music at home, for people just like you. I highly recommend you read through this article; it shows you what you will need, how to set it up, and it walks you through making your first recording.
If you are interested in checking out the best recording gear such as audio interfaces, studio monitor speakers, microphones, etc., you can find them at Amazon by clicking here.
Tracks in a song
A track is essentially one instrument you have recorded in a song. This could be a piano, a lead vocal, an acoustic guitar, a tambourine, etc. You record your performance onto a track. The process of recording your tracks is often called tracking.
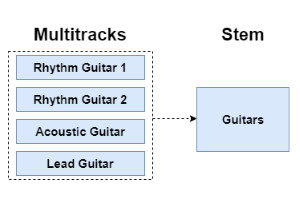
Closely related to tracks is something else you may have heard of – stems. These are very important when collaborating with others on a song. People think tracks and stems are the same, but they are not. Check out my article explaining the difference between tracks and stems to impress your musician friends!
There is no difference between the track you record in your computer at home, and a track recorded in a professional recording studio. The pro studio’s equipment will be more sophisticated and expensive, but you still record instruments onto tracks. My “do you need to go to a studio” article compares home and studio recording, and examines what you can realistically do in a home studio.
You often hear people refer to a guitar track, or a vocal track, or a piano track, etc. This means the track that the instrument has been recorded on. In DAW software, when you record an instrument, you will record onto a track. The track then holds the recording you have just made. A song will contain a number of these tracks mixed together.
I find it helpful to think of a track as a container for a recording.
If you are unsure what DAW (Digital Audio Workstation) software is, I highly recommend you check out my what is music recording software article. This will give you a good understanding of DAWs and how they are used.
Very basically, a DAW is the software used to record a song into a computer. I like to think of it as a recording studio in software. It is the main component of all home recording studios, and the place where all our tracks live.
One essential piece of equipment to use with a DAW is a good audio interface. I have been using Focusrite Scarlett interfaces for years, and have recorded three commercially released EPs using one. You can buy the Focusrite Solo from zZounds.com (affiliate link) for a very reasonable price.
What does a track look like in a DAW?
Each track in a DAW appears as a long horizontal block that spans the full length of your song.
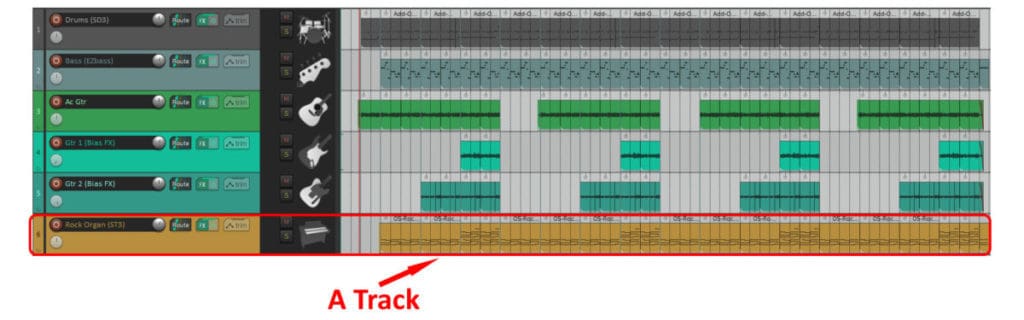
In the screenshot above, you can see 6 tracks from a song project in Reaper, which is the DAW software that I personally use. There is a drums track, a bass track, an acoustic guitar track, two electric guitar tracks, and an organ track.
I have highlighted the Rock Organ track with a red border. You can see that to the right the track contains an orange block (in Reaper this is called an item); this is the actual recording I made on that track. The left-hand side shorter part contains information about the track e.g. the track name, a picture representing the track, a volume control, etc.
Just from looking at the screenshot, you can see there are various things we can do to change the appearance of tracks to make it easier for us to identify and work with them…
- Color coding : Most DAWs allow you to change the color of a track, so you could have for example, drums one color, bass another, guitars another, vocals another, etc. This hugely helps in quickly identifying a track to work on.
- Sizing : You can change the size of a track by dragging its edges, and/or zooming in on the track using buttons or shortcut keys.
- Pictures : Each track can have an image attached to it. You can see I have used drumset, bass, guitars and organ pictures to help quickly identify which track is which.
- Re-ordering : You do not have to keep the tracks in the same order. Most DAWs allow you to drag and drop the tracks to re-arrange them, so you can have them in whatever order makes sense to you at the time. For example, in the above screenshot we could have the bass track at the top, the drums track at the bottom and the organ track in the middle if we wanted.
- Grouping : Most DAWs have a way to group several tracks together; the group can then be treated as one thing e.g. moving the group moves all the tracks. For example, you could have a “guitars” group with all your guitar tracks in it.
When recording a song, it’s always tricky to decide the order in which to record your tracks. That’s why I wrote my “what should you record first in a song” article. Definitely take a look at it if you’re interested in commonly used track recording orders, and want to find a method that will work for you.
The above image shows the tracks view in a DAW. But there is another view where you will commonly work with your tracks – the mixer view…
Using your tracks in the mixer
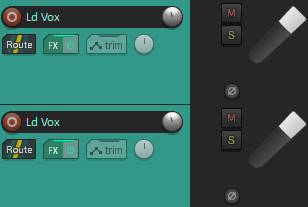
Here’s an example of tracks shown in the mixer view in a DAW, taken from the same example project used in the previous section…
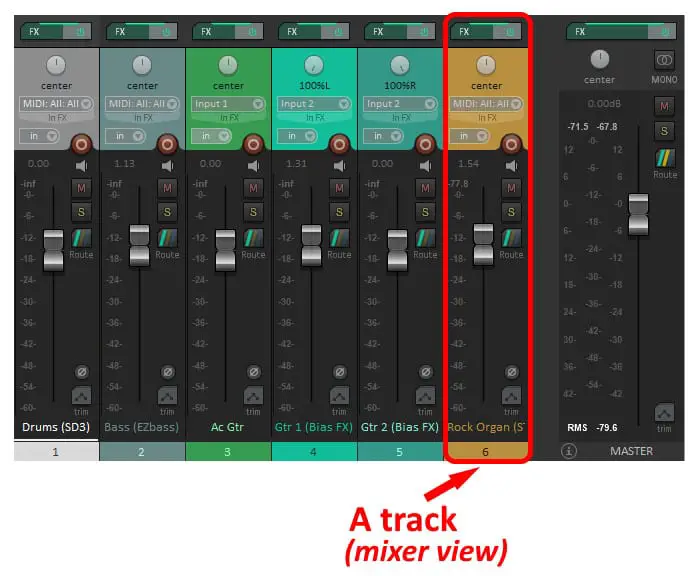
I have highlighted in red the same track that I highlighted in the previous section. You can see that the track names and the track colors are the same.
You would typically use this view when all your tracks have been recorded, and you have moved on to the mixing stage of your song project. This basically involves altering the volumes of all your tracks so that they sit nicely balanced, without any tracks overpowering any others.
The tracks are sometimes referred to as channels in the mixer; you can think of tracks and channels as being basically the same thing. You can see each track has a fader – essentially a volume control. Sliding the fader up or down makes that track louder or quieter.
You can also apply effects to a track from here, mute a track (essentially turning its volume to zero) and solo a track (essentially turning every other track’s volume to zero, so you hear just the solo’d track.
There’s a lot more to mixing, so I wrote a beginner’s guide on the basics of mixing and how to get started with your first mix. I highly recommend working through it if you’re new to all of this, and finding it all a bit confusing!
Working with tracks in a DAW
Creating a track in a DAW
When you want to make a new recording, the first step you will take is to create a new track in your DAW.
All DAWs have several very easy ways to create a new track. These typically include…
- Menu option – On the DAW’s main menu bar will be an option to create a track. For example, in Reaper you go to the Track menu and select Insert New Track.
- Shortcut key – All DAWs provide lots of shortcut keys to perform common tasks, and creating a track is no exception. For example, in Reaper press Ctrl+T on a PC and a new track will be instantly created.
Once you have created your track, it’s a good idea to give it a sensible name e.g. you might call an acoustic guitar track “Ac Gtr 1”. Click on the name of the track, and the DAW will allow you to edit its name to whatever you want.
Recording tracks in a DAW
Now you have created a track, you need to make sure that track is enabled for recording. How to do this varies from DAW to DAW, but it is usually just a matter of clicking a record-enable button on the track.
You can then simply press record, and capture your performance!
Once you have your first track recorded, you can then record another track whilst you listen and play along to the first track you recorded. Then again with a third track, then a fourth, etc.
This is the essence of multi-track recording. For example, you could…
- Record an acoustic guitar part
- Record a lead vocal part whilst playing back the acoustic guitar part
- Play them back in your DAW; they play back together and it sounds like a guitarist playing and a singer singing at the same time
- You could then add an electric guitar, a piano, a backing vocal…whatever you want!
- Play all the tracks back, and it sounds like you have a full band playing together
You can also record multiple tracks at the same time if you have several musicians in the same room. Recording in this way is known as live recording. For example…
- You have a guitar player and a bass player in the same room
- Create two tracks, and connect the guitar to one track and the bass to another
- Record on both tracks while the musicians play together
- You have a recording of the performance with the guitar on one track and the bass on another. You can then process each of the tracks individually, giving you full control over each instrument
At this point, you may be asking yourself “how long does it usually take to record all the tracks in a song”? Obviously, that hugely varies from song to song. Nevertheless, I wrote a guide on how long it takes to record a song to give you some general ball-park figures for the length of time you can expect. This should help you with planning your recording sessions.
What can you do with a track after recording?
When you have recorded all your tracks, you can manipulate and process each of those tracks individually in pretty much any way you want. For example, you can…
- Cut out parts of your recording from a track
- Paste parts somewhere else on the track, or onto a different track
- Move parts of your recording, for example to correct timing
- Duplicate tracks
- Duplicate sections of your tracks
- Apply fade-ins and fade-outs
- Add effects such as reverb, delay, compression, etc.
- …and much more…
This gives you full control over how your full song sounds, by letting you alter every single component part.
These types of operations are usually done in the mixing stage of your song project, or sometimes in an editing stage just before you move on to mixing.
When all your tracks are nicely balanced and sound how you want them to, all the tracks together form a mix. You would then export your mix to a file that anyone can play on their computer, phone, tablet, mp3 player, etc. This is usually in a format such as wav or mp3. Most DAWs can export a mix in those file formats.
If you are working with someone else on your song, it is very important to prepare your tracks properly before for them, especially if they are working in a different DAW to you. This process is detailed in my “consolidating your tracks” article; it is essential reading if you need to send your tracks to someone else.
How many tracks can you have?
The number of tracks you can have in a DAW is only limited by the capabilities of your computer. These days, with the power of modern computers you can have hundreds of tracks without any issues.
However, some DAWs themselves impose limits on the number of tracks you can create in them. Typically, a music software company might release a cut-down or even free version of their flagship DAW software. This will have limited features to encourage you to buy the full-price version.
The cut-down version might limit the number of tracks to say 16. This is plenty to get started with in home recording, but as you learn and develop you may well outgrow this number and need more tracks.
The DAW I use, Reaper, does not impose any limit on the number of tracks.
You’ve almost reached the end of this article. You should now have a good idea of what tracks are and how to use them. You might be wondering if it’s really possible to record tracks into a DAW at home yourself and get professional results. My article on recording professionally at home gives you a few tips on getting the very best pro-sounding recordings possible in your own home.
Using multiple tracks for one instrument
Up to now, I have said that a track is a recording of one instrument in a song. However, there does not necessarily need to be a 1-to-1 relationship between tracks and instruments.
One of the most common examples of this is recording a full acoustic drum set. Typically these are recorded with multiple microphones on the different drums and cymbals. Each one of those microphones will record onto a separate track, so your drum set recording may take up 8, 16 or maybe even more tracks.
Here is some of my favorite home studio gear…
Thanks for reading this article. I hope you found it helpful in your home music-making activities. Here are a few of the tools that I personally use in my home studio. These are affiliate links, so if you decide to use any of them I’ll earn a small commission.
Audio interface: My personal choice for audio interfaces are the Focusrite Scarlett series. I have been using these for years, and they have always given me great-sounding recordings. For a very reasonable price from Amazon you can buy the excellent Focusrite Scarlett 4i4, or if you don’t need MIDI capability the Focusrite Solo is a great choice.
Amp sim: Guitar amplifier simulator software has come on leaps and bounds in recent years, such that I record all my electric guitar parts using amp sims these days. One of the very best is the incredible Amplitube from IK Multimedia, which I have used on many of my songs.
Headphones for recording: My favorite headphones for recording are the Sony MDR-7506s, which I use for monitoring during all my recording sessions. They can also be found in many pro recording studios. Get the Sony MDR-7506 headphones from Amazon here.
General-purpose microphone: You can’t go wrong with a good ol’ Shure SM-57, one of the most versatile and ubiquitous microphones around. I’ve been using one in my home studio for as long as I can remember. Amazon offers the Shure SM-57 for a very competitive price.
To see all of my most up-to-date recommendations, check out this resource I made for you!