
When I first started recording guitars digitally, I would set the level far too high. This caused my recordings to not sound great, and caused problems with a lack of headroom when mixing. I have since learned that the correct level to record guitars at is a lot lower than I originally thought.
As a general rule, guitars should be recorded at an average level of about -18dB. It is acceptable for peaks to go up to around -15dB. Clipping should always be avoided. These numbers are a guide, not a hard and fast rule. Generally, if you have peaks greater than -10dB, that is too loud.
There is confusion around setting recording levels due to how they used to be set. In the analog recording days, it was good practice to set the level much hotter i.e. as close to 0dB as possible. These days we are all recording digitally, and to set levels that hot for a digital recording is a very bad idea.
If you are new to home recording in general, I highly recommend you check out my beginner’s guide to recording music at home. This is a comprehensive beginner guide to recording, and takes you right through from setting up your first equipment to recording your first track.
Read on for a process to use to get your guitar recording levels right every time.
What level should you record guitars at?
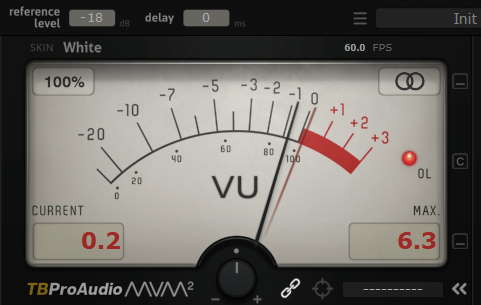
When setting a guitar recording level, you should aim for the meter to peak at no higher than -15dB. Its average position should be around about -18dB, and this is roughly where the meter should be for most of your track. This gives you lots of headroom to raise the volume at the mixing stage.
This applies to both acoustic and electric guitars, however you are recording them. Whether that’s using a microphone in front of an acoustic guitar, a DI’d electric guitar or a mic’d up guitar amp, the same principle applies.
You may well be thinking that this is a very low level, but it is absolutely the sort of volume you should be aiming to record at in a digital system. It seems low, as it is a lot lower than we would have recorded at using an analog system, as already stated. More on that later.
There are two very important reasons why levels should be set in this range…
- Avoiding distortion/clipping – digital distortion is always unpleasant (unlike analog distortion, which can be desirable), so we want to avoid it at all costs.
- Headroom – this is the amount of volume we have left to increase a signal by. This is important at the mixing stage, as we want to make sure if we need to turn the guitar up, we have sufficient volume available. If the guitar is already very loud, there might only be a tiny amount we can increase the volume by before we are at risk of causing unpleasant distortion and/or clipping.
Don’t get too hung up on the exact numbers. As long as you are in the same ball-park, you should be fine. Sometimes you will see -18dB average, peak -14dB being advised. Other times you might see -15dB average, peak -12dB suggested. These are all fine. If you have a few peaks that are a little bit higher, I wouldn’t worry about it.
A useful rule-of-thumb to keep in mind is if you’re regularly seeing the meter reading above -10dB, then your recording is too loud and should be re-recorded at a quieter level.
However you do your recording, you will need an audio interface. I have been using the Focusrite Scarlett series of interfaces for years, and they have always given me great sounding recordings for not very much money. You can buy the Focusrite Solo from Amazon (affiliate link) for a very reasonable price.
How to set guitar recording level right every time
Follow this process, and you will consistently record your guitar at the correct level…
1 Plug your guitar/mic into your audio interface
You may be recording using a microphone placed in front of a guitar amp, or a microphone in front of an acoustic guitar. Or you may be DI’ing (Direct Input) an electric guitar straight into your audio interface, and recording using an amp sim. It doesn’t matter; the principle is exactly the same whatever the recording source.
If you happen to be using amp sims for recording, definitely check out my complete guide to recording guitar using amp sims and how to eq an amp sim articles. You’ll learn an entire process from initial setup of your amp sim in your DAW, to recording your first complete amp sim-based guitar track to getting your guitar part to sit nicely and sound great in your mix.
2 Play at the loudest volume you are recording
You now need to play your guitar at the loudest volume you are intending to record. This will depend on the part you are recording and the style of music. You may be strumming power chords very hard, or you may be playing a gentle finger-picked part.
Just make sure you play as loud as the loudest part you will record.
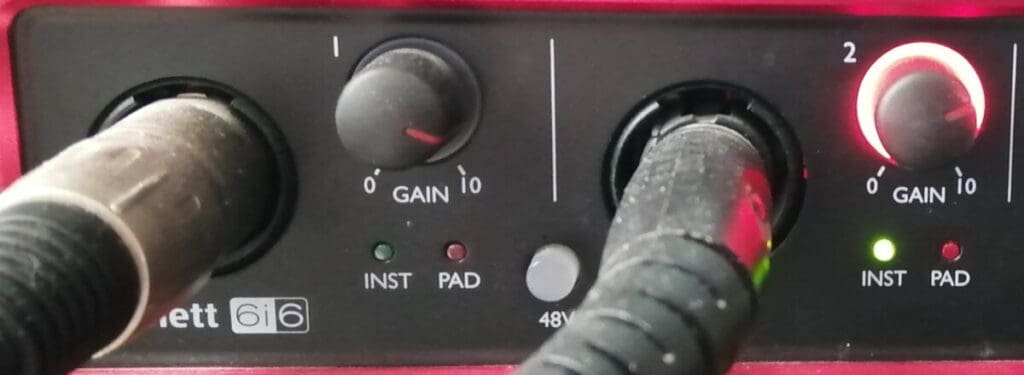
3 Turn up the gain on your audio interface
As you are playing your guitar at the loudest volume you will record, start to turn up the gain on your audio interface. Keep slowly increasing the gain in small increments, until it starts to clip.
Clipping is usually indicated on your audio interface by a light turning red.
Talking of gain….what exactly is it, and how does it differ from volume? I have a whole article on that topic! Check out my article on the difference between gain and volume. You’ll learn exactly what the difference is, and how to use this knowledge to improve your own recordings and mixes.
4 Back off the gain from clipping
Once the clipping point has been reached, turn down the gain to the point where clipping is no longer occurring.
Check you don’t go into clipping by playing as hard as you are going to again – if it clips, back off the gain a bit more. Repeat this step as necessary until you can consistently play at your loudest without the clipping indicator lighting up.
5 Adjust the input level for your DAW
Inside your DAW, make sure the appropriate track is enabled for recording.
Play the loudest section of your part to record on your guitar, and observe the dB meter for the guitar track. Adjust the input level until the meter is reading an average level of around about -18dB, making sure any peaks don’t go any higher than -15dB.
The exact method you use to alter the input level will depend on your hardware and software configuration. You might use…
- The gain knob on your audio interface
- An input level control on a software application for your interface
- An input level control inside your DAW
Guitars, especially electric guitars, are often recorded double-tracked. This means the same part is played and recorded 2 times, then usually panned hard left and right. This gives you a big guitar sound that fills the stereo space. To learn more about double-tracking guitars, check out my “Should you always double track guitars?” article.
6 Record your track
You now have the recording level set correctly, so you’re all ready to hit the big red record button!
Just remember that in the excitement of recording and with the adrenaline flowing, you may play harder than you did when you were preparing the recording level. Keep an eye on the meter as you record; if you find that you are peaking too loud simply turn down the input gain a little more and try again.
As a side note, a good pair of headphones is essential for recording guitar. My favorite headphones for recording are the Sony MDR-7506s, which I have been using in my home studio for many years. You will usually find a pair or two of these in most pro recording studios. You can buy Sony MDR-7506 headphones from Amazon (affiliate link) for a surprisingly competitive price.
Why setting analog recording levels was different
Going back a few decades when all recording was done onto analog tape, things were different. The recording level that was aimed for then was to get as close to 0dB as possible. It also didn’t matter if the meter occasionally went into the red above 0dB.
There are a few reasons for this…
- When analog tape goes into distortion it compresses and overdrives in a pleasant way, unlike digital distortion. This means it could actually be desirable to “go into the red” to get a nice, warm overdriven tape sound.
- Equipment was noisy with humming and buzzing in the background. Therefore you wanted to get your actual signal to record as loud as possible to drown out the noise (increase the Signal-to-Noise Ratio)
These days, we are all recording at home digitally. Digital distortion sounds awful, period! So you want to get nowhere near that 0dB recording level, staying well away from the risk of clipping/distortion.
Don’t confuse digital distortion with amp distortion or amp sim (guitar amplifier simulator software) distortion, which is obviously desirable and a key part of many guitar sounds. Even though distortion in an amp sim is digitally generated, it is using a software algorithm to simulate analog distortion/overdrive in a guitar amp.
This is not the same thing as the unpleasant digital distortion you get from a too hot signal going into a digital recording system.
The digital equipment we use today is much, much quieter than the old analog equipment and generates very little background noise. So turning up the volume to maximize the Signal-to-Noise Ratio is no longer necessary. The priority has become avoiding digital distortion, and leaving enough headroom to be able to increase the volume at the mixing stage.
Related articles
Before you go, I have some other articles on this website related to recording guitar which you will probably be interested in. Feel free to check out these articles…
- How to record electric guitar and vocals at the same time
- How to make guitars sound bigger in a mix
- Is the Shure SM57 good for recording acoustic guitar?
