The Complete Guide To Recording Guitar With Amp Sims
DISCLOSURE: This post contains affiliate links. If you buy through these links, I may earn a small commission.
The traditional method of recording electric guitar in a recording studio is to place a microphone in front of a guitar amplifier. This technique still works great and is done all the time in professional studios.
However, I actually recommend the convenience of using “amp sims” (guitar amplifier simulator software) to record electric guitar in a home studio setting. In this article, we show exactly how you use an amp sim to record electric guitar.
This article assumes you have DAW (Digital Audio Workstation) software such as Reaper, Cubase, Logic, Pro-Tools, etc. running on a computer, and an audio interface connected to that computer.
If you are interested in getting your amp sim to sound the best it can after you have recorded your track, then I highly recommend you check out my article on how to EQ an amp sim. This simplifies the often confusing EQ process, and gives you a method to use that should help you get the best from your amp sim recording every time.
If you are interested in checking out the best recording gear such as audio interfaces, studio monitor speakers, microphones, etc., you can find them at Amazon by clicking here.
1 Create a new track in your DAW
The very first thing to do is create a new track in your DAW to record the guitar part on. This should be a mono track, rather than a stereo track. If your DAW has different track types such as audio, MIDI or instrument, then you should select an audio track. In some DAWs such as Reaper there are no different track types (all tracks are the same), so just create a track.
My personal DAW of choice is Reaper, and I have recorded many guitar parts using it over the years. I have written a whole guide on recording guitars using Reaper. It will take you step-by-step through the process, and is highly recommended reading for anyone using Reaper to do any sort of guitar recording.
You may actually create and record more than one track if you intend on double-tracking your guitars. Double-tracking is such a commonly used and effective technique to get a big guitar sound in your mix, that I have written a guide to choosing whether you should employ this technique. Check it out if you are considering double-tracking.
2 Insert amp sim on the new track in your DAW
Your DAW will have a way of inserting plugins on the channel corresponding to a track. Typically these may be effects plugins such as compression, EQ or reverb. This is where we will insert the amp sim we wish to use to record our guitar part with.
If you are new to amp sims, Guitar Rig 6 is great for beginners and has an excellent free version. I have a whole beginner’s guide to Guitar Rig 6, which I highly recommend you work through. You’ll learn how to set up Guitar Rig, how to choose presets, and how to create your own sounds from scratch.
It doesn’t matter which amp sim you are using – BIAS FX, Amplitube, Guitar Rig, Lepou HyBrit, AmpLion, etc – we will add it as an insert effect on the channel.
You might be asking, why not add the amp sim as a “send” effect, then route all my guitar tracks to it?
You could do that, but I wouldn’t recommend it. You will end up with all the guitar parts having exactly the same sound. This could cause problems when it comes to the mixing stage, with any problem frequencies building up and compounding each other. Better to have separate amp sim instances as insert effects on each guitar track you are recording.
If you are used to recording real amps, I highly recommend you check out my article comparing real guitar amps to amp sims. You’ll learn about the differences between them in detail, and how to get the best out of each of them. It’s highly recommended reading if you are used to working with real amps and moving to amp sims.
3 Add separate IR loader and IR if needed
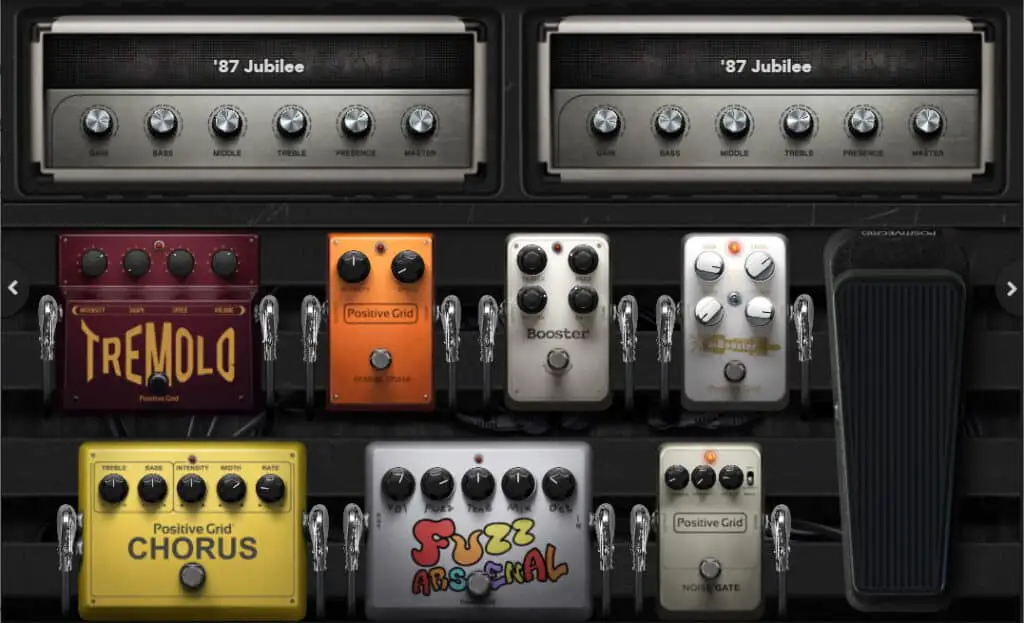
Real hardware guitar amps consist of two parts; the amplifier and the speaker. You need both parts for the amplifier to work.
Amp sims work much the same way, but in software. In software, the speaker and its cabinet are simulated by something called an Impulse Response (IR). This is a software model of the effect a speaker/cab has on the sound.
If you are using an all-in-one amp sim that simulates both the amplifier and the speaker part such as BIAS FX, Amplitube, Guitar Rig etc. then you can safely skip over this step. To tell; if your amp sim’s interface has somewhere where you can configure speakers or speaker settings, then you don’t need a separate IR.
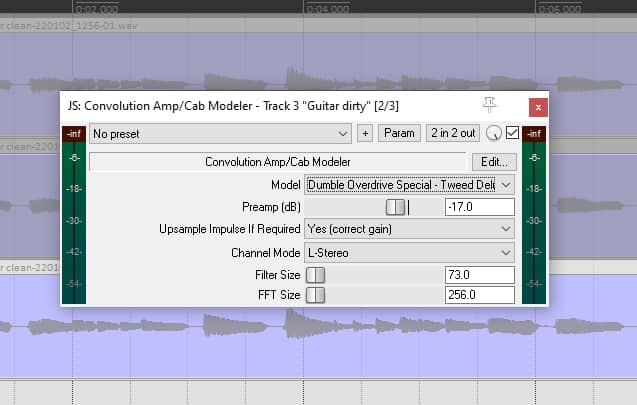
If you are using an amp sim that is just the amplifier part (such as any of the LePou amp sims or Ignite Emissary), then you will need a separate IR (Impulse Response).
To use an IR you need an IR loader plugin. You insert the IR loader on the same channel as your amp sim after the amp sim in the signal chain. This ensures that the output of the amp sim goes into the input of the IR. You then load a guitar cabinet impulse response into the IR loader through its user interface. There are a couple of free IR loaders available on the internet…
There are also many free guitar speaker cabinet IRs available. Here are a few examples…
- RedWirez Free Marshall 1960 IRs
- faIR Modern Rock Impulse Response Pack
- Cenzo Townshend Celestion IR Mix
There are loads more available; just google “guitar cabinet impulse responses” for more.
4 Connect your guitar to your audio interface
Connect your guitar to your interface in much the same way as you would connect your guitar to a real amplifier. Using a standard ¼ inch jack cable, plug one end into your guitar and the other end into an input on your audio interface.
Your audio interface may have a selector switch on the input, or an option in the software supplied with it to set an input as either instrument or line level. Make sure that the input that your guitar is plugged into is set to instrument level, which is appropriate for an electric guitar.
For more information, this video gives detailed instructions on how to connect an electric guitar to a PC…
Some may advise that you need to need a separate DI box in addition to the audio interface. I do not believe this is necessary, as audio interfaces these days are so good that you can get a great sound going directly into your interface from your guitar.
Bear in mind though, that an audio interface isn’t necessary for every musical activity in a home studio. To help you work out if you require one, I have written a whole article asking do you need an audio interface? It’s highly recommended reading before you part with any cash on an interface.
5 Set the input level on your audio interface
The level (i.e. the volume or amount of electrical signal) from your guitar into the audio interface needs to be set correctly. It should be loud enough for the amp sim to get a good strong signal, but not so loud as to be “clipping” the input, potentially causing unpleasant distortion.
Your audio interface will have a way of indicating when the input signal is clipping. This usually a red LED or light surrounding the input gain knob. Start with your guitar volume on full and the input gain knob on the interface turned right down. Slowly turn up the input gain on the interface as you play your guitar as hard as you can. At some point you will reach the level where clipping occurs. When this happens, back off the gain a little.
Keep playing your guitar hard and make sure that clipping still doesn’t occur. If at any point it does, back the input gain off a little more. You’re aiming for the point where no matter how hard you play, the red clipping indicator does not light up. This is the optimum signal level to send into your amp sim.
Some interfaces have a “pad” button on the input or in the software supplied with the interface. These are intended to be used with very hot signals, such as those coming from a guitar with high output active humbucker pickups. When active, the “pad” button reduces the signal level even further than turning the gain knob right down. It you’re having trouble preventing clipping with a high output guitar, try using the pad button.
Talking of gain….what exactly is it, and how does it differ from volume? I have a whole article on that topic! Check out my article on the difference between gain and volume. You’ll learn exactly what the difference is, and how to use this knowledge to improve your own recordings and mixes.
6 Set the input level in your DAW and amp sim
Once you have set the input level on your interface, you need to set the input level in your DAW.
Getting the recording level right can be tricky, but is an essential skill to learn if you want to avoid ruining an otherwise great take. I have written a complete guide to getting guitar recording levels right every time. It’s highly recommended reading if you are going to be doing any sort of guitar recording.
To briefly summarize…
Enable for recording the channel that your amp sim is on in your DAW. This should let you monitor the level from your guitar on the meter on the channel strip. Play your guitar, and make sure that it doesn’t peak any higher than about -10dB. The actual level doesn’t really matter; you’re just trying to make sure you leave some headroom. Another rule-of-thumb measure is that the level shouldn’t go any higher than about ⅔ up the meter.
Then check the level in the actual amp sim itself. If there is a meter or indicator on the amp sim, make sure you are getting a good strong signal without it going into the red indicating clipping.
If you are recording multiple parts, you will never get everything recorded at exactly the same volume however careful you are. That’s why gain staging is important. This is the process of getting all your tracks at a similar volume after they have been recorded. To learn how to do this, check out my gain staging in a DAW tutorial.
7 Select or create a sound in the amp sim
We are nearly at the point where we can hit the record button now. Much like using a real guitar amp, we are going to want to create or select a guitar sound to record.
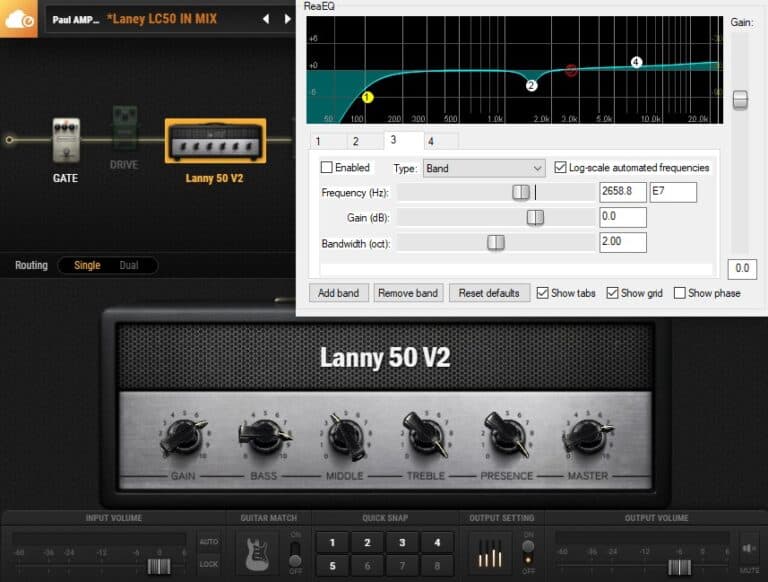
There may be a preset in your amp sim that you like, or that you can use as a basis for creating your sound. Or you may want to start completely from scratch, trying out then selecting an amp model, followed by whatever effects models or virtual mic/speaker configurations you need. All these will be configurable in the user interface of your amp sim.
As a quick aside, there are guitar players who are more interested in using amp sims to convert their computer into an effects processor, rather than recording with them. If that interests you then check out this article – a beginner’s guide to running guitar effects on your computer. It will show you how to set your PC up as an effects unit, exactly what software and hardware you need, and help you avoid some common pitfalls.
One big advantage that amp sims have is that you are not stuck with the sound you select! Recording a real amp, the sound you record is the sound you have on disk. With an amp sim, if you don’t like the sound you can just change it for another one after the guitar part has been recorded. Choose a new amp model, replace some effects, whatever – you are free to tweak as much as you like.
This advantage can be a drawback though. Although it allows huge flexibility – if you record a part with a sound you don’t like you don’t have to re-record the part like you would with a real amp. It can also lead to option paralysis – forever tweaking and never actually making a firm decision on a sound.
For this reason, I like to choose my sound before recording and stick with it. I do have the added safety net of being able to change it later if I decide I don’t like it. I find this approach leads to minimizing the indecision and overwhelm with too many options when it comes to the mixing process.
When getting a sound using amp sims, it’s not just a question of selecting a preset and you’re done. There are many factors to consider to get a great guitar sound. To help you with this, check out these two articles…
- Do your amp sims sound bad? 11 tips for a better sound
- Reducing guitar amp sim latency – a practical guide
8 Setup monitoring
There are two ways to setup monitoring – listening to what you are playing on the guitar while recording – when you are using a DAW; direct monitoring and software monitoring.
Direct monitoring is using the hardware in your audio interface to feed back the input from your guitar into your headphones or speakers. The advantage of this way is that there will be no latency i.e. no delay between when you play a note and when you hear it. The big disadvantage of direct monitoring is that you will not hear the sound from the amp sim. You just the sound of your guitar fed straight back to you with no amp or effects.
You usually set up direct monitoring in the software configuration program supplied with your audio interface – see you audio interface manual for precise details.
Software monitoring is using the power of your DAW and software drivers of your operating system to hear the actual output of the amp sim in your headphones/speakers. The obvious advantage here is that you are hearing the actual sound you have setup in the amp sim.
The potential disadvantage is latency – because there is a lot of digital processing occurring, there will be a delay between when you play a note and hear that note.
DAWs, amp sims and drivers are so good these days though, that it is usually possible to get the latency down to a usable level. You should aim for under 10ms, and preferably under 5ms if you can. I almost always record using software monitoring these days.
There will be setting in your DAW on the channel you are recording on to enable software monitoring.
Make sure you are using a dedicated pro-level digital audio driver (such as ASIO) in your DAW and/or amp sim. In your DAW there should be a way of setting driver parameters such as the buffer size, which you can experiment with to get the best trade-off between sound quality and latency.
One big advantage of monitoring an amp sim over a real guitar amp, is that you can use speakers if you wish. With a real amp the sound from the speakers would feed back into the microphone recording the amp. With an amp sim, your guitar is plugged directly into your interface so there is no mic to feed back into.
9 Record on the track in your DAW
Finally – we can hit the record button!
Enable the channel for recording, hit record and play your guitar. Keep an eye on the levels on both the audio interface and the input channel strip meter in your DAW. You should be ok due to the work you did in steps 5 and 6, but worth watching just in case.
If you are relatively new to home recording, I highly recommend you check out my beginner’s guide to recording music at home article. It takes you through making your first recording in a DAW, laying out exactly what you need and giving you a step-by-step process to get a great recording every time.
10 Tweak the amp sim sound
After one take (if you’re very good), or after 37 takes (if you’re me) you should have your guitar part recorded.
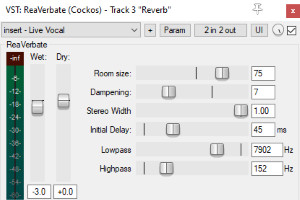
When you listen back to your recording, you may at this stage want to tweak your sound. As previously mentioned, this is one of the great benefits of recording guitar using amp sims, being able to change your amp, switch out pedals, change speakers etc. However, I would caution against doing too much tweaking – commit to a sound and stick with it.
It is more useful to be able to make tweaks at the mixing stage, particularly with EQ, compression and reverb. I find it helps to build up a series of usable amp sim presets over time, which become your go-to sounds for any musical situation. These then require minimal tweaking, and reduces the potential time for option paralysis.
11 Render to audio (optional)
You now have some audio (your guitar part) recorded on a track in your DAW. When you play it back, that audio is going through your amp sim and being digitally processed by its amp and effects models.
This processing does take up computing resources such as CPU cycles and RAM (memory). This isn’t usually a problem, but if you have many guitar parts each with an instance of an amp sim on you may notice some slowing down of your computer or even audio glitches.
What you can do is freeze (or render, or bounce, or export – depending on your DAW’s terminology) the track to audio. What this means is that the track will be re-recorded internally in the DAW, with all the effects applied to it including everything from the amp sim.
So you end up with a new audio track with no effects plugins on it, but with the full audio from the effects you had on the previous track. You can then delete the previous track (the one with the amp sim on as a plugin), knowing that you have rendered the full amp sim’s sound to a new track. Now you have no extra computing resources being consumed as you no longer have the amp sim instance.
Now obviously you only want to do this when you’re completely happy with the track as you can’t go back from this. This is probably a step for the mixing stage rather than the tracking stage. You could always take a backup of your current project in your DAW before you do this, just in case you need to go back to it at a later stage.
12 Record more guitar parts
It’s highly unusual to record a song that has only one guitar part. So you are likely to be recording more. Simply follow the steps above for each track you want to record.
The one thing to point out here is to try and use different settings on each amp sim for each part you record. Different amp models, different EQ, different effects etc. This will help in the mixing stage as if you have a load of amp sims with exactly the same sound, you are likely to get a build-up of problem frequencies. Using different sounds, you will have already taken steps to minimize this making your life easier when it comes to mixing.
If you’ve made it this far through this article, you’re obviously interested in amp sims. It’s not just recording guitars you can use them for. Using them to turn your computer into a guitar amp is also an extremely popular application. To learn how, check out my “How to use your PC as a guitar amp” article, and its related article “how to run VST plugins standalone“.
13 Experiment at the mixing stage (bonus tip!)
Now I know I have warned about too much tweaking, and ending up in an option paralysis nightmare.
But one of the huge advantages of amp sims is that flexibility they give you to change sounds post-recording. You may have a problem that only becomes apparent when you get to mixing your project. With a real amp, your only real choice is to set-up the sound again (amp/pedals etc) and re-record the guitar part. (OK, you can do re-amping if you recorded a dry signal, but that’s a topic for another article).
With an amp sim, you can change the “amp” out to your heart’s content until you find the sound that works for your project.
Often when you are mixing, you are trying to get the guitars to sound as full and big as possible in the context of your mix. A lot of factors are involved in this. That’s why I wrote my article containing tips to get your guitars sounding bigger in a mix. I recommend reading it if you are mixing guitars.
Here is some of my favorite home studio gear…
Thanks for reading this article. I hope you found it helpful in your home music-making activities. Here are a few of the tools that I personally use in my home studio. These are affiliate links, so if you decide to use any of them I’ll earn a small commission.
Audio interface: My personal choice for audio interfaces are the Focusrite Scarlett series. I have been using these for years, and they have always given me great-sounding recordings. For a very reasonable price from Amazon you can buy the excellent Focusrite Scarlett 4i4, or if you don’t need MIDI capability the Focusrite Solo is a great choice.
Amp sim: Guitar amplifier simulator software has come on leaps and bounds in recent years, such that I record all my electric guitar parts using amp sims these days. One of the very best is the incredible Amplitube from IK Multimedia, which I have used on many of my songs.
Headphones for recording: My favorite headphones for recording are the Sony MDR-7506s, which I use for monitoring during all my recording sessions. They can also be found in many pro recording studios. Get the Sony MDR-7506 headphones from Amazon here.
General-purpose microphone: You can’t go wrong with a good ol’ Shure SM-57, one of the most versatile and ubiquitous microphones around. I’ve been using one in my home studio for as long as I can remember. Amazon offers the Shure SM-57 for a very competitive price.
To see all of my most up-to-date recommendations, check out this resource I made for you!