How to use Guitar Rig 6 – the complete beginner’s guide
DISCLOSURE: This post contains affiliate links. If you buy through these links, I may earn a small commission.
Guitar rig is one of the most popular amp sims available today, not least because it has a fully functioning free version. However, it can be intimidating to use for the first time, and it is not immediately obvious where to begin with Guitar Rig.
To get started with Guitar Rig, go to File->Audio & MIDI settings. Configure the device/driver for your audio interface. Connect your guitar to your interface, then click the Presets button. Select a category in the top left-hand pane, then select a preset from the bottom left-hand pane.
This article shows you exactly how to use Guitar Rig, from downloading and installing it to creating and saving your own presets. You will be able to do all this for free, as we will only be using components that are provided in the free version.
If you are interested in checking out the best recording gear such as audio interfaces, studio monitor speakers, microphones, etc., you can find them at Amazon by clicking here.
What is Guitar Rig?
You probably already know what Guitar Rig is. If that’s the case, feel free to skip this section and move straight to the downloading and installation sections.
Nevertheless, an introductory article on Guitar Rig feels incomplete without at least a short paragraph explaining exactly what it is.
Guitar Rig is a software application from music technology company Native Instruments, available for both Windows and Mac. It is a guitar amplifier simulator, or “amp sim” for short. It lets you effectively turn your computer into a guitar amp, to use for playing or recording. You can also use it as a “plugin” within a DAW (Digital Audio Workstation) allowing you to record using its sounds within that DAW.
It has both a paid version and a lower featured but still fully functional free version. The free version comes with a matched amp & cabinet simulation, 13 effects, and 50 ready-to-use presets. This makes it ideal for turning your computer into a guitar amp for no cost.
Using your computer as a guitar amp is asked about so often these days that I have written a whole article dedicated to it. Check out my “How to use your PC as a guitar amp” article for the complete how-to, including what hardware and software you will need, setting it all up and how to get your guitar sounding the best it can through your PC. It’s essential reading if you’re taking your first steps into the world of computer-based guitar amps.
How to download the free version of Guitar Rig
Go to the download link for Guitar Rig Player. Links tend to change over time, so if this link doesn’t work, simply go to the Products page on the Native Instruments website and search for Guitar Rig. Click the link to the Free Guitar Rig Player. Click the “Free Download With Komplete Start” button. Komplete Start is a collection of free software, of which Guitar Rig Player is a part.
You will be prompted to create an account. If you don’t have an account, click the button to create one and follow the instructions. If you already have an account, click the Get Komplete Start button. You will be prompted to log in, then given another button to click to download Komplete Start. Select either the Windows or Mac download, then save the installer file.
How to install the free version of Guitar Rig
Navigate to the Komplete Start installer you downloaded (on my machine it was called “Native-Access_2.exe”), and launch it in the usual way. Follow the prompts as they appear – on my machine the installation took about 90 seconds.
When this has finished, you will be prompted to log in with your Native Instruments account…
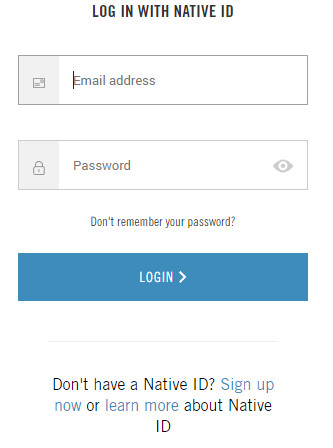
Login with your details, and you will be presented with the Native Access application showing you the applications available for you to install…
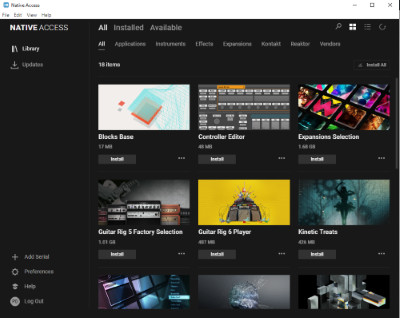
Click on the Install button for Guitar Rig 6 Player. This will download and install Guitar Rig 6 – on my machine the process took about 2½ minutes. Once you see a message saying the installation is complete, open the Windows Start Menu, and you should see an entry for Guitar Rig 6…
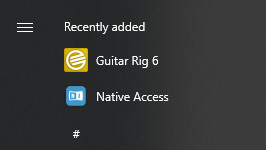
Click on the menu item to start Guitar Rig 6.
Guitar Rig 6 Standalone and Plugin Modes
Guitar Rig 6 can be run in two modes: standalone and plugin. We will concentrate on the standalone mode in this article, where you just click on the Windows menu entry to start it, and it runs on its own without needing any other applications.
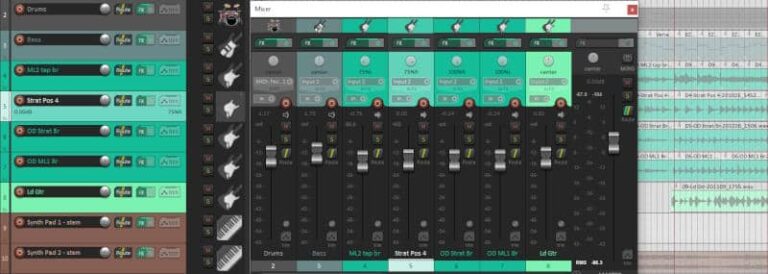
You can also run Guitar Rig as a plugin inside a DAW. This allows you to get your guitar sounds for recording and playback in the DAW through Guitar Rig. The method of doing this will vary from DAW to DAW, but the principle is the same. You add Guitar Rig as a VST effect to a guitar track in the DAW.
Your DAW may not automatically find the plugin. If that’s the case, then you will need to add the plugin location to the folders that your DAW looks for plugins in. This will be in the DAWs settings. On my machine the plugin was installed to “C:\”Program Files\Native Instruments\VSTPlugins 64 bit”, and the plugin file is called “Guitar Rig 6.dll”.
Whichever mode you use Guitar Rig in, you will only get the best out of it through a quality set of headphones or speakers. I recommend the Sony MDR-7506 headphones (Amazon affiliate link), which can be found in many recording studios around the world. I use these in my home studio while using Guitar Rig and other amp sims. I highly recommend them for their sound quality, comfort and reliability at a very reasonable price.
Setting up Guitar Rig
Audio Settings
On launching Guitar Rig for the first time, you will be presented with the Audio Preferences settings…
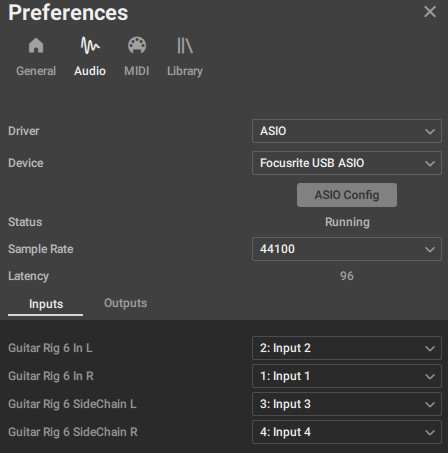
The options you see will not be exactly the same as mine above, unless you have exactly the same audio interface as I do. Set each option in turn as follows…
Driver: Ensure that an ASIO driver is selected. This is required to give you the best performance for a high-end audio application such as Guitar Rig.
Device: Select the entry for your audio interface, its connection and its driver e.g. Focusrite USB ASIO.
Sample Rate: How many samples per second the digital audio contains. Don’t worry if you don’t understand this – essentially set it higher for better sound quality, but at the expense of computer performance. In my experience, a value of 44100 gives very usable sound quality.
Inputs: Guitar Rig 6 In L & Guitar Rig 6 In R represent the left and right stereo inputs into Guitar Rig. You can assign which input from your audio interface goes into each of those inputs. My guitar is plugged into Input 2 on my audio interface, and you can see I have assigned that to Guitar Rig 6 In L.
Don’t worry about the SideChain inputs for now.
Outputs: Clicking Outputs will unsurprisingly show you audio interface outputs. You should select the outputs you want to hear Guitar Rig through, usually the normal outputs your speakers or headphones are connected to.
ASIO Config: Click this button, and a dialog will appear allowing you to configure settings for your audio driver. Again, it won’t look exactly the same as mine unless we have the same audio interface, but the options should be similar. Here’s what mine looks like…
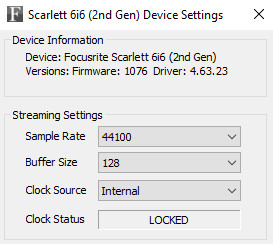
The most important option as far as Guitar Rig is concerned is the Buffer Size. Setting it higher will give you the best sound quality, but at the expense of more latency (time taken between playing a note and hearing it come out of Guitar Rig). Set it lower and you will reduce the latency, but also reduce the sound quality.
Experiment with this setting once you are all set up to find the best value for your personal system. I suggest starting with a sample rate of 44100 and buffer size of 128.
Getting the latency as low as possible with the best possible sound quality is very important when using any amp sim. That’s why I wrote my guide to reducing amp sim latency. It gives you various tips and tricks on lowering your latency, while showing you how to avoid common pitfalls that can reduce your amp sim sound quality.
Connecting your guitar to Guitar Rig
OK; you are now ready to connect your guitar up to Guitar Rig. Basically, ensure your audio interface is connected to your computer, then plug your guitar into an input on your interface using a jack cable.
That should be all there is to it. Because this is such a common thing to do these days, I have written a whole article dedicated to connecting a guitar to a computer. It goes into great depth, and will help you get connected while avoiding common pitfalls and problems. It is highly recommended reading if you encounter any issues, or if you just want to know more about plugging a guitar into a PC.
You will need an audio interface to use Guitar Rig. I have been using Focusrite Scarlett audio interfaces for years, and they have always given me great sound quality and proven very reliable. They are also built like tanks! You can get the Focusrite Scarlett Solo (affiliate link) from Amazon for a very reasonable price.
Talking of audio interfaces…an audio interface isn’t necessary for every musical activity in a home studio. To help you work out if you require one, I have written a whole article asking do you need an audio interface? It’s highly recommended reading before you part with any cash on an interface.
Guitar Rig quick start
At this point, you are probably itching to get using Guitar Rig. The quickest way to get started is to use one of the presets. This also doubles up as a quick test, just to check your settings are correct and your guitar is connected up properly.
Presets in Guitar Rig are pre-made collections of equipment, i.e. amps and effects to get a particular sound. You might have one preset for a clean sound, one for a crunch sound, one for a solo sound with a short delay effect, etc. Guitar Rig ships with some ready-made presets, and you can make your own (more on that later).
To choose a preset, we need to click a few things on the left-hand side (the “Browser“) of Guitar Rig’s user interface…
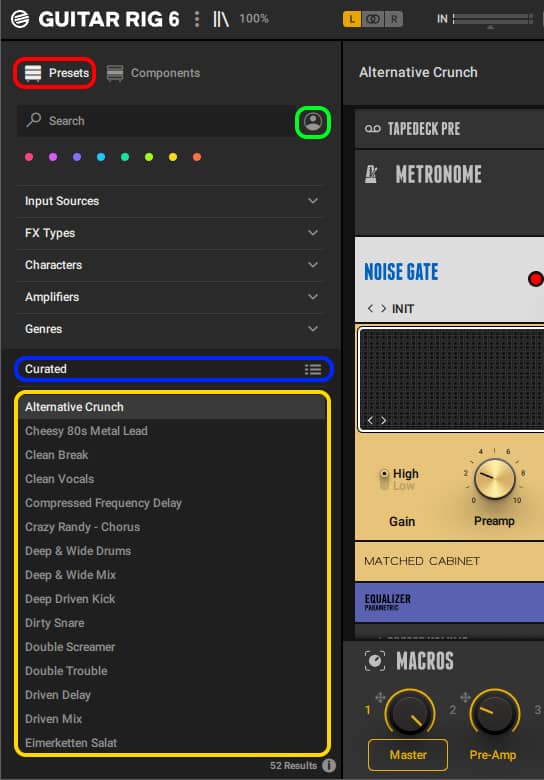
You can see I have highlighted which areas we need to use with red, green, blue and yellow boxes.
- Make sure that the L<->R selector at the top of Guitar Rig is set to the input your guitar is plugged into. e.g. if you configured Guitar Rig 6 In L to be the input your guitar is connected to in the audio settings earlier, you want the selector to be set to “L“. Just click on it to change it.
- Click the “Presets” button (highlighted in red)
- If you don’t see a list of presets (yellow) in the bottom half of the Browser on the left-hand side, click the “User” button (highlighted in green). This switches between the supplied presets and user-defined presets that you have created yourself (you won’t have any of those yet).
- Clicking on the “Curated” (blue) text will let you choose the order in which the presets are displayed.
- Double-click on a preset to load it into the right-hand side of Guitar Rig.
You will see the amps and effects for that preset on the right-hand side (the “Rack“). You are now good to go – start playing your guitar through Guitar Rig!
N.B: Despite its name, Guitar Rig is capable of processing sounds for many instruments, not just guitar. To limit the shown presets to those designed just for guitar, click the “Input Sources” drop-down list, and click the “Guitar” tag.
Some guitar players are mainly interested in Guitar Rig 6 for its effects, to effectively turn their computer into a guitar effects processor. If you are one of those guitarists, I have a whole article just for you – a beginner’s guide to running guitar effects on your computer. You’ll learn exactly how to set up your computer for providing effects, what hardware and software you need, and how to avoid some common pitfalls.
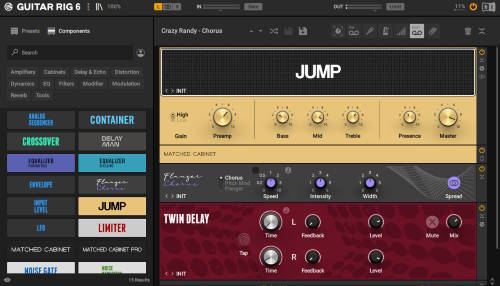
Overview of the Guitar Rig 6 User Interface
The Guitar Rig 6 user interface can be split into five main areas. These are highlighted in different numbered colored sections in the screenshot below…
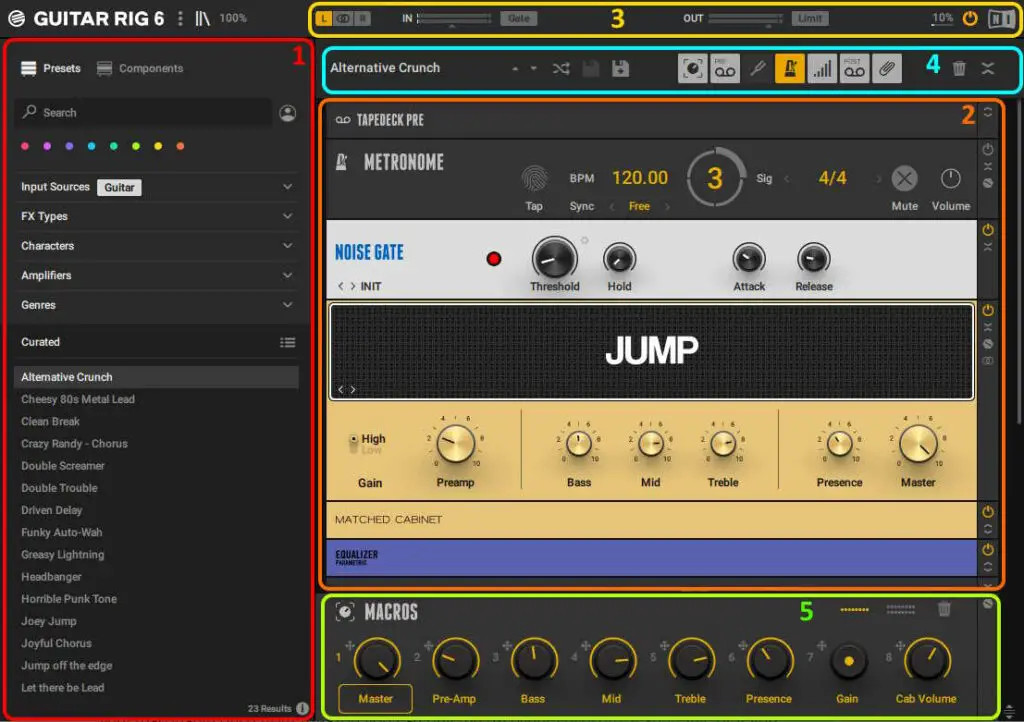
- (RED) The Browser: Allows you to select a preset (a collection of components) to play your guitar through. Also provides a list of components (amps & effects) that you can add to a preset.
- (ORANGE) The Rack: These are the components that are in the currently selected preset. There is usually an amp, optionally one or more effects, and some optional utility components such as a metronome and a tuner.
- (YELLOW) Input/Output: Here you can select the input you are using. There are also dB meters for the inputs and outputs, and you can configure a noise gate on the input and a limiter on the output.
- (BLUE) Preset Options: Provides up/down buttons to switch between presets in the list on the left. Also has buttons to turn on/off utility components in the current preset, such as the tuner, metronome and tapedeck.
- (GREEN) Macros: Contains controls for the preset as a whole in one place. e.g. the gain and pre-amp controls in the macros section in the screenshot control the Gain and Preamp settings on the “Jump” amp component.
Using Presets in Guitar Rig 6
Editing an existing preset
Perhaps the easiest way to create a “new” preset in Guitar Rig 6 is to edit an existing one.
Select a preset in the Browser on the left-hand side. In the Rack on the right-hand side, try deleting a component. To do this, select the component with a mouse left-click, and either press the delete key on your keyboard, or right-click on the component and select Delete from the context menu.
You can undo the change by pressing Ctrl+Z, or going to the three-dots “hamburger” menu on the top-left, and selecting Edit->Undo.
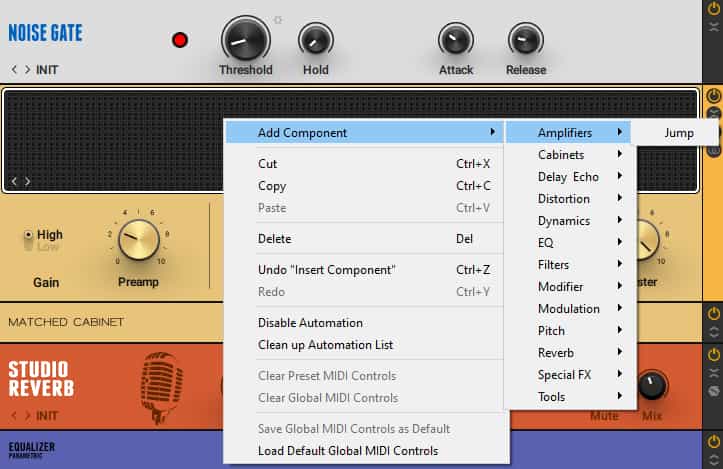
There are a couple of different ways to add a component. Select Components in the Browser. In the list of components, find the one you want to add then click and drag it onto the right-hand side Rack in the place you want to add it. You can also double-click on a component to add it.
Or, you can right-click anywhere io the Rack on the right-hand side , then select Add Component from the context menu. You will be shown a list of categories containing their corresponding components, and you can select the one you want to add.
You can save the preset by clicking the “Save As” button, then entering a new name for the preset. Or you can go to the three dots “hamburger” menu and select File->Save As…

Creating a new preset from scratch
Let’s go into a little more detail by creating a whole new preset completely from scratch.
Go to the three dots “hamburger” menu and select File->New…, or press Ctrl+N. You will see a mostly blank area in the Rack for you to add components to; it will just have whatever utility components you have selected to be shown e.g. the metronome, tuner, tape decks, etc.
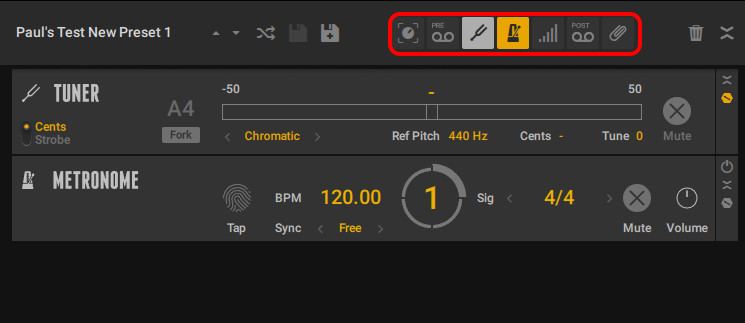
You can toggle any of these on or off by clicking on the corresponding button.
Add some components in one of the ways you now know how to do. I suggest adding the “Jump” amplifier and “Studio Reverb” effect to start with.
The component’s controls are fairly self-explanatory; they are very similar to the controls you would find on the “real-life” hardware component. For example, Preamp, Bass, Mid, Treble, Presence & Master on the Jump amp do exactly what they would do on a real guitar amplifier.
Similarly, the effects components have controls that you would expect to find on an effects pedal of the same type. For example, the Studio Reverb component has Predelay, Size, Bright and Mix controls, all of which you could reasonably expect to find on a reverb pedal.
But the little controls down the right-hand side of each component (shown highlighted in red below) could do with a little explanation…
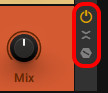
Component on/off – the top one that looks like a power button simply turns that component on or off.
Minimize/Restore – the middle one that looks like a cross minimizes and restores that component. Very useful if you want to concentrate on one component and make all the rest as small as possible.
Show Hidden Controls – the bottom one that looks like a screw head shows controls that are normally hidden for that component.
Once you have added and configured your desired components to your liking, you can save your preset. Just click the Save button (just to the left of the Save As… button), or go to the three dots hamburger menu and select File->Save.
Tagging your preset
You can add various different “tags” to your preset, just like the ones that are supplied with Guitar Rig 6. This allows you to filter for different tags in your own presets in the Browser.
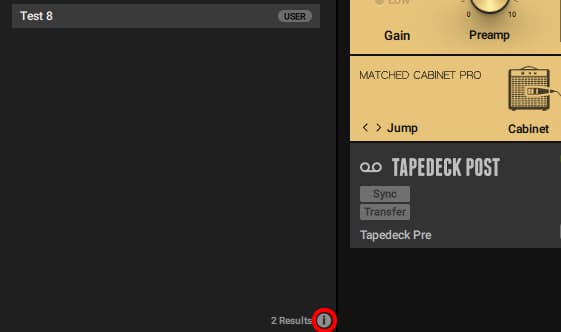
In the screenshot shown below I have made a preset called “Test 8”, added the “Guitar” input source tag, the “Amps & Cabinets” and “Crunch” FX type tags. I have also added an author name and a basic description…
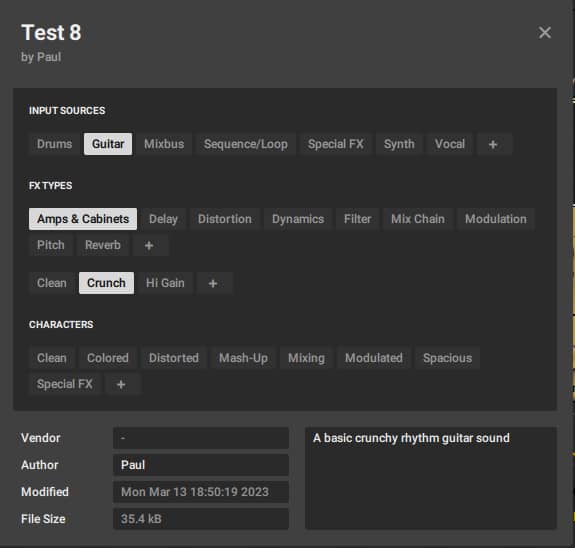
To add tags to your preset, click the “i” information button near the bottom right of the Browser…
Preset management in Guitar Rig 6
You have already met the “User” button that selects between the supplied presets and user-defined ones. Whatever list is displayed in the Browser in Guitar Rig 6, you can use the preset up/down selection buttons to switch between presets in the shown list.

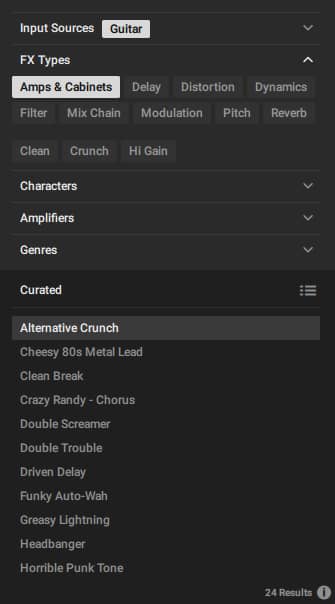
As already mentioned, you can filter the displayed list by clicking on the tags in the Browser. For example, below I have chosen to only show the presets that contain the “Guitar” Input sources and “Amps & Cabinets” FX Types tags…
Individual component presets in Guitar Rig 6
Guitar Rig 6 doesn’t just provide presets containing a whole rig. Each individual component can also contain presets. This is best illustrated by example…
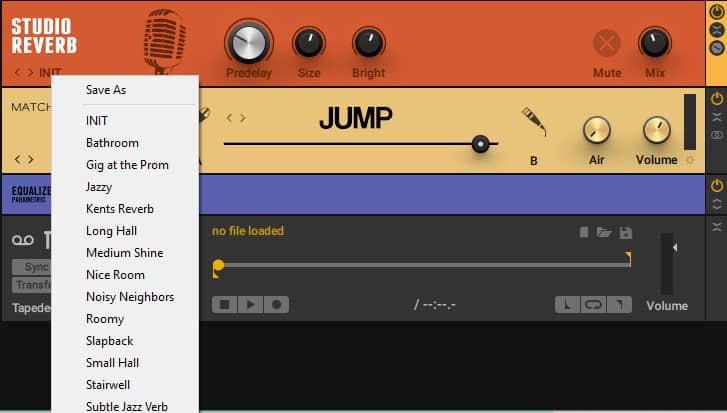
Near the bottom left of a component, is its preset menu. Click on it, and you will see a list of the currently available presets for the component. Click on one to load it into the component. The screenshot shows the available presets for the Studio Reverb component. You can also switch between the presets using the “<” and “>” buttons.
To save a new preset, just click on “Save As” in the menu, and enter a name for the new preset.
Using macros in Guitar Rig 6
Presets can get quite large and unwieldy in Guitar Rig 6. Imagine you have an amp & cabinet, half a dozen different effects, a metronome, a tuner and a tapedeck configured. That’s a lot of different components to keep track of, and most of the time you probably only want to change a few settings on a few components.
Wouldn’t it be great if you could have all the controls you regularly use all in one place? Well that’s what macros are for!
You can turn on macros by clicking on the macros button in the utility components bar near the top of Guitar Rig 6…

This will display the “macros” section at the bottom of your components. Here, you can configure each of the controls to operate any control on any component you have in your preset.
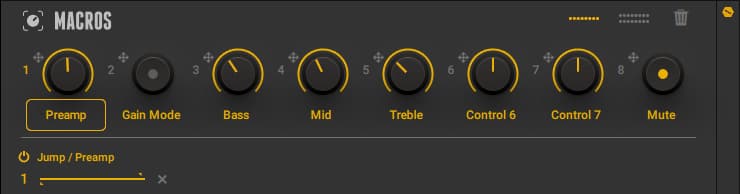
Say you wanted to assign macro control 1 (the left-most one) to control the Preamp dial on the amp component. Simply click and drag the macro control onto the amp’s Preamp dial. Now, if you change the setting on the macro dial, you will see the Preamp control on the amp change with it.
You can assign most controls on most components to a macro control. It’s not just dials either – you can do on/off buttons and switches. Right-click on a macro control, and you can select “Toggle knob/button mode” to change the control from a dial to a button.
Recording
One extremely useful component in Guitar Rig 6 worth a mention here is the Tapedeck. This lets you record your playing, and play it back so you can play over it. It also lets you select a section of a recording as a loop, so you can set it to play over and over while you solo over it. You can also save your recordings, which is great for capturing ideas.

The tapedeck is reasonably self-explanatory and easy to use. I’ve numbered the controls in the screenshot above, and I’ll go through the basics of what each one does in turn…
- Stops recording or playback.
- Plays a recording or starts recording when the record button has been pressed.
- Arms the tapedeck for recording. Note you have to press the play button to actually start recording.
- The loop on/off button.
- Loop begin button. Press to set the start of a loop.
- Loop end button. Press to set the end of a loop.
- Loop begin marker.
- Loop end marker.
- File open. Loads a saved recording.
- File save. Saves the current recording to a file.
While the Tapedeck in Guitar Rig 6 is incredibly useful, there is so much more you can do with recording using amp sims. You can record full songs, using amp sims to record all the guitar parts and have it sound just as good as if you mic’d up real amps. I highly recommend my complete guide to recording with amp sims article if this sounds like something you’d be interested in.
Further learning
If you’ve made it this far in this article, you should know enough to operate Guitar Rig 6 effectively and productively. You should have no issues using it to play your guitar through, edit and configure presets and set it up for your hardware.
Having said that, this article has really only just scratched the surface of this incredibly powerful software. For further information, there are many YouTube videos about Guitar Rig 6. Just search for “Guitar Rig 6 tutorial” – this video from Native Instruments channel is a good place to start…
Finally, the user manual is the ultimate source of information for using Guitar Rig 6. I know most people don’t like reading user manuals, but if you want to become an expert it is essential to keep a link to it handy.
Here is some of my favorite home studio gear…
Thanks for reading this article. I hope you found it helpful in your home music-making activities. Here are a few of the tools that I personally use in my home studio. These are affiliate links, so if you decide to use any of them I’ll earn a small commission.
Audio interface: My personal choice for audio interfaces are the Focusrite Scarlett series. I have been using these for years, and they have always given me great-sounding recordings. For a very reasonable price from Amazon you can buy the excellent Focusrite Scarlett 4i4, or if you don’t need MIDI capability the Focusrite Solo is a great choice.
Amp sim: Guitar amplifier simulator software has come on leaps and bounds in recent years, such that I record all my electric guitar parts using amp sims these days. One of the very best is the incredible Amplitube from IK Multimedia, which I have used on many of my songs.
Headphones for recording: My favorite headphones for recording are the Sony MDR-7506s, which I use for monitoring during all my recording sessions. They can also be found in many pro recording studios. Get the Sony MDR-7506 headphones from Amazon here.
General-purpose microphone: You can’t go wrong with a good ol’ Shure SM-57, one of the most versatile and ubiquitous microphones around. I’ve been using one in my home studio for as long as I can remember. Amazon offers the Shure SM-57 for a very competitive price.
To see all of my most up-to-date recommendations, check out this resource I made for you!