
DISCLOSURE: This post contains affiliate links. If you buy through these links, I may earn a small commission.
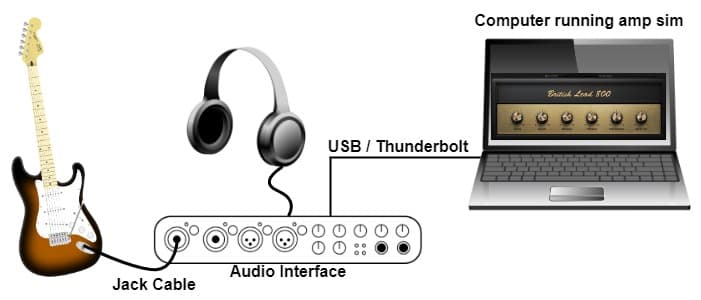
When amp sims (guitar amplifier simulator software) first came on the market, the sounds they produced did not really sound anything like a real guitar amp. These days that is no longer true; amp sims are capable of producing excellent guitar sounds, and provide a genuine alternative to using a real amplifier. Team up an amp sim with a laptop, an audio interface and an audio output device such as headphones or speakers, and you effectively have a guitar amp running on a PC.
A PC can be used as a guitar amp by installing an amp sim (guitar amp simulator). Then, connect your guitar to an audio interface input, and the audio interface via USB to the PC running the amp sim. Finally, connect speakers or headphones to the audio interface output, for a working guitar amp.
This article is a detailed guide on using your PC as a guitar amp. A list of how-to steps shows you exactly how to set-up your PC and other hardware, and possible applications for this set-up are discussed. It also talks about the drawbacks of the amp-on-PC system, and some possible alternatives.
If you are interested in checking out the best recording gear such as audio interfaces, studio monitor speakers, microphones, etc., you can find them at Amazon by clicking here.
Equipment needed
This is what you will need to play guitar through your PC. Make sure you have all these available before you start working through the how-to steps…
- Computer – I assume you already have a PC you can use. If you are in the market for a music PC at the moment, then I highly recommend you check out my article about PC specs for music production.
- Audio interface – an audio interface allows you to connect musical instruments and microphones to your computer. They also usually come with high-quality audio drivers to install, which we will be using. My personal choice for audio interfaces are the Focusrite Scarlett series. I have been using these for years, and I think they give great sounding recordings for not very much money. You can buy the Focusrite Solo through Amazon (affiliate link) for a very competitive price.
- Amp sim – there is lots of amp sim software available today, both paid and free. I am a big user of BIAS FX. Both Amplitube and Guitar Rig have free versions available for download. Amp sims can be run in one of 2 ways; as a plugin in a DAW, or as a standalone program. Not all amp sims can be run standalone. In this guide, we use the amp sim standalone. BIAS FX, Amplitube and Guitar Rig can all be run standalone. For more information, I recommend you check out my article on how to run VST plugins standalone.
- Jack cable – fairly obvious this one; use it to connect your guitar to your audio interface, in much the same way as you would normally connect your guitar to a real guitar amp.
- Audio output device – This is something allowing you to hear the output from your audio interface. This could be active speakers, headphones, a hi-fi amp & speakers, a P.A. system, etc.
The headphones and speakers I recommend for playing your guitar through your PC are…
- AKG K-702 Reference Headphones (Amazon affiliate link)
- Kali LP-6 Monitor Speakers – link is for one speaker (Amazon affiliate link)
Both of these devices allow you to hear your guitar through your amp sims with great results, and are available from Amazon at very reasonable prices. They can also be used very effectively for mixing your music.
I love using my PC as an amp using software amp sims. But they are not for everybody. For that reason, I have a whole article comparing real guitar amps to amp sims. It goes into detail about the differences between real amps and software amps, including the advantages and drawbacks of each. I highly recommend reading it if you are taking your first steps into the world of amp sims after using real amps.
How to use your PC as a guitar amp
Before you do anything, make sure the volume is turned down on your audio interface, and any active audio output devices you may have connected to it such as speakers or a hi-fi amplifier. This prevents any unpleasant “pop” sounds as you start plugging things in.
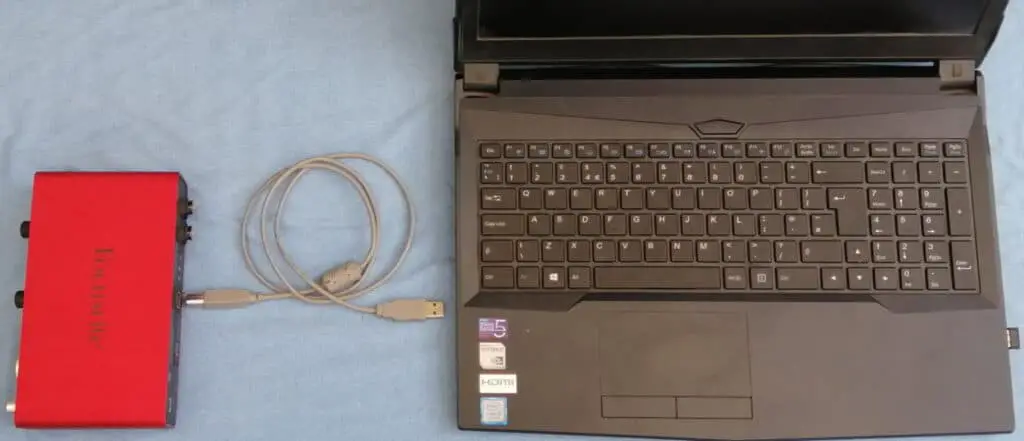
1 Connect audio interface to PC
If you haven’t already done so, then connect your audio interface to your PC. This is usually done via USB or thunderbolt. There are several different types of USB connector and cable, so make sure you have the correct one; your interface usually comes supplied with an appropriate cable.
If you are using a laptop computer in particular, there are some specific issues you should consider. That’s why I have a whole guide on using audio interfaces with laptops. It takes you through exactly how to use an interface with a laptop, the best interfaces to use, the issues you may encounter and how to solve them.
Locate a suitable free USB port on your PC, connect one end into your interface and one end into your PC…
At this point, your computer may recognize the new interface and start installing drivers and/or other software for it. If not, you may have to either install these from a disc or go to the manufacturer’s website, then download and install drivers from there. Follow the instructions supplied with your particular interface.
It is very important to install the drivers, so don’t skip this step. On Windows, these are usually ASIO drivers. These drivers are specially designed to work with high-quality digital audio applications, and are what we will need to get the best performance out of our amp-on-PC setup.
Now using a computer as an amp is just one way of playing your electric guitar without using an amp, but certainly not the only way. To learn all about the different ways to play amp-less, I highly recommend checking out my article “How to play electric guitar without an amp“.
2 Install and configure an amp sim
If you don’t already have an amp sim installed, now is the time to install one.
I am a long-time user of BIAS FX, which I can highly recommend. If you want a free option to try the base versions of Amplitube 5 from IK Multimedia and Guitar Rig 6 from Native Instruments are free, although if you can afford them the paid versions are excellent.
If you are new to amp sims, Guitar Rig 6 is great for beginners. I have a whole beginner’s guide to Guitar Rig 6, which I highly recommend you work through. You’ll learn how to set up Guitar Rig, how to choose presets, and how to create your own sounds from scratch.
Amp sims can also be used very effectively for recording electric guitar, as a great alternative to mic’ing up guitar amps. If that is something you are interested in, then definitely check out our complete guide to recording guitar using amp sims.
The installation process will depend on which particular amp sim you are using. There may be an “.exe” installer file to download, which you simply double-click on to launch the installer, then follow the on-screen prompts. Or they may be a “Product Manager” style application to download and install, and that will then let you install the amp sim and any updates for it. IK Multimedia (which produces Amplitube) has one of these. Don’t let it put you off – the process is usually very straightforward.
Once the amp sim is installed, you will need to do a small amount of tweaking settings inside it to set it up to use your particular audio interface. Run the amp sim in standalone mode (this should simply involve clicking the shortcut in your Windows menu, or double-clicking the shortcut on the desktop).
There are usually 4 settings we should configure…
- The input(s) the amp sim should use – if your audio interface has several inputs, you need to tell the amp sim which one your guitar is plugged into.
- The output(s) the amp sim should use – similarly, if your audio interface has several sets of outputs, you need to tell the amp sim which one your speakers/headphones are plugged into.
- Audio driver selection – use this to select the audio driver for your interface. We almost always want to select the ASIO option here; if you don’t see that option, you probably haven’t installed the driver for your interface. I strongly suggest you go back and install it.
- Buffer size for the audio driver – this works in conjunction with sample rate, and gives you some control over latency and sound quality. (The article on latency on this website goes into considerable detail if you’re interested).
Examples
BIAS FX 2
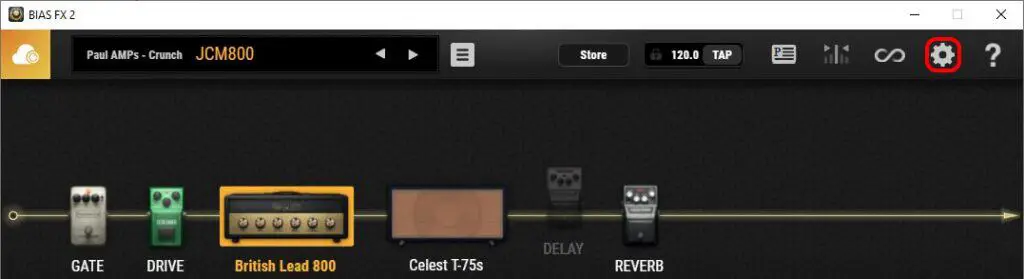
In BIAS FX 2, the settings button can be found in the top right of the user interface – the one that looks like a gear. It is highlighted below with a red border…
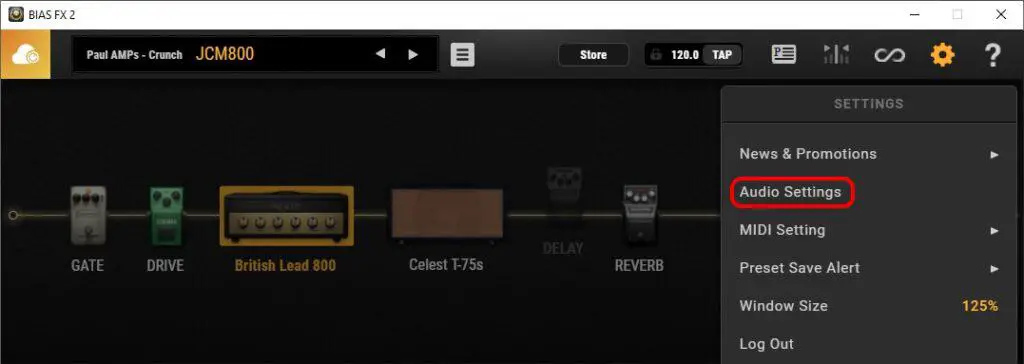
Once you have clicked on the settings button, a menu will launch with an Audio Settings option on it, highlighted with a red border below…
After clicking on the Audio Settings menu option, the following settings dialog launches…
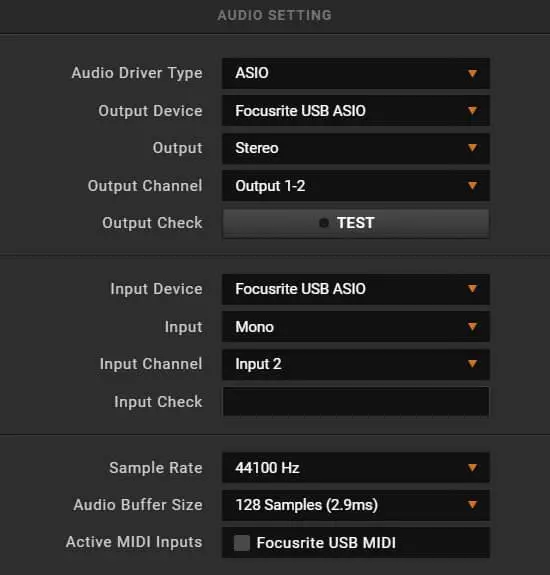
- Audio Driver Type – This should always be set to an ASIO driver.
- Output Device – This will depend on your audio interface. For mine, I selected the Focusrite USB ASIO device. If your device is listed multiple times one of which says ASIO in it, choose that one.
- Output – Usually you would want this to be Stereo for your headphones or speakers.
- Output channel – This will depend on your interface, and which outputs you have your speakers connected to. I have the left and right speakers connected to outputs 1 and 2.
- Input Device – Similar to output device; if there is one that says ASIO for your interface, pick that.
- Input – For a guitar, this will be mono
- Input Channel – Corresponds to which input on your interface your guitar is connected to. My guitar is connected to input 2, so that’s what I have set here. Always worth checking this if you get no sound…
- Sample Rate – How many samples a second the digital audio processing uses. The higher the rate, the better the sound quality. Experiment, and see what works for you. Even the lowest setting should give acceptable sound quality.
- Audio Buffer Size – Used by the digital audio processing algorithms. Essentially a trade-off between sound quality and latency; the lower the buffer size, the lower the latency; the higher the buffer size, the better the sound quality. Experiment, and see what works best for you. More details can be found in this amp sim latency article.
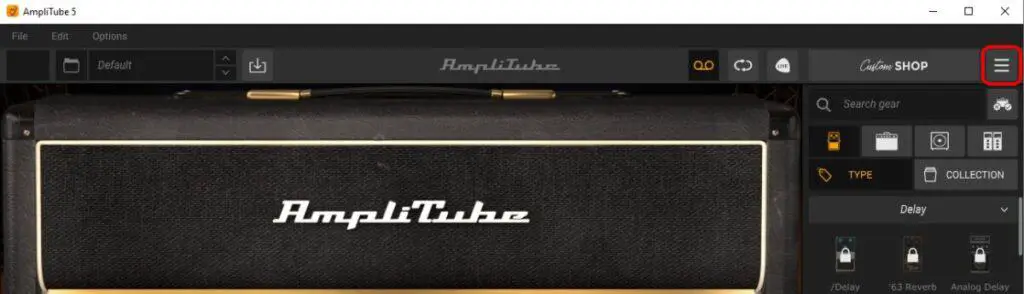
Amplitube 5 CS
In Amplitube 5, the settings button can be found in the top right of the user interface – the icon with the three horizontal lines (the “hamburger”). It is highlighted below with a red border…
After clicking on the Audio Settings menu option, the settings dialog pictured below launches. We are interested in the Audio/MIDI tab…
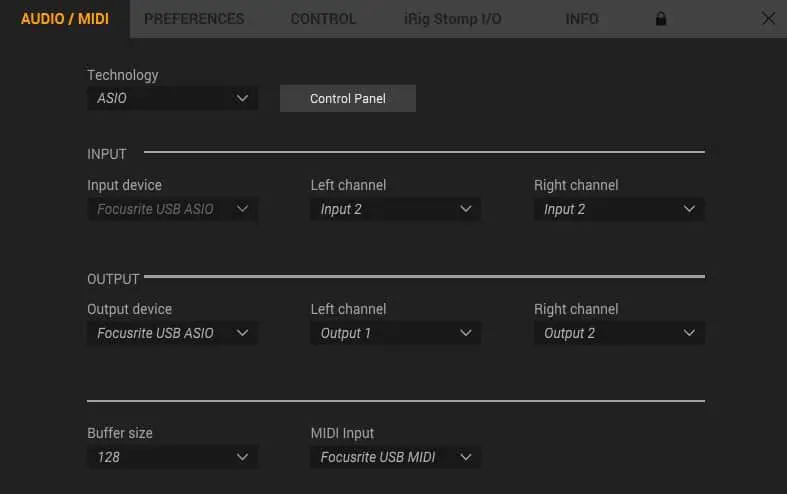
- Technology – This should always be set to an ASIO driver.
- Input Device – This will depend on your audio interface. The Focusrite USB ASIO device was the only option listed on my computer.
- Input Left/Right Channel – This is slightly confusing, in that a guitar being a mono instrument only has one channel. My guitar was plugged into input 2, so I selected input 2 for both of these.
- Output Device – Similar to input device; the same one device was listed.
- Output channel – This will depend on your interface, and which outputs you have your speakers connected to. I have the left and right speakers connected to outputs 1 and 2.
- Buffer Size – Used by the digital audio processing algorithms. Essentially a trade-off between sound quality and latency; the lower the buffer size, the lower the latency; the higher the buffer size, the better the sound quality. Experiment, and see what works best for you. More details can be found in this amp sim latency article.
You can ignore the MIDI Input option, unless you are using a MIDI controller to control Amplitube.
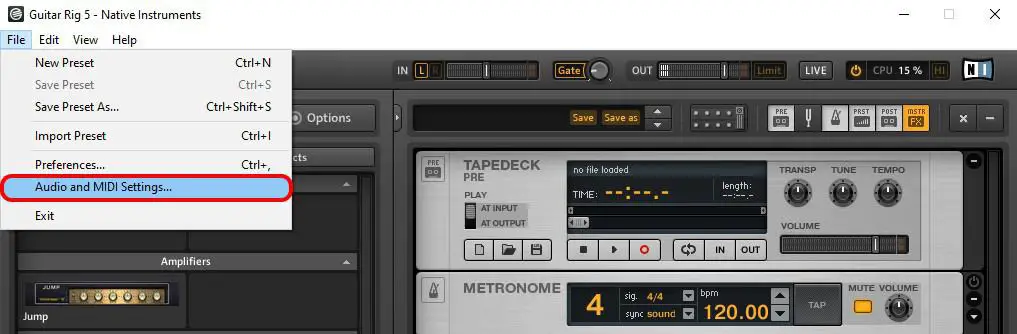
Guitar Rig 5 Factory Selection
In Guitar Rig 5, the Audio and MIDI Settings… menu option can be found under the File menu. It is highlighted below with a red border…
After clicking on the Audio and MIDI Settings… menu option, the settings dialog pictured below launches. We are interested in the Audio and Routing tabs…
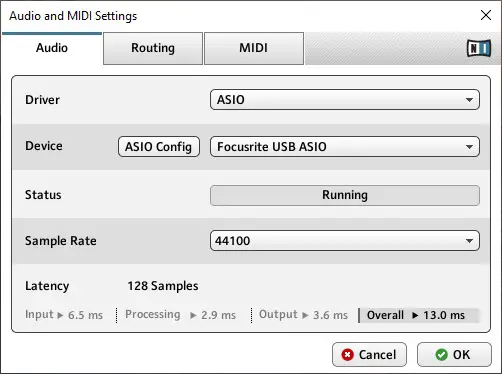
On the Audio tab…
- Driver – This should always be set to an ASIO driver.
- Device – This will depend on your audio interface. The Focusrite USB ASIO device was the only option listed on my computer.
- ASIO Config button – This launches a separate little dialog, allowing you control over the audio driver buffer size and sample rate. A low buffer size means lower latency; high buffer size gives better sound quality. A high sample rate gives better sound quality. Experiment, and see what works best for you. More details can be found in this amp sim latency article.
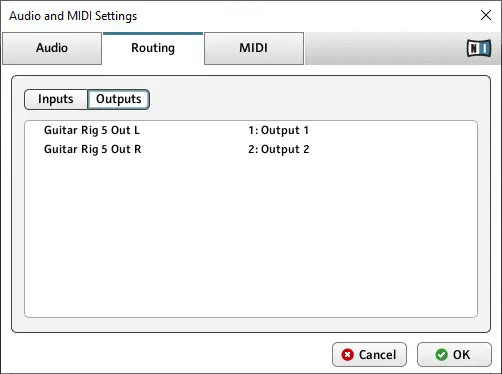
On the Routing tab…
- Inputs – Click on an item in the right column, and you can change it. For both L & R, you want to list the input your guitar is connected to. e.g. My guitar is connected to input 2 on my interface, so I list input 2 for both of these. If Sidechain L & R are listed, you can safely ignore these.
- Outputs – Similarly to the inputs, click on an item in the right column, and you can change it. These should be the audio interface outputs you have your speakers connected to. I have the left and right speakers connected to outputs 1 and 2.
3 Connect output device to audio interface output
If you haven’t already done so, then connect your output device to your audio interface.
This may be plugging a pair of headphones into the audio interface’s headphone socket with a standard jack-plug. Or it could be connecting a pair of powered monitor speakers to two of your audio interface outputs, with a pair of jack or XLR cables, one each for the left and right channels. Or it could be connecting two of the audio interface outputs to a Hi-Fi system amplifier, via jack-to-phono cables.
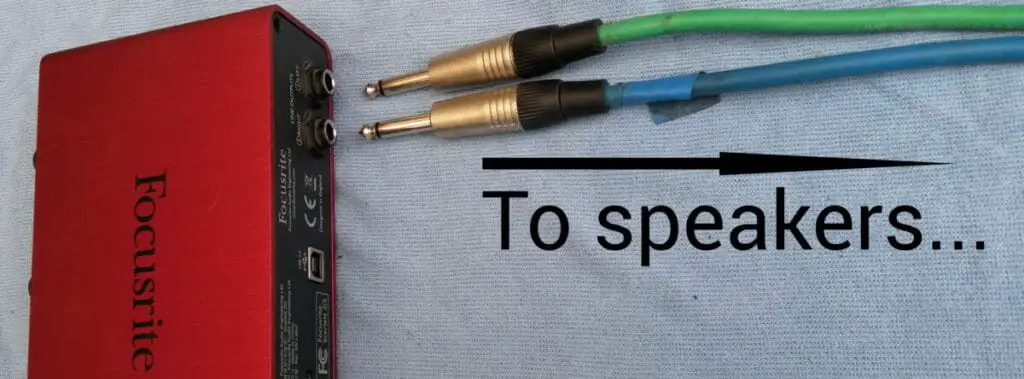
As you may have realized reading the above paragraph, the important thing here is that you use the right type of cable. You may need jack-to-XLR cables, or jack-to-jack cables, or jack-to-phono cables. There may even be a choice of cable you could use, if your interface or speakers has different types of outputs or inputs. There will almost always be a cable to use to connect the different types you need; check carefully which you need before you part with your cash.
4 Connect guitar to audio interface input
It’s now time to connect your guitar to the audio interface. Use the audio interface input you selected when you configured your amp sim in step 2. Use a standard ¼ inch jack cable to connect your guitar to the audio interface input, much like you would connect your guitar to a real amplifier.
Depending on your interface, you may need to configure the input to be an instrument level input suitable for the signal an electric guitar provides. This can be a button on the interface itself, or sometimes using a simple software utility supplied with your interface. Consult your audio interface instructions for details.
This video gives detailed instructions on connecting an electric guitar to a computer, if you need more information…
5 Set levels on the interface
Now your guitar is connected, it is important to get the optimum signal level from your guitar into the audio interface. Set it too low, and you are likely to get a weak sound with a lot of background noise. Set it too high (“clipping”), and you may experience unpleasant distortion and other unwanted audio artifacts.
There will be an indicator on your audio interface to show you when the input signal is clipping, something we want to avoid at all costs. We want the input signal to be as loud as possible, without it ever getting the clipping state. My Focusrite 6i6 shows clipping by the surround around the interface gain knob lighting up red, as shown below…
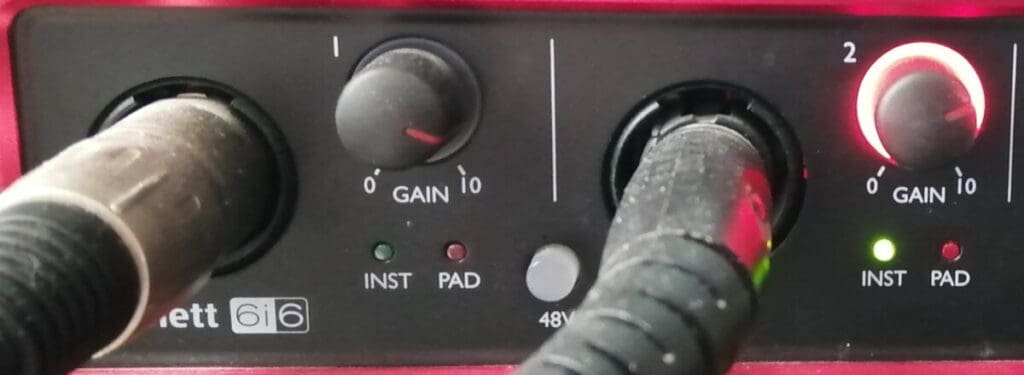
Yours may have an LED or other similar indicator.
To set the optimum input level, follow this process…
- Turn your guitar volume up full and the input gain knob on the interface right down.
- Slowly turn up the input gain on the interface as you play your guitar as hard as you can…
- …when the clipping indicator starts to light up, back off the input gain a little.
- Keep playing your guitar hard and make sure that clipping still doesn’t occur. If it doesn’t, then you can stop here – you have set the optimum input level.
- If clipping still occurs, back the input gain off a bit more.
- Keep playing and backing off the input gain until clipping doesn’t occur at all
If you have a guitar with very high output pickups, such as active humbuckers, you may need to make use of a “pad” feature in your interface. These reduce the input signal even further – they are specifically designed to work with guitars with high output pickups. If you can’t get your guitar to stop clipping the input, look for a pad setting and activate it. Depending on your interface, it may be on a button on the interface or in a software utility supplied with it.
6 Turn up the volume to listening/playing levels
It’s time to crank up the volume!
On your audio interface, gradually start turning up the output volume. This may be a main monitor volume dial for your speakers, or a separate headphones volume dial. Either way, gradually turn it up as you are playing until the volume reaches the level that you want to play at.
If you have powered speakers or are connecting to a separate amplifier like a hi-fi or a PA, you may need to adjust the volume there as well.
As a quick aside, there are guitar players who are more interested in using their computer as an effects processor than as an amp. If you are one of these guitarists then I have an article just for you – a beginner’s guide to running guitar effects on your computer. It will show you how to set your PC up as an effects unit, exactly what software and hardware you need, and help you avoid some common pitfalls.
7 Set the input level in the amp sim
You have already set the input level on your interface, but we also need to do it inside the amp sim itself.
There will be a dial or slider on the amp sim called input volume, input level or input gain. You need to set this while playing the guitar. The meter shown should be filled most of the way, without ever going into the red. If you see it going into the red, then turn down the input dial or slider.
Here are screenshots of the input level control and meters from BIAS FX 2, Amplitube 5 and Guitar Rig 5…

8 Choose or create a sound in your amp sim
At this point, you should have a working guitar amplifier on your computer! Although at the moment, you are probably playing through the default sound on your amp sim, or whichever sound you last used on it.
This may or may not be what you want; if it is, then you can skip the rest of this section, and start playing your guitar to your heart’s content!
If you wish to change the sound, then in this section you will find a short guide to quickly finding a sound in BIAS FX 2, Amplitube 5 and Guitar Rig 5. These are not intended to be full tutorials on how to use these amp sims, but should be enough to give you a quick start into selecting and changing sounds.
Some people complain that their amp sims always sound bad, whatever they do to it. If this applies to you check out my “Do your amp sims sound bad?” article, which will give you tips and tricks to help you eliminate the bad from your amp sims and help you get a sound you are pleased with.
Examples
BIAS FX 2
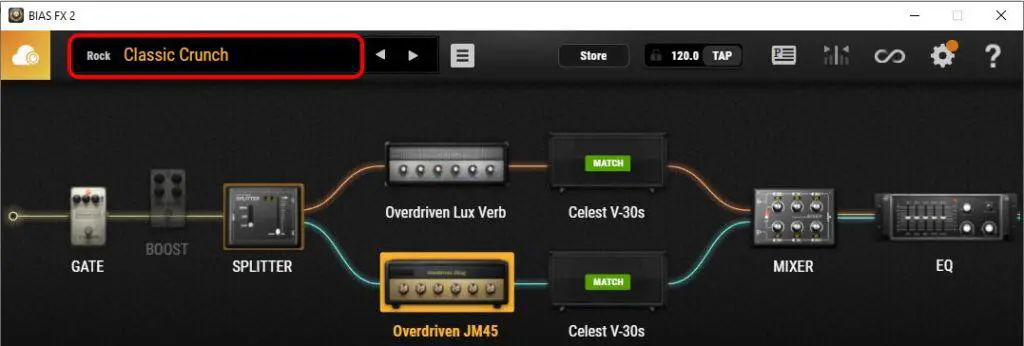
The quickest way to find a new sound in BIAS FX 2 is to pick a different preset. Presets are arranged in banks. You can quickly switch between presets in the current bank by clicking the left and right arrows, as shown highlighted with red borders below…

To see all the banks and the presets located in them, click the “Preset Management” bar at the top of the screen, highlighted with the red border below…
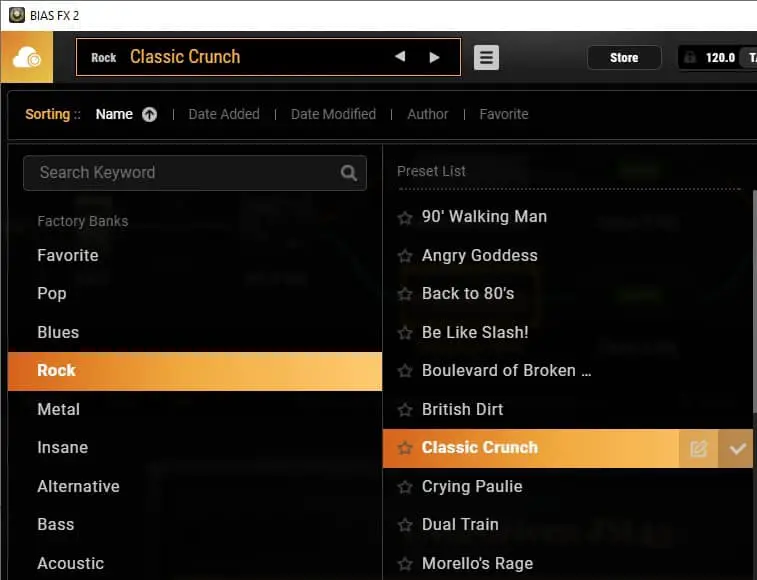
This will give you the Preset Management screen. Hover your mouse pointer above the name of a bank on the left-hand side. You will then see a list of all the presets within that bank. To load a preset, double click it in the Preset List. This will load the new sound, and switch back to the amp view.
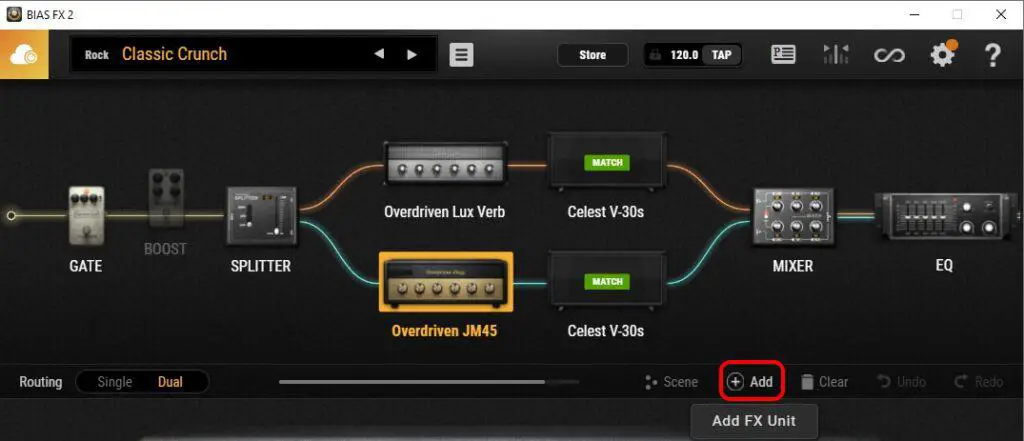
To change any component in the preset, in the amp view right-click it and select Replace. You can also delete effects pedals by right-clicking and selecting delete. To add new FX components click the Add button in the middle strip (highlighted with the red border below), select a component, then drag it into where you want it to go in the signal chain in the top pane.
Amplitube 5 CS
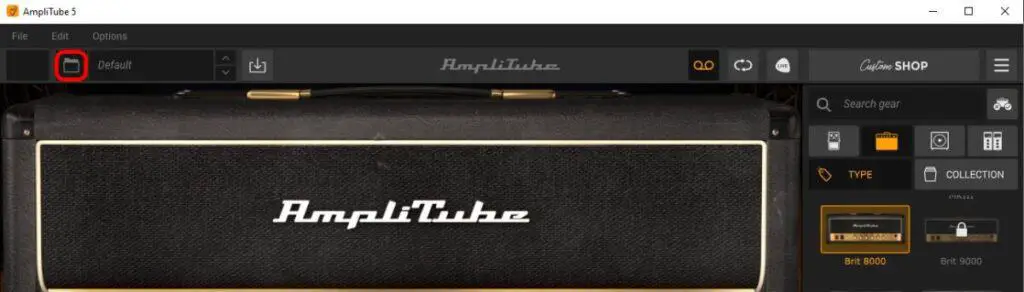
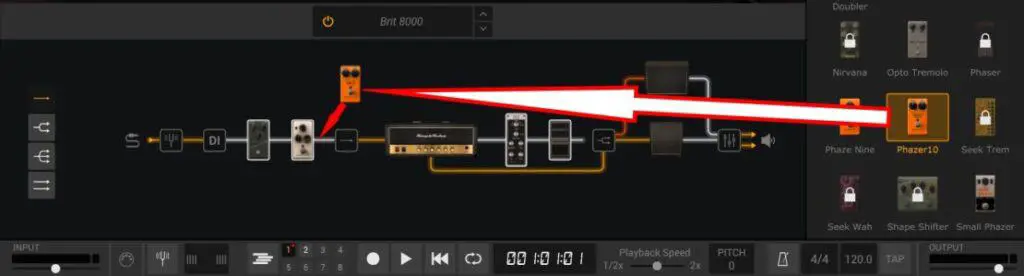
When Amplitube 5 CS launches for the first time, it will have the Default preset loaded. This contains the Brit 8000, which is a sort of crunchy overdriven Marshall-style amp model. This is a great sound, but if it’s not what you want you can change the sound by picking a different preset. The best way to do this with the free Amplitube 5 CS is to click the Preset Browser button in the top left, highlighted with the red border below. You can click it again to return to the main amp/pedals screen.
This will give you a list of preset collections on the left-hand side. The potential problem is that in the free version, a lot of the presets won’t be available to us as you have to pay for some of the models they contain. This is not really an issue, as if you select Amplitube 5 CS on the left-hand side (highlighted with a red border), this will limit you to the available presets in the free version. Click a preset in the right-hand list to load it. You can now also switch between presets by using the up and down arrow buttons, highlighted in red.

You can also add effects pedal models by dragging them from the right-hand side, into where you want them in the signal chain in the lower half of the screen. Click on any amp or pedal to see a bigger view of it in the top half of the screen.
Guitar Rig 5 Factory Selection
The free Guitar Rig 5 Factory Selection, like Amplitube CS, contains lots of presets that are available only in the paid version. You can limit the shown presets to just the ones containing free components by clicking Products, then Factory Selection in the top left hand Presets pane. See highlighted with red borders below…
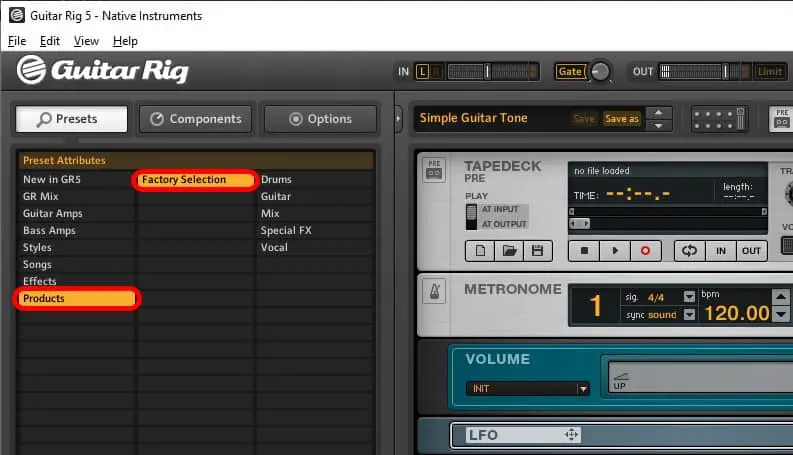
This will then limit the presets shown in the bottom left hand pane. To switch to a new preset, double click one of these and it will be loaded into the main right hand pane.
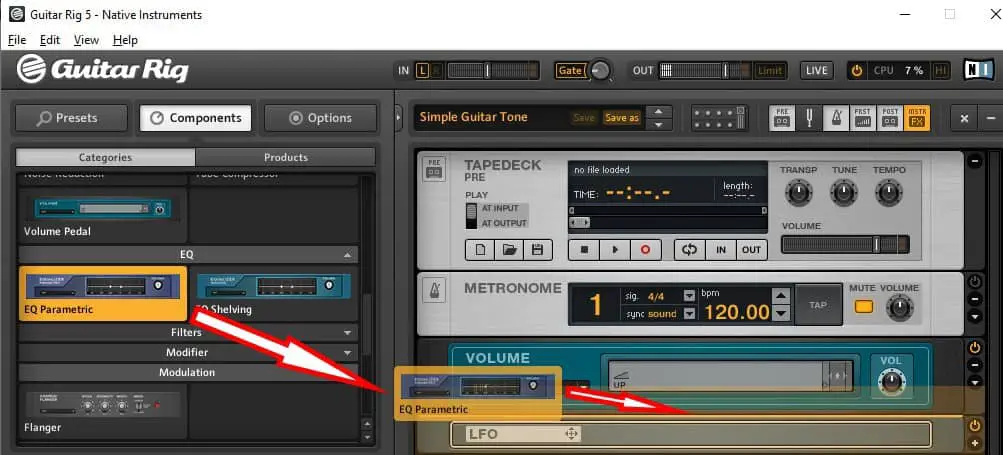
To add components, select Components from the top left, then either double click the component or drag it into the right hand pane. See highlighted in red below…
Why use your PC as a guitar amp?
There are some fantastic guitar amps available for not very much money, such as the excellent Boss Katana (Amazon.com affiliate link) – one of the best-sounding, best value guitar amps available today. And that’s not even considering the bargains you can pick up on the used market. So why on earth would anyone want to use their PC as a guitar amp?
Amp sims are really incorrectly named – they should be called rig sims or something similar. That’s because amp sims don’t necessarily just simulate amps; they simulate effects pedals and speaker cabinets as well. If you add up all the amp, pedal and cab models inside one of the amp sims used in this article and then compare it with what it would cost to buy the hardware equivalent, the amp sim is hugely cheaper.
For example, let’s take BIAS FX 2 Standard Edition. This contains…
- 30 amp models
- 43 effects models
Let’s assume that on average a real hardware amp is $400, and a pedal is $50 (both very conservative estimates), then this represents an equivalent cost of (30 x $400) + (43 x $50) = $14,150. BIAS FX 2 Standard costs $99, so from this point of view represents ridiculously good value for money. Similar calculations can be done for Amplitube and Guitar Rig, and the same conclusion can be reached. If you want the cheapest way to access lots of different sounds through loads of different gear (albeit “software” gear), then an amp sim is by far the best option. This of course assumes you already have a PC.
The other main benefit of amp sims is that of portability. Compare the size of a laptop and an audio interface, to a big heavy tube head and 4×12 cabinet, along with a potentially huge, heavy pedal board. It is much easier to transport the laptop to a rehearsal or gig, and plug it into the P.A. It will probably save you some back pain, unless you’re lucky enough to have your own personal crew of roadies.
For even finer control over the sound, you should learn how to properly EQ your amp sim. I have a complete guide to EQ’ing your amp sim, which will show you exactly how to use this powerful tool to get the sound that you want.
Uses for a PC based guitar amp
There are several applications for an PC based guitar amp where it really excels. Here’s some examples of situations ideally suited to a PC turned into a guitar amp…
- Home use instead of a regular guitar amp – If you already have a PC and an audio interface, installing a free amp sim or even a paid one can be a lot cheaper than buying a regular guitar amp. The sound quality you can get from amp sims is much improved from a few years ago, and while you will always get some guitarists who refuse to play through anything other than vintage tube amps, amp sims are perfect for home use.
- Late night silent practice – Plugging headphones into your audio interface connected to your computer running an amp sim, is a great way to not annoy the neighbors/spouse/partner/kids trying to get to sleep, etc when you want to rock out late at night. You can do this with some regular amps as well, but they don’t all have headphones sockets.
- Recording – If I’m ever asked, I always recommend using amp sims for recording in a home studio. It’s just a lot easier than mic’ing up guitar amps, and a lot quieter too. See my complete guide to recording with amp sims for details.
- Rehearsal – As a laptop and an audio interface is a lot more portable than a hulking great guitar amp, if you can plug your audio interface output into a P.A., then this is a great alternative for use at a band rehearsal.
- Live use – If you have a gig or a show to play and space is limited, the laptop/audio interface combination can be a great alternative to a regular amp. Plug the audio interface output into a line-level input on the mixing desk, and you should be able to get a great sound through the P.A. It will also give the sound engineer full control over the guitar levels, which they will love you very much for.
Disadvantages of a PC based guitar amp
Great as a guitar amp on a PC can be, it’s not perfect. There are several drawbacks associated with the “PC amp”, and we’ll take a look at those here…
- Computers crash – One thing is fairly certain; your traditional tube amp isn’t going to crash, something you can’t say about your PC. Any time you use an amp sim on a PC, you risk a blue screen of death appearing just before the climax of that stunning guitar solo you’re playing. This isn’t as much of a problem as it used to be (PCs are pretty reliable these days), but it is adding yet another thing that can go wrong into the mix.
- Some guitarists don’t like the sound – Some guitarists just will never like the sound of a digitally modeled amp. That’s fair enough – we all have our own personal preferences. For me, the sound coming out of amp sims is so close to real amps these days that I am very happy to play through them. Again, this is less of a problem than it used to be as the amp sim technology has improved, and I’m sure will only continue to improve.
- Doesn’t behave like a real amp – There are certain behaviors of a real amp that a PC based amp will struggle to replicate. The most obvious one that springs to mind is generating feedback; with a real amp get the pickups close to the speaker and you can get lovely musical melodic feedback. I’m not sure how you would do this with a PC plugged into a P.A. – there might be a way, but it will be a lot more difficult.
If you are using amp sims in a mix of a song, a common requirement is to make your guitars sound as big as possible without overpowering anything else. Check out my “11 tips to make guitars sound bigger in a mix” article for tips and tricks on getting the huge guitar sound in your mix.
Alternatives to a PC based guitar amp
Selecting an alternative to a PC-based guitar amp will depend on what you intend to use it for.
If you are after lots of different sounds along with a headphone socket for silent practice, then a modeling amp such as the Boss Katana would be an ideal alternative.
I have a Boss Katana in my home studio; I use it as my main practice amp and for small gigs. I highly recommend it as being probably the best affordable guitar amp on the market. You can get the Boss Katana 50 MkII from Amazon at a competitive price.
If the extreme portability of the PC amp is your most important requirement, then you can get amp sims that run on your smartphone. Amplitube and BIAS FX both have versions that will run on phones. There are options available for both iOS and Android, although the iOS options are more numerous and generally work better, while Android options are catching up. This six best guitar tone apps article on guitar.com gives you an introduction into the world of phone-based amps, and how you might connect your guitar to your phone.
Here is some of my favorite home studio gear…
Thanks for reading this article. I hope you found it helpful in your home music-making activities. Here are a few of the tools that I personally use in my home studio. These are affiliate links, so if you decide to use any of them I’ll earn a small commission.
Audio interface: My personal choice for audio interfaces are the Focusrite Scarlett series. I have been using these for years, and they have always given me great-sounding recordings. For a very reasonable price from Amazon you can buy the excellent Focusrite Scarlett 4i4, or if you don’t need MIDI capability the Focusrite Solo is a great choice.
Amp sim: Guitar amplifier simulator software has come on leaps and bounds in recent years, such that I record all my electric guitar parts using amp sims these days. One of the very best is the incredible Amplitube from IK Multimedia, which I have used on many of my songs.
Headphones for recording: My favorite headphones for recording are the Sony MDR-7506s, which I use for monitoring during all my recording sessions. They can also be found in many pro recording studios. Get the Sony MDR-7506 headphones from Amazon here.
General-purpose microphone: You can’t go wrong with a good ol’ Shure SM-57, one of the most versatile and ubiquitous microphones around. I’ve been using one in my home studio for as long as I can remember. Amazon offers the Shure SM-57 for a very competitive price.
To see all of my most up-to-date recommendations, check out this resource I made for you!
