How to run VST plugins standalone – the complete guide
DISCLOSURE: This post contains affiliate links. If you buy through these links, I may earn a small commission.
If you want to alter the sound of something you have recorded in a DAW, using VST plugins is a great way to do it. From EQ to compression, from guitar to keyboard sounds, there’s a plugin for just about anything you can think of. But what if you wanted to use those plugins outside your DAW, to just play your instrument through your computer using a plugin? Can you run VST plugins in a “standalone” mode?
There are three ways to run VST plugins standalone. Some have a built-in standalone mode available. You can also use a VST Host app designed for running VST plugins on their own. Finally, you can use a DAW to run just your plugin, without using it for recording or anything else.
This article shows you exactly how you can run any VST plugin on its own. This doesn’t just apply to plugins you have bought or downloaded individually. It applies to any plugin on your computer, including those supplied with your DAW. Read on for the methods and full instructions for using your VST plugins in standalone mode.
If you are interested in checking out the best recording gear such as audio interfaces, studio monitor speakers, microphones, etc., you can find them at Amazon by clicking here.
What is a VST plugin?
Before we start, let’s briefly make sure we know what we’re talking about when we refer to a VST plugin.
A plugin in this context is a software application that can be used inside another application, in this case inside your DAW (Digital Audio Workstation) such as Cubase or Reaper. It provides extra functionality that the DAW does not provide on its own. Typically this will be to apply some sort of effect, e.g. reverb, compression, EQ, delay, etc. Or will provide instrument sounds that can be used by a keyboard for example.
As a quick aside, a DAW is a software application designed for recording, mixing and mastering music such as Reaper, Cubase, Pro-Tools, Logic Pro, etc. If you are new to DAWs, I recommend you read these two articles which will be of great help to you in getting started…
OK, back to VST plugins. VST is a standard for plugins created by the German music tech company Steinberg.
There are actually two types of VST plugins – VST and VSTi plugins. VST plugins provide effects or alter the recorded sound, and VSTi plugins provide instrument sounds. For more information, I highly recommend checking out my article on the difference between VST and VSTi. You’ll learn in detail about the VST standard and the different types and their uses.
Typically when you want to run a VST plugin standalone, it is because you want to play either a guitar or a keyboard through the plugin. You can then use the effects and sounds that they provide, even though you are not recording in a DAW.
The three ways to run VST plugins standalone
As already mentioned, the three methods of running a VST plugin standalone are…
- Use a plugin’s built-in standalone feature. Some VST plugins will provide a standalone application to launch when you install them, which runs the plugin on its own.
- Use a VST Host application. These are software programs that are specifically designed to let you run VST plugins without having to use a DAW
- Use a DAW, but use it just for running the plugin (cheat mode!). In this method you do use a DAW, but not for anything other than running the plugin you want to use.
Method 1 is the easiest, but is only available for a select few plugins. Methods 2 and 3 should work for any VST plugin.
Let’s take each of the three methods in turn and walk through exactly how to use each one…
Using a VST plugin’s built-in standalone mode
VST plugins that contain a built-in standalone mode tend to be the ones built by big music software companies. They are often paid plugins, but a lot of them also have free versions. This is the easiest method to use to run VST plugins standalone, but obviously is only possible if your plugin has a standalone mode.
When you download and run a plugin’s installer, it will be installed in two ways; one for your DAW to use it as a plugin and another to add a shortcut to a software program that can be run on its own. You launch the plugin in standalone mode by clicking on that shortcut in exactly the same way as you would run any other program on your computer.
Once you have launched the program, you will typically connect your guitar or keyboard to your audio interface. You then tell the plugin which input on your audio interface you are using, and you should be able to hear your instrument being played through the plugin. You will have access to all its features and be able to change your instrument’s sound using the plugin.
This way of working is great for practice, or just playing your instrument. It’s a great way to utilize your VST plugin’s abilities to affect your sound. Perhaps the most common use is to play either a guitar or keyboard through your computer, and utilize your VST plugin’s abilities to affect your sound.
It could also save you some money. If for example, you run a guitar amp sim plugin you could use that instead of a real amp, eliminating the need to buy a guitar amp at all. I have an entire article on using your PC as a guitar amp, which I highly recommend if you are thinking of doing this.
You could also use a MIDI controller keyboard with no sounds of its own, and connect it to your computer running a ROMpler or sound module type VST plugin. This will give you access to all the plugin’s sounds, effectively turning your MIDI keyboard into a fully featured synth.
Here are a few examples of VST plugins with standalone mode, that I have personally used…
- Amplitube (guitar amp sim)
- BIAS FX (guitar amp sim)
- Guitar Rig (guitar amp sim)
- Sampletank (keyboard ROMpler)
Whichever plugin you are playing through, you will need a good audio interface to connect your instrument to your computer and hear the output. I have been using Focusrite Scarlett interfaces for years, and they have always sounded great, have proven very reliable and are built like tanks. You can pick up the Focusrite Scarlett Solo (affiliate link) for a very competitive price at Amazon.
Let’s work through a couple of examples of using VST plugins in their standalone mode, one for guitar players and one for keyboard players…
Using Amplitube (guitar amp sim) in standalone mode
Go here to download Amplitube 5 CS (free). You’ll have to download and install the IK Multimedia Product Manager first, then create an account if you don’t have one. This may seem like a hassle, but trust me it’s worth it to get an amp sim of the quality of Amplitube for free.
Go to “Manage My Products”, select Amplitube 5 and click “Install”. This will start downloading Amplitube 5, and install it once the download has finished. This can take a while (it’s several gigabytes worth). You will also have to click the “Authorize” button for Amplitube 5 in the Product Manager.
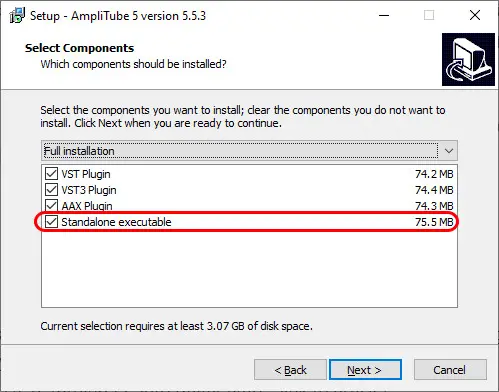
Follow the installer’s prompts, and when the “Select Components” dialog appears, make sure the “Standalone executable” option is checked. This will ensure that the standalone mode of Amplitube will be installed, not just the plugin. It should automatically pick up the location for VST plugins from your system.
Once Amplitube is installed, use the shortcut on the start menu to launch the application. When it has launched, click the burger settings menu in the top right-hand corner and you should see a screen that looks like this…
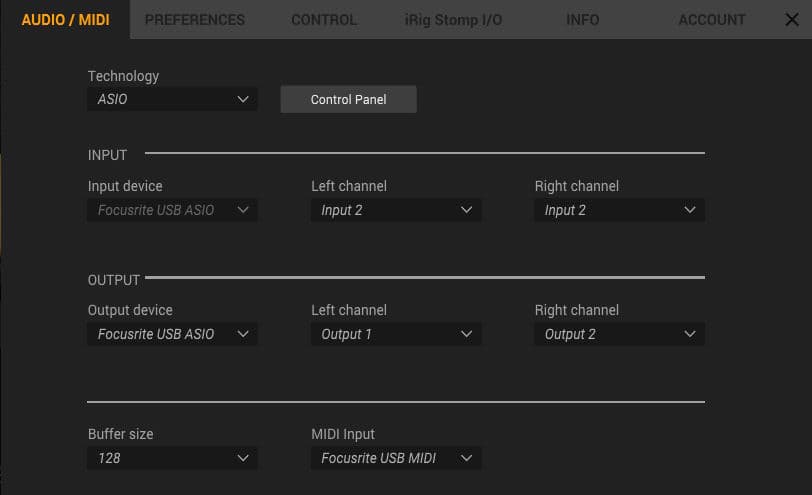
Make sure that you have an ASIO driver selected. In the input section, make sure your audio interface is selected, and for the channels select the input on your interface that your guitar is connected to. Select your audio interface in the output section, and the outputs that your speakers and/or headphones are connected to.
If you are uncertain how to connect your guitar to your computer or audio interface, take a look at my “how to connect a guitar to a PC” step-by-step guide. It will take you through the process of connecting your guitar, assuming no prior knowledge whatsoever.
You should now be able to play your guitar and hear it coming through Amplitube. All its amps and effects models are available to use; even the free version has 42 different equipment models in it so you should be good to go.
Using Sampletank (ROMpler for keyboards) in standalone mode
Go here to download Sampletank 4 Custom Shop for free. Like with Amplitube, you’ll have to download and install the IK Multimedia Product Manager first, then create an account if you don’t have one.
Go to “Manage My Products”, scroll down to Sampletank 4 and click “Install”. This will start downloading Sampletank, and install it once the download has finished. While this is downloading (it can take a while), click the “Authorize” button for Sampletank 4 in the Product Manager.
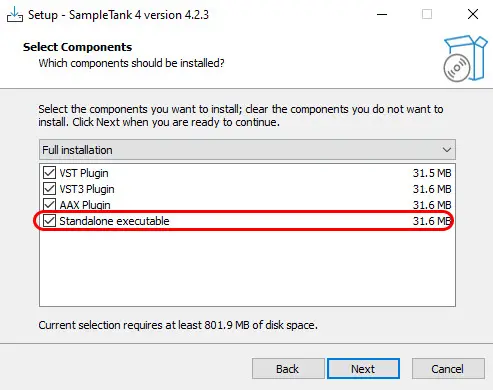
Follow the installer’s prompts, and when the “Select Components” dialog appears, make sure the “Standalone executable” option is checked. This will ensure that the standalone mode of Sampletank will be installed, not just the plugin. It should automatically pick up the location for VST plugins from your system.
When Sampletank is installed, launch it from the start menu. Click the “gear” settings menu in the bottom right (just above the piano keyboard) and you should see a screen that looks like this…
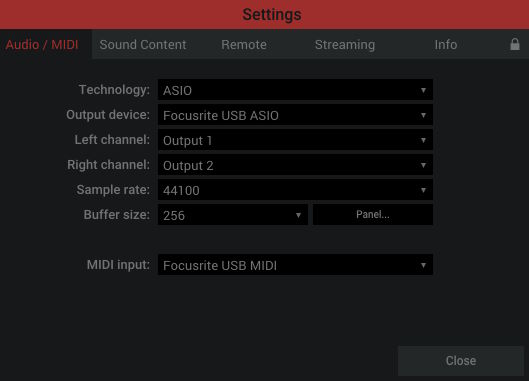
For “Technology, select an ASIO driver. In the “Output device” section, select your audio interface, and the corresponding audio interface outputs for the left and right channels. Select your MIDI input as either the MIDI input on your audio interface, or the separate MIDI interface your keyboard is plugged into.
If you’re not sure how to connect your MIDI keyboard to your computer or audio/MIDI interface, I highly recommend my “how to connect a synth to a computer” article. You’ll learn exactly how to connect your keyboard to your computer, the different methods available and how to avoid common pitfalls. My “Does a MIDI keyboard need an audio interface?” article may also be useful.
You can now play your MIDI keyboard and hear it coming through Sampletank. Even the free version has 50 different sounds you can use, including pianos, strings, organs and synths.
To be able to hear the sounds from your plugins, I highly recommend investing in a decent pair of headphones. You don’t need to spend a lot to get a great pair. I have used Sony MDR-7506s (affiliate link) in my home studio for many years, and they are also found in many pro studios around the world. They sound great, are very durable, and are available at Amazon for a great price.
Using VST Host software to run VST plugins standalone
There are several applications available that are much simpler than full DAWs, whose sole purpose is to let you run VST plugins in them. They “host” the plugins, therefore they are called VST Host applications. Using one of these programs is a great way to run plugins standalone that do not have their own built-in standalone mode. There are both free and paid options.
Here is a selection of VST Host applications available…
There are many more available – just search online for “VST Host”.
You would typically install the VST Host app the same way you install any other application. Once you have launched the app, you adjust the settings to your system, e.g. select the audio driver, audio interface inputs and outputs, MIDI inputs. You then point it to the plugin you want to host, and you should be able to use the features of that plugin including playing an instrument through it.
Here’s a walkthrough of using a VSTHost to run a plugin…
Using Cantabile Lite to host a VST plugin standalone
I have chosen Cantabile Lite to demonstrate using a VST host application as I have personally used it as a VST host. Go to the website, and download the setup file. Double-click to install Cantabile Lite the same way you would install any other program.
You will be prompted to enter your email address to get a license key for the free version – check your email for it; it only took a minute or so to arrive when I installed it. You may be prompted to choose between the 64-bit and 32-bit versions to run – choose the 64-bit version if you are unsure.
Cantabile will attempt to detect the folders on your computer where your VST plugins are installed. This is a bit hit-and-miss; on my computer it detected some of the folders, but not all of them where I have VST plugins. This isn’t a big problem, as you can just tell it where the plugin is that you want to use.
First, configure your audio interface within Cantabile. Go to Tools->Options, and select Audio Engine on the left-hand side.
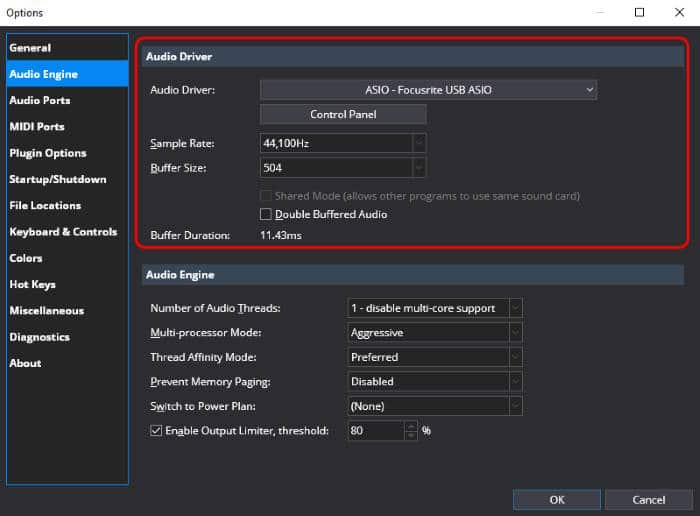
Select an ASIO driver for the Audio Driver. Set the sample rate and buffer size to a value that gives you a reasonable buffer duration. You will have to experiment with this a little to find the optimum settings for your own system.
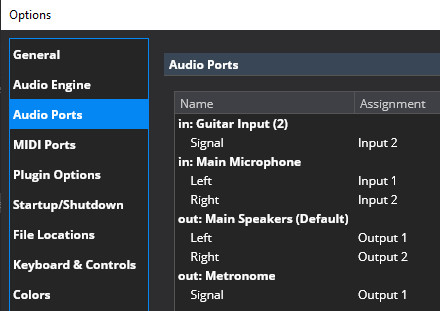
In the same dialog, select Audio Ports on the left-hand side. Select the input that your instrument is connected to, and the outputs that your speakers/headphones are connected to. You can change the name of these if you want by double-clicking on them or clicking on the Edit button when selected.
OK the settings dialog, and click the big “+” sign in the main screen. Select “Plugin…”.
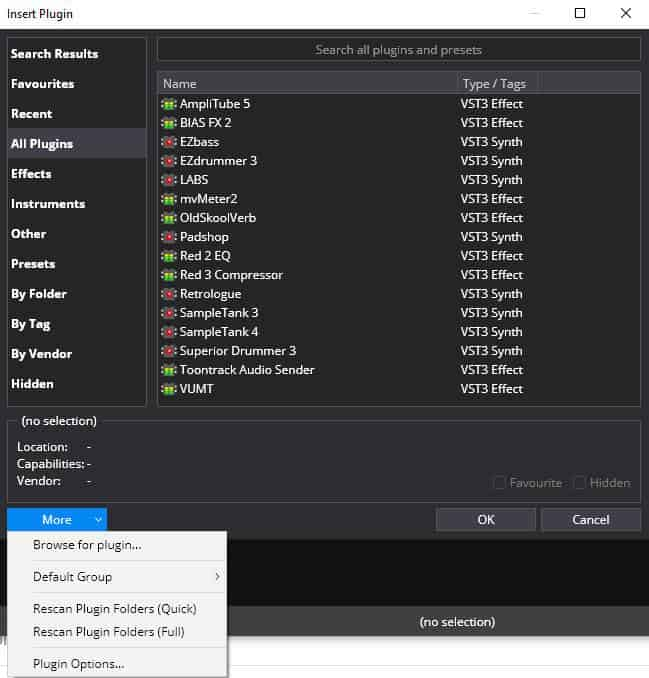
In the Insert Plugin dialog, double click a plugin in the list to load it into Cantabile Lite. If you don’t see your plugin listed, go to the “More” button on the bottom left, select “Browse for plugin…” and navigate to the location on your computer where your plugin lives.
You’ll now see a block in the main window representing your plugin. It should have a line from it going to your output on the right-hand side of the screen. You need to connect an input to it. Do this by holding down the left mouse button on the input on the left, and dragging it to the “Audio In” block on the top of the plugin block.
You should now be all set up, and be able to play your instrument through the plugin. To launch the plugin’s own window, simply double-click on its block in the main Cantabile Lite screen.
This is how mine looked when I set it up to run the OldSkoolVerb plugin…

You can also chain plugins, so you could add another one and have the output of the first plugin going into the input of the first one.
Pretty much any VST plugin should work in Cantabile Lite. The only thing to watch out for is that there are a few commercial plugins that require some sort of licensing. You will have to make sure that you have set up whatever licensing they need for them to work in Cantabile Lite.
Using a DAW just to run a plugin standalone
Now I know what you’re thinking…
“Wait a minute…didn’t you say using a plugin standalone is using it without a DAW? Now you’re saying use a DAW? That’s cheating!”
Well, yes I guess technically it is cheating. But the important point here is that you want to run the plugin on its own and be able to use its features. And using a DAW is one way to achieve that, so I make no apologies for including this “cheating” method here.
The key point is that we will use the DAW to just run the plugin and nothing else. This is a little bit of a using-a-hammer-to-crack-a-nut type situation but if it works, it works.
Don’t discount this method. Using a DAW such as Reaper which is famed for being very efficient and lightweight is actually a very practical way of running a plugin on its own. And if you already have a DAW on your system that you are familiar with, it avoids having to learn any new software.
There are several free DAWs available if you don’t have one on your machine to use…
I would advise creating a new project in your DAW. Add one track to it – this will be the only track in the project. Add the plugin to the track, and you should be good to go.
Here’s a walkthrough of using Reaper to just host a plugin. The process for any DAW will be very similar.
Using Reaper just to run a VST plugin standalone
My DAW of choice is Reaper and has been for many years. I highly recommend it if you are looking for your first DAW – it is light on system resources and relatively easy to learn with many tutorials freely available. It is ideal for running a single plugin.
Download and install Reaper in the usual manner if you need to. The first time you run Reaper, you will have to configure the audio settings for your system. Go to Options->Preferences… or press Ctrl+P
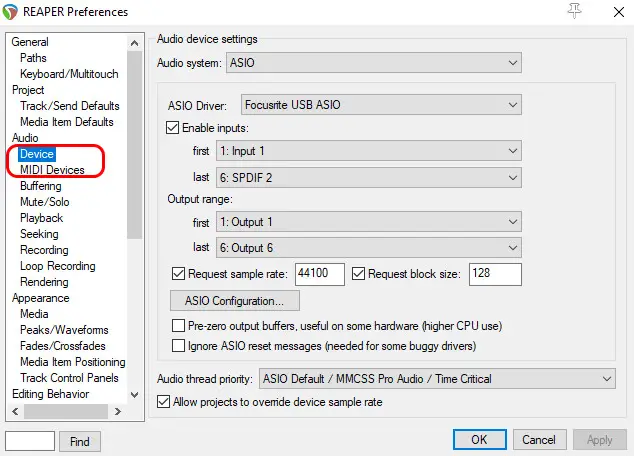
Select ASIO for the audio system, and your audio interface driver for ASIO driver. You can select which inputs and outputs to enable – make sure you enable the input that your instrument is plugged into, and the output that your speakers or headphones are connected to.
On the MIDI Devices page, you can similarly enable the MIDI input your keyboard is connected to.
Create a track to host your plugin. You can do this by going to Track->Insert New Track, pressing Ctrl+T, or double-clicking anywhere in the Track Control Panel.
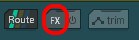
To add your plugin to your track, click the FX button on the track…
Select your plugin from the big list in the dialog.
There are then three things to do to ensure you will be able to hear your instrument playing through Reaper…
Enable the track for recording (even though we are not going to record). You do this by clicking the little red button on the left-hand side of the track until it turns bright red.

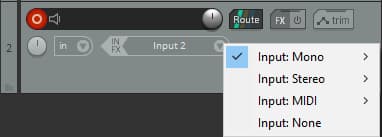
You will then see the monitoring enable button and the input selector appear. Click the monitoring enable button (the little speaker icon to the right of the record enable button) until it goes solid.

Finally, use the input selector (where it says IN FX) to select the required input. This will correspond to the input on your audio interface that you have your instrument plugged into.
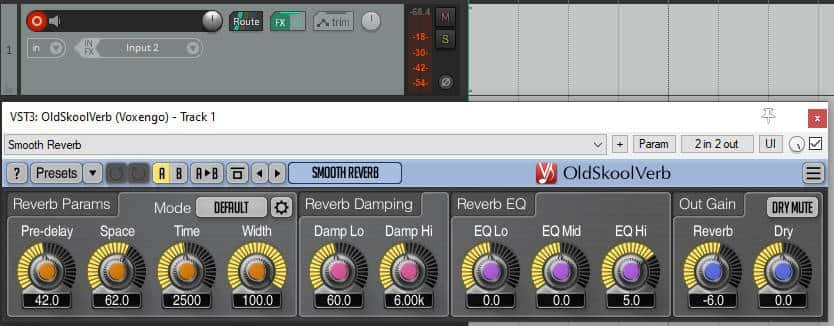
You should now be all set up, and be able to hear your instrument being played through your plugin. Here’s a screenshot of Reaper running the OldSkoolVerb plugin…
I suggest you now save your project, so the next time you want to run the plugin inside Reaper you don’t have to go through all the setup again. Just open the required project, and you can start playing!
Which VST plugins can you run standalone?
Obviously, to use a plugin’s own standalone mode that plugin has to have the feature built-in. There are not that many plugins that have their own standalone mode – they tend to be ones made by big music technology companies. They are usually plugins designed to play an instrument through, such as amp sims or ROMplers.
For use inside a VST host or DAW, pretty much any VST plugin should work. If you can find it on your hard drive, you should be able to use it. This includes all the stock plugins included with your DAW. The only potential issue you might have is licensing, but as long as the plugin you are trying to run is correctly licensed it should work fine.
Here is some of my favorite home studio gear…
Thanks for reading this article. I hope you found it helpful in your home music-making activities. Here are a few of the tools that I personally use in my home studio. These are affiliate links, so if you decide to use any of them I’ll earn a small commission.
Audio interface: My personal choice for audio interfaces are the Focusrite Scarlett series. I have been using these for years, and they have always given me great-sounding recordings. For a very reasonable price from Amazon you can buy the excellent Focusrite Scarlett 4i4, or if you don’t need MIDI capability the Focusrite Solo is a great choice.
Amp sim: Guitar amplifier simulator software has come on leaps and bounds in recent years, such that I record all my electric guitar parts using amp sims these days. One of the very best is the incredible Amplitube from IK Multimedia, which I have used on many of my songs.
Headphones for recording: My favorite headphones for recording are the Sony MDR-7506s, which I use for monitoring during all my recording sessions. They can also be found in many pro recording studios. Get the Sony MDR-7506 headphones from Amazon here.
General-purpose microphone: You can’t go wrong with a good ol’ Shure SM-57, one of the most versatile and ubiquitous microphones around. I’ve been using one in my home studio for as long as I can remember. Amazon offers the Shure SM-57 for a very competitive price.
To see all of my most up-to-date recommendations, check out this resource I made for you!