Reaper audio device settings – a guide for the confused!
DISCLOSURE: This post contains affiliate links. If you buy through these links, I may earn a small commission.
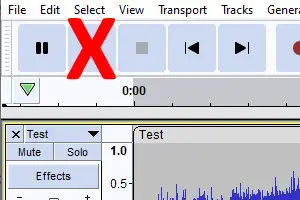
Reaper is a great DAW (Digital Audio Workstation), suitable for beginners and experienced music producers alike. But to get the best out of it, it needs to be configured correctly. In particular, the audio device settings can make a huge difference in performance and sound quality.
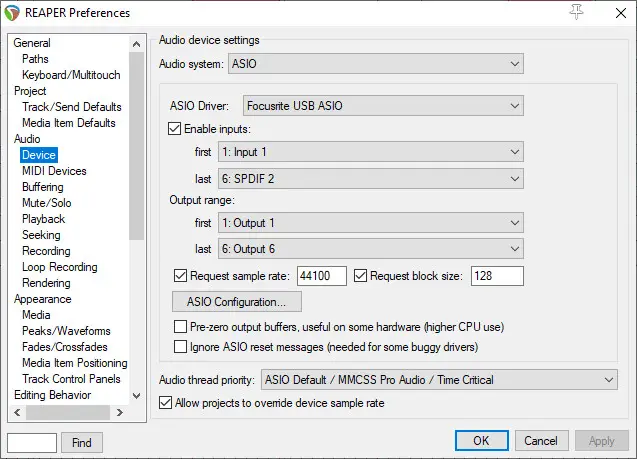
For excellent performance with Reaper’s audio device settings on Windows, set the audio system to ASIO. Select an ASIO driver, and its configuration to a 44.1kHz sample rate and a buffer size of 128. Select the inputs and outputs you want to be enabled. Set the audio thread priority to ASIO default.
It’s important to get the audio device settings right for your setup before you begin working in Reaper. Doing this will minimize latency, make sure the inputs & outputs are enabled and ensure you can actually hear any sound at all! Read on to discover exactly how you should set your audio device settings in Reaper for your hardware and software.
If you are interested in checking out the best recording gear such as audio interfaces, studio monitor speakers, microphones, etc., you can find them at Amazon by clicking here.

Reaper’s audio device settings pane
All the audio device configuration in Reaper is done in the Audio device settings pane of the Preferences dialog. To launch it you can…
- Select Options->Preferences, then on the left-hand side select Audio, Device
- Press Ctrl+P (Cmd+P on a Mac), then on the left-hand side select Audio, Device
Hover over any option, and you will see a hint about what it does at the bottom of the dialog.
We configure the audio device settings to give us the best compromise between performance and sound quality. There are other ways to improve Reaper’s performance, which is why I wrote an article on getting the best performance out of Reaper. I highly recommend reading it if you are new to Reaper, and want to quickly set it up to work optimally on your system.
Quick start for the impatient
If you are the sort of person who doesn’t want details or explanations and just wants to get going as quickly as possible…this section is for you! Note that your dialog may not look exactly like mine unless you have very similar hardware and software.
Nevertheless, the following is a generic collection of settings that you should be able to adapt to your system, and should work pretty well for most people…
- Audio system: “ASIO”
- ASIO Driver: Pick a driver with “ASIO” in the name. These drivers will have been supplied with your soundcard, so will probably have something in the name identifying your soundcard in e.g. “Focusrite ASIO”
- Enable inputs: Checked
- first: Select the name of the first input on your audio interface
- last: Select the name of the last input on your audio interface
- Output range:
- first: Select the name of the first output on your audio interface
- last: Select the name of the last output on your audio interface
- Request sample rate: Checked, 44100
- Request block size: Checked, 128
- Pre-zero output buffers, useful on some hardware (higher CPU use): Unchecked
- Ignore ASIO reset messages (needed for some buggy drivers): Unchecked
- Audio thread priority: “ASIO default / MMCSS Pro Audio / Time Critical”
- Allow projects to override device sample rate: Checked
If you have an “ASIO Configuration” button or similar, click it and you will get a dialog with a few settings for the ASIO driver for your audio interface. It may not look exactly the same as mine, but there should be similar settings. Here’s what mine looks like for my Focusrite Scarlett 6i6 audio interface’s ASIO driver…
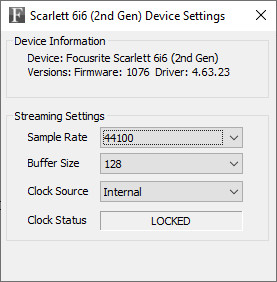
Configure the settings similar to these…
- Sample rate: 44100
- Buffer size: 128
- Clock Source: Internal
And that should be enough to get you going!
To accurately check your audio settings and sound output, you will almost certainly need a good set of studio headphones. I highly recommend the AKG 702s (affiliate link), available from Amazon for a very competitive price. I have been using these open-back headphones in my home studio for many years for arranging, editing, mixing and mastering. They sound fantastic, and are a great addition to any home studio.
Now for those who want more explanation and detail on Reaper’s audio device settings, read on…
Audio system & ASIO Driver settings
If you are using a Windows PC, you really need to use an ASIO driver. ASIO stands for Audio Stream Input/Output. It is a specification for digital audio drivers that allows direct access to the audio hardware. It is specifically designed for high-end audio applications such as music production, and provides low latency and high fidelity.
By the way, if you’re using a Mac you can ignore all this and just use the built-in high-quality Core Audio drivers which do a similar thing.
ASIO drivers are usually supplied with your audio interface. There will either be a CD with them on, they’ll be downloadable from the manufacturer’s website or when you connect your interface they will be downloaded and installed automatically.

You can see the ASIO driver options for my Focusrite Scarlett 6i6 interface within Reaper; there’s a driver for a USB connection, and one for a Thunderbolt connection. To get the ASIO driver options, make sure you set Audio System to ASIO. Then select one of the drivers from the ASIO driver dropdown list.
You can use Reaper without an ASIO driver, and without using an audio interface. But I would strongly recommend against it. You are likely to be frustrated by poor sound quality and high latency (the delay between playing a note and hearing it). Because it’s such a commonly asked question, I have a whole article asking “Do you need an audio interface?”. It will help you decide if you really need an interface or can get away without one.
If you are in the market for an audio interface, you can’t go far wrong with the Focusrite Scarlett series. I have been using these in my home studio for years, and they have always given me great sound quality and performance. They are also reliable, durable and built like tanks. The Focusrite Scarlett Solo (affiliate link) is available at Amazon for a very competitive price.
If you have the option to use an ASIO driver, just use it! It will give you much, much better performance for audio production on a Windows PC than any other option.
Inputs and outputs settings
If you want to record into Reaper, you will need to enable the inputs. This means checking the Enable inputs: checkbox. If your audio interface has multiple inputs, you can select which of those inputs you want to be active. You can pick a range of inputs and a range of outputs to be active.
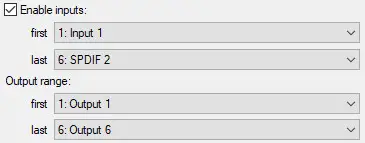
My Focusrite Scarlett 6i6 interface has six inputs and six outputs. In the screenshot, you can see I have selected all my inputs and outputs to be active. For example, the first input is “1: Input 1” and the last is “6: SPDIF 2”. This means all the inputs between 1 and 6 inclusive will be active.
If you want to enable just one, then select the first and last input to be the same.
Outputs are usually used in pairs to form a single stereo out. Most of the time your master bus will output to a single pair, but you can output to more if you wish. You might for example have a main pair of speakers, then a separate monitoring mix for a recording musician.
Request sample rate and block size
Request sample rate and Request block size set the sample rate & block size for your audio hardware. Strictly speaking they ask the hardware to use these settings, and the hardware will use them if they do not conflict with other settings or instructions it may have been given.

Settings a sample rate and a block size is essentially a compromise between sound quality and performance. You’ll learn more about this in the next section. For now I recommend starting with a sample rate of 44100 Hz (44.1 kHz). The Reaper User Guide actually recommends a block size of 512 to start with. I prefer to start with 128.
ASIO Configuration
Pressing the ASIO Configuration button will launch the ASIO control software utility for your audio interface. Strictly speaking, this is not part of Reaper’s audio device settings. But we’ll take a look at some example settings here anyway, as it is important to understand how these could affect sound quality, latency and performance.
It’s important to note that “sound quality” here has nothing whatsoever to do with the audio sound quality of your final song. We’re purely talking about not experiencing any audio drop-outs or glitches. You have full control over the sound quality of your song from within Reaper and when you export your song to a file when you have finished it.
The exact look and available options will vary between different audio interfaces and drivers. There will be some settings that are common, even if they are not named quite the same. Here’s the one from my system…
- Sample Rate: Digital audio works by taking many samples per second. This setting is how many samples are taken in a second.
- Buffer Size: This equates to how long your computer has to process the digital audio.
Buffer size is very important in combatting latency. This is the delay between playing a note and hearing it come out of your computer. You generally want it as low as possible, ideally so low it is imperceptible to the human ear. This is entirely possible with today’s modern hardware.
If you are suffering from high latency, you can try reducing the buffer size. The potential issue with this is that if you set it too low, you can start to suffer from audio dropouts and glitches.
So what should you set buffer size to? There’s no one-size-fits-all answer to that question. It will be different for every different computer, audio interface and driver. Experiment, and find the best setting for your particular setup.
You can do this by turning on monitoring on a track and recording; listen for any delay between sound from the recording source and the sound out of Reaper. If the delay is too much, try a lower buffer size. If you are getting audio glitches, try a higher buffer size. Repeat until a satisfactory compromise between latency and performance is achieved.
Suboptimal ASIO settings are not the only reason you could suffer from audio glitches. Check out my “How to stop clicks and pops” article if you are suffering the frustration of audio dropouts, pops or glitches. Hopefully, it will give you a few ideas to help you fix the issue.
Sample rate usually offers options such as 44100 Hz, 96000 Hz or even as high as 192000 Hz. Digital music on CDs and music streaming sites uses a sample rate of 44100 Hz, so that is what I would recommend for your music productions.
Audio thread priority
A lot of modern software is multi-threaded. This allows it to perform several actions seemingly at once. Actually, a lot of the time it is switching between different tasks so fast that it just appears that many things are happening at the same time.
You can assign a priority to audio threads in Reaper, ensuring audio will be processed ahead of other threads. I have never needed to change this setting from ASIO default in all my years of using Reaper. But if you are having performance problems, it may be worth experimenting with setting a higher priority.
Other options
The remaining options we haven’t covered are beyond the scope of this article. In all honesty, I have never needed to change them from their defaults in more than a decade of using Reaper, so I would recommend not worrying about them.
Non-ASIO audio device settings (not recommended!)
If you’re using Reaper on Windows, you really need to use an audio interface and its supplied ASIO drivers. If for some reason you are using non-ASIO drivers, you may be able to use Reaper to an extent, although the whole experience will probably be unsatisfactory.
So I’ll briefly describe the audio device settings for a non-ASIO audio system selection (e.g. DirectSound) here…
- Input device: The input you are recording from, that your microphone or instrument is plugged into
- Output device: The output your speakers/headphones are connected to.
- Sample format: How many bits each digital audio sample contains. I recommend setting to 16 bit.
- Input device: Number of input channels. Will probably set this to 1 (mono) or 2 (stereo).
- Output device: Number of output channels. Will almost always be set to 2 (stereo).
- Sample rate: How many samples per second. Recommend setting to 44100 Hz.
- Bufffers & samples: Combination of these will set the latency (displayed just underneath). Experiment to get the lowest latency you can with acceptable performance.
Recap of the important points
To get the best out of Reaper, you need to set the audio device settings carefully. The most important points to bear in mind are…
- Choose ASIO for the audio system and an ASIO driver
- Don’t forget to enable the inputs and outputs you want to use
- Set the ASIO config to give as low latency as possible with acceptable sound quality and performance (no drop-outs, glitches, etc)
- Note the “acceptable sound quality” here does not mean the sound quality of your final song; it has nothing to do with that. It’s just the sound quality while you are working on it. You can output to as high a sound quality possible when you export your mixdown when you’ve finished (using WAV, FLAC or other uncompressed format)
Hopefully this will help you configure Reaper to allow you to complete your latest masterpiece without too much drama! Once your recording and mixing is complete, you will need to output a mixdown of your song to a stereo file. Check out my article on how to save a mixdown in Reaper for full easy-to-follow instructions, allowing you to distribute your song to the world.
Here is some of my favorite home studio gear…
Thanks for reading this article. I hope you found it helpful in your home music-making activities. Here are a few of the tools that I personally use in my home studio. These are affiliate links, so if you decide to use any of them I’ll earn a small commission.
Audio interface: My personal choice for audio interfaces are the Focusrite Scarlett series. I have been using these for years, and they have always given me great-sounding recordings. For a very reasonable price from Amazon you can buy the excellent Focusrite Scarlett 4i4, or if you don’t need MIDI capability the Focusrite Solo is a great choice.
Amp sim: Guitar amplifier simulator software has come on leaps and bounds in recent years, such that I record all my electric guitar parts using amp sims these days. One of the very best is the incredible Amplitube from IK Multimedia, which I have used on many of my songs.
Headphones for recording: My favorite headphones for recording are the Sony MDR-7506s, which I use for monitoring during all my recording sessions. They can also be found in many pro recording studios. Get the Sony MDR-7506 headphones from Amazon here.
General-purpose microphone: You can’t go wrong with a good ol’ Shure SM-57, one of the most versatile and ubiquitous microphones around. I’ve been using one in my home studio for as long as I can remember. Amazon offers the Shure SM-57 for a very competitive price.
To see all of my most up-to-date recommendations, check out this resource I made for you!