
DISCLOSURE: This post contains affiliate links. If you buy through these links, I may earn a small commission.
There are many excellent commercial DAW (Digital Audio Workstation) software applications available today. Reaper is a DAW that sometimes gets a bit of a bad press, and is thought of by some as inferior to the other DAWs on the market.
Reaper is an excellent DAW, being well known for reliability, stability and efficiency. It has the recording and mixing features expected of modern DAWs. Reaper is extremely customizable, and comes bundled with a comprehensive suite of effects plugins. Its price point is lower than comparable DAWs.
Reaper’s low price has a tendency to make people think that it is not a serious DAW, and cannot compete with the likes of Pro-Tools, Cubase, Logic and other commercial DAWs. This is simply not true, as you will discover in the rest of this article.
If you are interested in checking out the best recording gear such as audio interfaces, studio monitor speakers, microphones, etc., you can find them at Amazon by clicking here.
What makes a good DAW?
I like to think of Digital Audio Workstations as “recording studios in software”. As such, there are several characteristics and features that you would expect to see in a modern DAW. These include…
- Great sound quality
- High performance (quick, minimal latency)
- Easy to use recording workflow and features
- Easy to use mixing workflow and features
- Reliability and stability
- Good documentation and other help available
- Customizability to make it fit my preferred ways of working
- Value for money
Reaper does well in all these categories and more. Let’s take each of these, and look at how Reaper fares in some detail.
Now if you’re reading this article, maybe you are looking into what you need to start home recording. One essential piece of equipment to use with Reaper or any other DAW is a good audio interface. I have been using Focusrite Scarlett interfaces for years, and they have always given me great sounding recordings for not very much money. You can buy the Focusrite Solo from Amazon (affiliate link) for a very reasonable price.
Reaper’s sound quality
I’ll get this one out of the way first, as it really isn’t relevant. Some people say that Reaper doesn’t sound as good as other DAWs. This is nonsense, as the DAW itself has very little to do with sound quality.
All modern DAWs can sound great. This is because the sound quality doesn’t come from the DAW software; it comes from your audio hardware and its associated drivers. In practice, this means your audio interface, and the software drivers that you are using with it. These are likely to be ASIO drivers on Windows, or Core Audio drivers on a Mac.
Any sound quality issues you are having are likely to come from these two areas. If anyone tries to tell you that Reaper (or any other DAW for that matter) doesn’t sound as good as another DAW, just ignore them.
Reaper’s performance
Reaper is well-known for its efficiency, and is one of the fastest DAWs available. This can be largely attributed to its developers doing an excellent job in writing efficient, high-performance code.
Its start-up speed is probably the fastest of any DAW on the market today. This is very likely related to how lightweight the install is – the download size is only about 15MB. Compare that to the multiple 100s of megabytes for other DAWs, even stretching into gigabytes sometimes, and you can see where the speed of Reaper comes from.
You can even very successfully run Reaper from a USB stick, with a “portable” install.
Performance in Reaper continues to be worked on to this day. A recent update implemented optimized behavior for projects with high (200+) track counts, which is evidence that the performance of the codebase is a high priority for Reaper’s development team.
Computers can software can always be optimized for better performance. That’s why I wrote an article on how to improve Reaper’s performance, which will give you several tips and tricks for getting the very best out of Reaper on your own setup.
Using Reaper for recording and mixing
The two most common activities performed in a DAW are recording and mixing. A good DAW needs to provide a reasonably intuitive environment for both, with everything working in a similar way to other established DAWs. All the tools the user expects need to be present.
If you are a novice in the world of home recording, I highly recommend you check out my article looking at if Reaper is suitable for beginners. It should reassure you that Reaper is a good choice if you are just starting out.
Reaper performs admirably at both recording and mixing, having comprehensive features and logical workflows for both. Let’s have a look in a bit more detail…
Reaper for recording
The Track View in Reaper looks exactly as you would expect. If you have used any other DAW from about the last 25 years, this will seem very familiar to you. It’s very easy to create a track, using either the menu or the keyboard shortcut (CTRL-T).
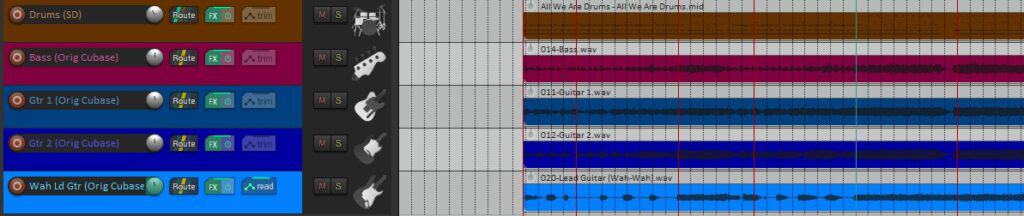
There is just one track type in Reaper, so you don’t have to choose between audio, MIDI, instrument, etc. This may seem confusing at first if you are coming from another DAW, but it actually makes a lot of sense when you get used to it. You just create a track, and record whatever data you want on it whether that is audio or MIDI.
Other recording features provided by Reaper are…
- Buttons for recording input/output/record enable right there on the track
- Punch-in/out recording (setting on the transport bar)
- Comping (recording multiple takes, then selecting the best bits from each one)
- All editing options you would expect; cut, copy, duplicate, fade-in/out, split, join, volume, etc.
- Full MIDI piano-roll style editor
- Shortcut keys (lots built-in, and can add custom shortcut for just about any operation)
- Track grouping functionality using “folder” tracks, including groups of groups
- Color coding & images for identifying tracks
As you can see, you are highly unlikely to find any recording functionality you need missing from Reaper.
As a side note, a good pair of headphones is essential for recording. My favorite headphones for recording are the Sony MDR-7506s, which I have been using in my home studio for many years. You will usually find a pair or two of these in most pro recording studios. You can buy Sony MDR-7506 headphones from Amazon (affiliate link) for a great price.
Reaper for mixing
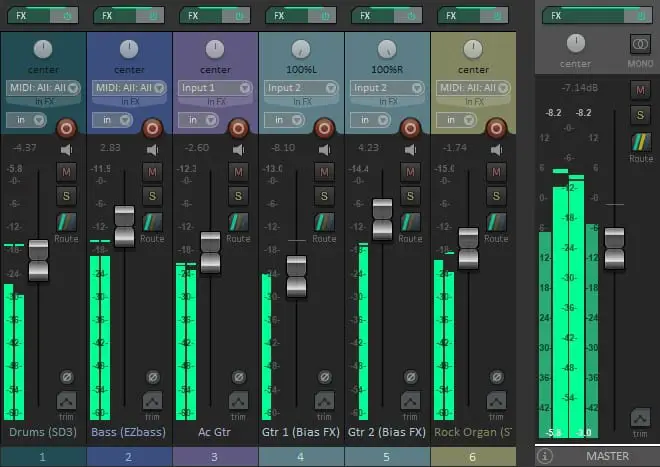
Reaper adopts the same metaphor as pretty much every other DAW out there – the mixer application looks like a hardware mixing desk. The expected faders and meters are present, and you should have no issues switching from mixing in another DAW to Reaper.
Some of the mixing features Reaper provides include…
- Individual & grouped tracks/channels
- Fully configurable in what tracks/channels display and are hidden
- Mute/Solo
- Use of effects buses
- All FX and plugins drivable from the mixer, including quick bypass for A/B comparison
- Configurable meters (different styles)
Reaper is a great environment for mixing. I have mixed 3 commercial EPs using it (like this one), and find it easy to use and full-featured.
As a side note, I have also written a beginners guide to mixing in general. I highly recommended you check it out if you are new to mixing. It clears up some of the confusion novice mixers often have, and helps you avoid some common mixing pitfalls.
Reliability and stability of Reaper
One of the most frustrating things that can happen when using a DAW, is it crashing right in the middle of your creative flow. It is made even worse if data is lost due to the crash, especially if it cannot be recovered somehow.
Reaper’s reliability and stability are legendary. All software crashes from time to time, but crashes are very rare with Reaper. On the rare occasions that it does crash, it is usually very easy to recover what you were working on and data is almost never lost.
Reaper reliability is as good as, if not better than any other DAW available today. Even with large numbers of plugins loaded in a project with a large number of tracks, it still runs smoothly and demonstrates remarkable stability. The only issues you would have in that situation are the limitations of your hardware, e.g. running out of RAM.
Regarding hardware, another plus point for Reaper is its compatibility with just about any hardware. This includes a lot of older hardware. It just tends to work! I had issues with another commercial DAW (that shall remain nameless); I switched to Reaper, and it just worked flawlessly with the previous issues gone.
Updates to Reaper are brought out every few weeks. These constant updates, fixes and improvements should give you confidence that Reaper is actively being worked on, and any issues are quickly addressed.
Reaper’s more advanced features
Some people have commented that Reaper isn’t as fully featured as other DAWs, or is somehow less capable. This simply isn’t true. All the features you would expect in a professional DAW are in Reaper, and it has been used by many musicians and producers to make commercially released music.
Some of those more advanced features contained in Reaper include…
- Automation
- Customizable actions, toolbars, menus, context menus, macros
- Advanced routing including a sophisticated Routing Matrix
- Advanced grouping including a sophisticated Grouping Matrix
- Project templates
- Track templates
- Flexible busing and grouping
- Added functionality available via SWS extensions
Training material available for Reaper
All DAWs are highly complex software applications, and have a significant learning curve if you want to get the most out of them. The available material, documentation and support are therefore extremely important, and could be major factors in which DAW you choose to use.
The video tutorials available for Reaper are excellent, as good as anything any other DAW has to offer. A large number of these are by Kenny Gioia, and they are also available on his Reaper MANIA YouTube channel.
You can learn Reaper entirely by watching these videos (the “This is Reaper 6” playlist is a great starting point), indeed that’s pretty much what I did. If I ever need to find out how to do something in Reaper today, I can be pretty sure that there will be a video on it explaining it clearly and concisely.
There is also an excellent very active forum, where on the rare occasion that you have a question not covered in a video you have access to a large number of expert users ready and willing to help.
As you would expect, a comprehensive and detailed user manual is supplied with Reaper. This is a great reference, when you want to find out about how something works in detail or need help dealing with a more complicated topic.
And finally you have many sites around the web that answer questions related to Reaper, such as the one you’re on at the moment! Here are a couple of examples of articles on this website showing you how to perform certain tasks using Reaper…
Reaper’s configurability and customizability
Reaper is one of the most configurable DAWs out there.
One of the common criticisms of Reaper is that it doesn’t look as pretty or modern as other DAWs. That doesn’t bother me in the slightest – as long as it works and is relatively easy to use, then I’m happy.
But if the look does bother you, the user interface is fully skinnable, with many themes available including ones that can make Reaper look like other DAWs. Reaper is supplied with a few themes, and there are many more available from the Reaper website. Users can create and upload their own themes, and new ones are being added all the time.
The user interface of Reaper is fully customizable. Windows can be docked/undocked, custom layouts created and saved, menus and toolbars customized. The color and position of just about everything can be changed to suit your tastes.
Plugins included with Reaper
Modern DAWs are expected to contain several stock plugins, and Reaper is no exception.
Reaper includes many great quality stock effects plugins. All the usual suspects are present such as EQ, compression, reverb, delay, pitch correction, etc. They are easy to use, work in the standard way you would expect them to and are well documented in the user manual.
The sound quality of these plugins are excellent – as good as anything else on the market. It’s entirely possible to create a pro-sounding mix entirely using Reaper’s stock plugins, something I have done myself many times.
Where Reaper falls down a little, is in its lack of Virtual Instrument plugins. Reaper doesn’t really have any, not like you would expect anyway. For more details, check out these two articles; does Reaper have built-in instruments, and does Reaper have amp sims.
I can see why Cockos (the developers of Reaper) have chosen this route. Without having to develop and maintain any virtual instruments, the full development focus and cost can be fully thrown behind the main DAW application. This helps keep the cost of Reaper low, and ensures the main application is never neglected.
I would actually argue that these days, you don’t really need virtual instruments supplied with a DAW. There are so many great free options available, that you can be sure to find one to suit your needs.
Additionally, if you have your favorite commercial Virtual Instruments, you would probably buy those anyway. For me, these would be EZDrummer & Superior Drummer, BIAS FX and Sampletank, which I can easily justify the purchase costs for. These all work seamlessly as plugins inside Reaper without any issues.
Reaper is excellent value for money
You could argue that Reaper’s killer feature is its price. It costs $60 for a license, and also has a 60-day free trial period before you have to pay anything. It is much cheaper than other DAWs with comparable feature sets.
For more details on Reaper’s price and licensing, check out this article on how much Reaper costs, and what happens if you don’t pay after the free trial period ends.
The low price is part of the reason why Reaper is sometimes thought of as inferior. It is human nature to an extent to think if it is so cheap, it can’t possibly be as good as something much more expensive. Fortunately for us this is not the case, and Reaper is a great option if you want a full-featured DAW and don’t have much money to spend.
The system requirements for Reaper are also not too onerous. It will run fine on a lot of older computers, so there is no need to go out and buy the latest expensive, whizz-bang machine for your music production activities.
All the above reasons make Reaper a great DAW, and entirely usable for professional, commercial music projects. Hopefully, I have destroyed any misconceptions you may have had that Reaper is somehow inferior to other DAWs. You can be confident that Reaper will fulfill your music production software needs, and will probably save you a bit of money along the way.
Here is some of my favorite home studio gear…
Thanks for reading this article. I hope you found it helpful in your home music-making activities. Here are a few of the tools that I personally use in my home studio. These are affiliate links, so if you decide to use any of them I’ll earn a small commission.
Audio interface: My personal choice for audio interfaces are the Focusrite Scarlett series. I have been using these for years, and they have always given me great-sounding recordings. For a very reasonable price from Amazon you can buy the excellent Focusrite Scarlett 4i4, or if you don’t need MIDI capability the Focusrite Solo is a great choice.
Amp sim: Guitar amplifier simulator software has come on leaps and bounds in recent years, such that I record all my electric guitar parts using amp sims these days. One of the very best is the incredible Amplitube from IK Multimedia, which I have used on many of my songs.
Headphones for recording: My favorite headphones for recording are the Sony MDR-7506s, which I use for monitoring during all my recording sessions. They can also be found in many pro recording studios. Get the Sony MDR-7506 headphones from Amazon here.
General-purpose microphone: You can’t go wrong with a good ol’ Shure SM-57, one of the most versatile and ubiquitous microphones around. I’ve been using one in my home studio for as long as I can remember. Amazon offers the Shure SM-57 for a very competitive price.
To see all of my most up-to-date recommendations, check out this resource I made for you!
