
I have been using Reaper as my DAW (Digital Audio Workstation) for many years. When I first started using it, I was productive with it within a few hours of first downloading it. The video tutorials available, along with Reaper’s layout and ease of use made it a great choice for a beginner like me.
Reaper is a great DAW for beginners. Its logical layout and excellent available video tutorials make it easy to learn. Although fully featured, it is easy to use without using advanced features. Reaper’s low price, renowned stability, and low computing requirements make it an ideal first DAW.
There are many reasons why I would recommend Reaper as a DAW for a beginner, even if they have never used a DAW or similar software before.
If you are new to DAW software in general, then I highly recommend you check out my guide on how to start learning a DAW. It will take you through the best way to get productive with a DAW quickly, and help you avoid some of the pitfalls you can succumb to.
If you are interested in checking out the best recording gear such as audio interfaces, studio monitor speakers, microphones, etc., you can find them at Amazon by clicking here.
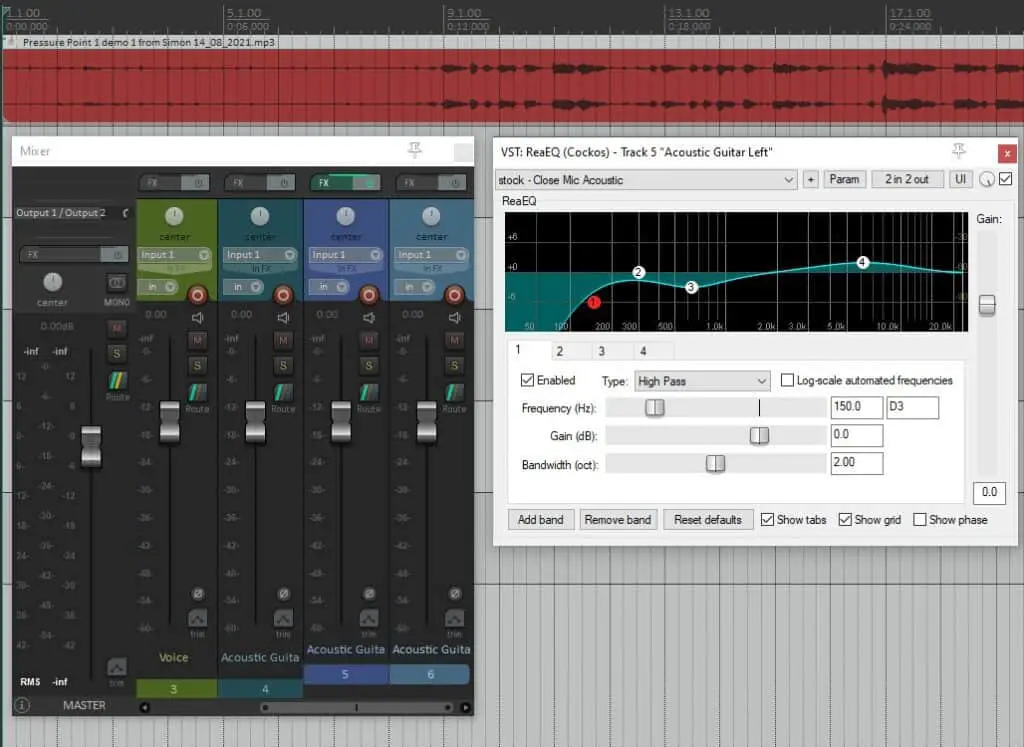
Reaper’s logically laid out features
Reaper’s user interface is logically separated out into sections. This means that it is easy to learn to use the basics, without needing to learn any advanced features. You can therefore get to the stage where you are productive quite quickly.
Often one of the biggest hurdles to overcome with any DAW is the initial setup. Setting up audio drivers, inputs and outputs, and configuring for your specific hardware can often be a challenge, especially for newcomers. Reaper’s clearly separated config sections help make this as easy as it can be.
Reaper’ video tutorials and available support
I think this is perhaps the most important thing that makes Reaper a good choice for beginners; the excellent video tutorials available, along with other support avenues.
Tutorial videos
There is a YouTube channel called Reaper MANIA, run by a guy called Kenny Gioia. This channel is considered to be the official video training channel for Reaper. Indeed, the videos can also be found on the main videos training page on the Reaper website.
I cannot stress enough how good these videos are! I’ve learned pretty much everything I know about Reaper from these videos. The knowledge I have gleaned has ultimately led me to be able to release 3 full EPs commercially using Reaper.
I would suggest that if you are looking to learn how to use Reaper, don’t even consider any other method for learning it – watch these videos!
A good place to start is with the “This is Reaper 6” playlist. After learning the material in the first few videos of this playlist, you will easily know enough to be able to make your own songs using Reaper.
If you are completely new to home recording, I highly recommend you check out my beginner’s guide to recording music at home. A huge amount of work has gone into this guide! It is a complete resource to take you from never having recorded before all the way through to making your first home recording.
Available support through the Reaper forums
Great support is available through the Reaper forums.
During your time learning and using Reaper, you will encounter problems and find questions that need answering. Search for your question on the forums, and 99% of the time you will find your question answered already. Someone will have had exactly the same issue as you, and got multiple solutions to the problem already.
On the rare occasions when your question has not been answered, you have a central place to ask questions with expert users on hand.
Comprehensive user guide
The Reaper User Guide is excellent. It is very detailed, covering everything you are ever likely to need. Every aspect of using Reaper is covered, and it is great for learning about a topic in great detail.
A word of caution though; don’t try and learn how to use Reaper from the User Manual. Use it as a reference when you need to learn a particular feature in detail, or when you need to look up how to do some specific operation.
There is also an excellent quick start guide, which is a great resource for quickly reminding yourself how to perform a particular task in Reaper.
One essential piece of equipment to use with Reaper or any other DAW is a good audio interface. I have been using Focusrite Scarlett interfaces for years, and they have always given me great sounding recordings for not very much money. You can buy the Focusrite Solo from Amazon (affiliate link) for a very reasonable price.
Reaper’s stability and low computing requirements
Reaper is very well known for its stability – it doesn’t crash very often. On the rare occasions that it does crash (all software does from time to time), it recovers well without losing any of your data. This means it is reliable and can be trusted. This is very important for beginners to have that reassurance that their music projects are safe in Reaper’s hands.
Reaper is also famed for its very low system requirements. It makes lower demands on CPU, memory and disk resources than other DAWs. In addition, the download size is only about 14MB at the time of writing.
All this makes Reaper ideal for running on slightly older computers. This is important for beginners as you can be reassured that your computer won’t cause your DAW to run slowly or have stability issues.
To get the absolute very best from Reaper on your own hardware, check out this article on how to improve Reaper’s performance. It gives you tips and tricks on setting up Reaper for maximum efficiency on your personal setup.
Reaper is very configurable
Reaper has a reputation as the most configurable DAW available. You can make it look exactly how you want with the use of themes, and pretty much every part of the user interface is customizable.
As a beginner, this is probably won’t be something you will do right away. But as you continue learning and you have some use under your belt, you will appreciate the ability to set it up exactly as you want. This will help you develop your own style, workflows and methods as your knowledge increases.
Reaper is very affordable
There is no better DAW than Reaper available at its price point. It successfully competes with DAWs costing many times its price.
A license to use Reaper costs just $60. You also get a 60-day free trial before you have to pay anything at all. This is an excellent deal for software of Reaper’s capabilities. If you’re interested in exactly how Reaper’s licensing, free trial and payment terms work, check out my article on Reaper’s licensing. It clearly explains how you can use and pay for Reaper.
As a side note, a good pair of headphones is essential if you are using a DAW, particularly for recording. My favorite headphones for recording are the Sony MDR-7506s, which I have been using in my home studio for many years. These can be found in many pro recording studios. You can buy Sony MDR-7506 headphones from Amazon (affiliate link) for a great price.
Drawbacks of Reaper
Although I have been waxing lyrical about Reaper in this article, it is not perfect – no software is.
The main drawback of Reaper, especially for beginners, is the lack of supplied virtual instruments. Other commercial DAWs have a selection of built-in synths, sound modules, amp sims and related plugins. The plugins included in Reaper are excellent, but they tend to be more on the effects and sound processing side (EQ, dynamics, modulation, delay, etc.) rather than instruments.
This is not a huge problem, as there are many very high-quality free virtual instruments available that work great with Reaper. Just Google for “free virtual instruments” to get you started.
A similar issue exists with amp sims (guitar amplifier simulator plugins). For more information on virtual instruments and amp sims in Reaper, I highly recommend reading the following two articles. They will help you understand what capabilities Reaper has in these areas, and how to use both free and paid 3rd party plugins with Reaper…
Importance of attitude when learning a DAW
DAWs are huge, complex, highly capable software applications. So to develop a level of proficiency with any of them will take some time. They are not like a word processor program when you can be using it productively within a couple of minutes, even if you have never used similar software before. There is no DAW like that.
This means that the attitude you have when learning a DAW is very important. Expect to have to work through a few tutorials, whichever DAW you use. It will take you a few hours to get to the point where you can get something useful accomplished with the DAW.
This is perfectly normal, and should be expected. Think of this initial time spent purely learning the software as an investment for the future, when this knowledge will be ingrained in your brain.
While we’re talking about learning Reaper, check out these two how-to articles to learn how to do these commonly asked about tasks…
Is Reaper difficult to learn?
Reaper is not difficult to learn compared to any other DAW. Reaper does have a huge advantage in the quality of video tutorials available, which are an excellent aid to learning. Along with the logical user interface layout, Reaper is perhaps one of the easier DAWs to learn.
All DAWs do very similar things in similar ways. Learn one, and you can very quickly learn another. The knowledge is very transferrable between the different available applications – DAWs are far more similar to each other than they are different.
Is Reaper a good DAW?
Reaper is an excellent professional, fully-featured DAW, known for its stability and efficiency. It can host many plugins and virtual instruments with ease. Reaper is also the most customizable DAW available. No other DAW can compete with Reaper at its $60 price point. Check out this article for more details on Reaper, and its suitability for use as a professional DAW.
Here is some of my favorite home studio gear…
Thanks for reading this article. I hope you found it helpful in your home music-making activities. Here are a few of the tools that I personally use in my home studio. These are affiliate links, so if you decide to use any of them I’ll earn a small commission.
Audio interface: My personal choice for audio interfaces are the Focusrite Scarlett series. I have been using these for years, and they have always given me great-sounding recordings. For a very reasonable price from Amazon you can buy the excellent Focusrite Scarlett 4i4, or if you don’t need MIDI capability the Focusrite Solo is a great choice.
Amp sim: Guitar amplifier simulator software has come on leaps and bounds in recent years, such that I record all my electric guitar parts using amp sims these days. One of the very best is the incredible Amplitube from IK Multimedia, which I have used on many of my songs.
Headphones for recording: My favorite headphones for recording are the Sony MDR-7506s, which I use for monitoring during all my recording sessions. They can also be found in many pro recording studios. Get the Sony MDR-7506 headphones from Amazon here.
General-purpose microphone: You can’t go wrong with a good ol’ Shure SM-57, one of the most versatile and ubiquitous microphones around. I’ve been using one in my home studio for as long as I can remember. Amazon offers the Shure SM-57 for a very competitive price.
To see all of my most up-to-date recommendations, check out this resource I made for you!
