
DISCLOSURE: This post contains affiliate links. If you buy through these links, I may earn a small commission.
In my years using Reaper as my DAW, I have imported mp3 files into it many times. There are actually several different ways to import mp3’s into Reaper, ranging from simple drag-and-drop to full media file management using the Media Explorer.
To import an MP3 file into Reaper, locate the file in your computer’s file manager application. Then simply drag ‘n’ drop the file into Reaper’s main window. You can drag ‘n’ drop it on an existing track or onto empty space in the arrange area, the track control panel, or the mixer control panel.
That is the simplest way to import an mp3 file into Reaper. It also works with many other media file formats. Read on to see the details of all the ways importing media files can be done, and the reasons why you might want to use one of the other methods.
If you’re interested in importing mp3 files into Reaper, you may also be interested in how to save a mixdown in Reaper. Check out the linked article for simple, clear instructions on how exactly you would use Reaper to save your audio mix and export tracks.
If you are interested in checking out the best recording gear such as audio interfaces, studio monitor speakers, microphones, etc., you can find them at Amazon by clicking here.
Drag ‘n’ drop an MP3 file into Reaper
Drag ‘n’ drop is the easiest method of getting an mp3 file into Reaper, but perhaps the least flexible. The process is quite intuitive if you have ever used drag ‘n’ drop on a computer before, but here are the steps anyway…
- Locate the mp3 file you want to import into Reaper in the file manager application on your computer
- Drag the file into Reaper. You can drag it to…
- Empty space in the Arrange Area, the Track Control Panel or the Mixer Control Panel – a new track will be created with the same name as the name of the mp3 file; the file will get added as an item on the new track
- An existing track – the file will get added as an item on the existing track
If you are new to using a DAW (Digital Audio Workstation) such as Reaper and are keen to learn, then definitely check out my guide to learning a DAW. This will show you the best way to learn, and get you productive with the software as quickly as possible.
Use Insert menu to import an MP3 file into Reaper
On Reaper’s main menu, select Insert->Media File…

- In the file chooser dialog that appears, navigate to and select the MP3 file to import
- Click Open
- The file will be inserted…
- On the currently selected track, at the current project location
- Or if no track is selected, a new track will be created with the same name as the name of the mp3 file; the file will get added as an item on the new track
Import an MP3 file into Reaper from The Media Explorer
The Media Explorer in Reaper is designed to be able to manage all the media files on your computer that you might want to use in a Reaper project. This includes previewing (listening to) files, filtering files, and grouping related files into databases. But it can also be used to import files, including MP3s into Reaper.
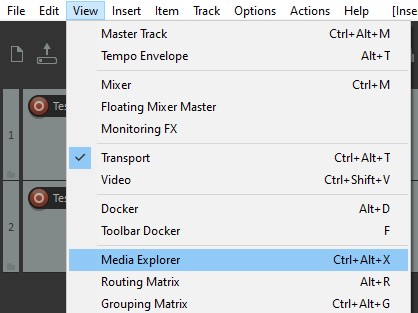
- Select View->Media Explorer from Reaper’s main menu to launch The Media Explorer
- Navigate to the folder where your MP3 file is in Media Explorer’s left-hand pane
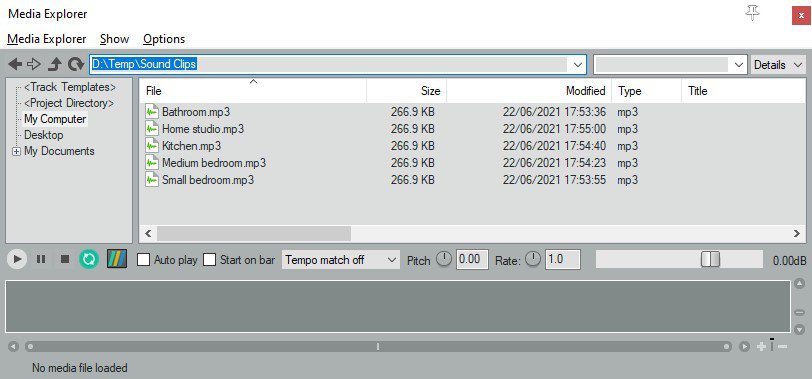
You can audition the files from here i.e. listen to them, to make sure you are selecting the correct one. Select the file on the right, then click the Play transport bottom at the left of the window to hear the selected file play.
Once you have selected the desired file, there are several ways to get a media file from the Media Explorer into your Reaper project…
- Drag ‘n’ drop the file straight onto a track in your project, or an empty area (in this case a new track will be automatically created with the same name as the file name)
- Right-click on the file, and select one of several available options…
- Insert into project : this will insert the file on the currently selected track, at the current cursor position. If there is no track selected, a new track will be automatically created
- Insert at time selection (stretch/loop to fit) : if a time selection is active, the file will be inserted and stretched to fit the selected time. If there is no time selection, this options acts the same as “Insert into project”
- Insert on a new track : this creates a new track, then inserts the file onto it at the current cursor position
- Insert into sample player : this adds an instance of the ReaSamplOmatic5000 sample player plugin in the FX of a track, and loads the file into the sampler. You can choose to create new track, or use an existing sample player in your project.
- Insert in selected item : if you have an item selected, this option will insert your file into that item. You can choose whether to insert it as a new take, to replace the item, or to replace it and stretch the file to fit the same space as the old item. If no item is selected, this option will not do anything.
If you are reading this article because you are considering Reaper as your DAW and wondering about its capabilities, I highly recommend you check out my article on Reaper’s pricing and licensing article. This is information you will need to know about Reaper’s cost, free trial and terms of use. Also, definitely have a read of my article looking at Reaper’s suitability for beginners.
What can you do with an mp3 file imported into Reaper?
Once you have imported an mp3 file into Reaper, it acts the same as any other media item in Reaper. So anything you can do to an item in Reaper, you can do to the item from the mp3 file. These operations include…
- Trim
- Fade-in/fade-out
- Copy & paste
- Duplicate
- Time stretch
- …and all the other item operations in Reaper – far too many to list here!
It’s important to realize that once it has been imported, it is treated exactly the same as any other media item – Reaper sees it as no different.
What other file types can you import into Reaper?
It’s not just mp3 files that can be imported into Reaper. Some of the common file formats that Reaper supports are…
- Ogg Vorbis (.ogg)
- WAV (.wav)
- AIFF (.aiff)
- FLAC (.flac)
- WAVPACK (*.wv)
- CD Audio (.cda)
This is not an exhaustive list. See section 4.8 Import Media File Types in the Reaper User Guide for a list of all the media file types that can be imported into Reaper.
Related questions
If you’ve read through this article, you will probably also be interested in some related and commonly asked questions about Reaper. These articles may well answer some of your other questions…
- Does Reaper have built-in instruments?
- Does Reaper have amp-sims?
- How to improve Reaper performance
- Is Reaper a good DAW suitable for professional use?
Here is some of my favorite home studio gear…
Thanks for reading this article. I hope you found it helpful in your home music-making activities. Here are a few of the tools that I personally use in my home studio. These are affiliate links, so if you decide to use any of them I’ll earn a small commission.
Audio interface: My personal choice for audio interfaces are the Focusrite Scarlett series. I have been using these for years, and they have always given me great-sounding recordings. For a very reasonable price from Amazon you can buy the excellent Focusrite Scarlett 4i4, or if you don’t need MIDI capability the Focusrite Solo is a great choice.
Amp sim: Guitar amplifier simulator software has come on leaps and bounds in recent years, such that I record all my electric guitar parts using amp sims these days. One of the very best is the incredible Amplitube from IK Multimedia, which I have used on many of my songs.
Headphones for recording: My favorite headphones for recording are the Sony MDR-7506s, which I use for monitoring during all my recording sessions. They can also be found in many pro recording studios. Get the Sony MDR-7506 headphones from Amazon here.
General-purpose microphone: You can’t go wrong with a good ol’ Shure SM-57, one of the most versatile and ubiquitous microphones around. I’ve been using one in my home studio for as long as I can remember. Amazon offers the Shure SM-57 for a very competitive price.
To see all of my most up-to-date recommendations, check out this resource I made for you!
