Why is my interface popping? How to stop clicks & pops
DISCLOSURE: This post contains affiliate links. If you buy through these links, I may earn a small commission.
From time to time when working on my music in my home studio, for apparently no reason I have started getting the dreading popping sounds coming out of the audio interface. Over the years I have discovered several common causes of the problem, and it is usually just a process of elimination to isolate the cause and get rid of the annoying popping sounds for good.
Audio interface popping is often caused by faulty cables or ports. Audio drivers can also be a cause and changing their settings, particularly reducing buffer size, can solve the issue. Your computer can also be too busy to process audio, and reducing its workload often helps.
The best way to diagnose and fix audio interface pops and clicks is to work through all the possible causes, and eliminate each one in turn until you identify the culprit. This often means swapping out a certain component e.g. a cable, or experimenting with some application, driver or operating system settings.
Read on to discover the likely causes of, and how to get rid of pops and clicks.
If you are interested in checking out the best recording gear such as audio interfaces, studio monitor speakers, microphones, etc., you can find them at Amazon by clicking here.

Faulty cables often cause audio interface popping
OK I know – it’s a boring answer. But cables are so often the cause of audio pops, clicks, crackles and scratches. And this applies not just in a home studio environment. Whenever I’ve had an audio problem in a live stage situation, 9 times out of 10 a cable has been the culprit.
It makes sense when you think about it. A cable is the stress point physically in any audio connection. It is constantly flexing, being plugged in and out, being snagged around furniture, being trodden on, twisted, turned and pulled every which way it can be.
So always eliminate your cables first. There are several different types of cables plugged into your audio interface that could be causing an audio problem…
- Jack instrument cables
- XLR cables
- USB cables
- Headphone cables
- Speaker cables
Some of the things that can go wrong with cables include loose connections, dry solder joints, breaks in the internal wires, and oxidization over time.
How to diagnose a faulty cable
First, give the suspected cable a wiggle. Try gently moving the connector on the end of its cable from side to side in its port. Also, try wiggling the cable at several places along its length. If either of these actions causes the popping sound you have been hearing, you may have found the culprit.
Once you have a suspected cable, swap it out with another cable and repeat the process. If the problem goes away, you have identified the dodgy cable. Make sure to try the suspected cable with some other piece of equipment as well, just to confirm your findings, and to check the issue isn’t with what the cable was plugged into.
Use quality cables to avoid issues
Cables can generally be bought for very little money. Don’t buy these cheap cables! It almost always turns out to be a false economy. Spend more on good quality cables and they should last you decades, if not a lifetime.
You can sometimes repair cables, especially if the problem is a loose connection or dry solder joint in the plug attached to the end. If you are a dab hand with a soldering iron, this is certainly a possibility. But buying good quality cables to start with gives you the very best chance of never having to deal with that interruption to your creative flow.
As a side note, a reliable audio interface is a must for any home studio. My personal choice is the Focusrite Scarlett series, which I have been using for as long as I can remember. They last for years and years, and they give great-sounding recordings for not very much money. You can buy the Focusrite Solo from Amazon (affiliate link) for a very reasonable price.
There are many other models in the Focusrite Scarlett range in addition to the “Solo”. To help you decide which one to buy, I have written a guide to choosing the right Focusrite Scarlett for you. It will help you make an informed choice based on your personal musical and recording needs.
Audio interface ports can cause clicks and pops
Closely related to cables, are the ports or sockets that the cables plug into.
Ports can suffer from broadly similar problems to cables, such as loose connections, dry solder joints and oxidization over time. They generally cause issues less than faulty cables, but they are more difficult to repair if you find a problem.
Diagnose the problem in a similar way to cables by plugging in a known working cable, and wiggling the connector. Listen out for the offending crackling or popping noises.
The following types of port and socket can cause issues…
- Instrument jack sockets on your audio interface
- XLR sockets on your audio interface
- USB ports on your computer
- Headphone sockets on your audio interface
- Speaker cable sockets on your audio interface
If you do determine that the port is the issue, the short-term solution is usually to find another working port. e.g. if one particularly USB port on your computer is giving you audio problems, you can usually find another port to use instead. Similarly with audio interface input sockets.
If you cannot find another port that works, your options are limited. You can either get the unit repaired, particularly if it is still under warranty, or purchase another unit.
This does underline how important it is to treat our equipment well. Modern audio gear is generally very well made, and with the right care can last many, many years.
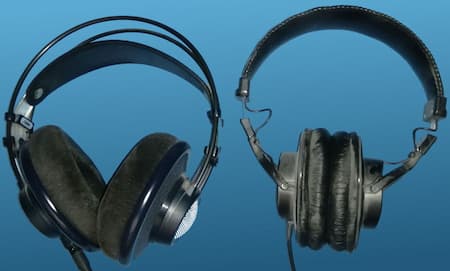
A quality pair of reliable headphones is a perfect example. My favorite headphones for recording are the Sony MDR-7506s, which I have been using in my home studio trouble-free for many years. You will usually find a pair or two of these in most pro recording studios. You can buy Sony MDR-7506 headphones from Amazon (affiliate link) for a great price.
Changing driver settings to fix audio popping
Audio drivers are small programs that are responsible for communication between the operating system and the audio interface. There are different types designed for different purposes, and it is important you use the right one.
Specialist high-end audio drivers are usually supplied with audio interfaces, intended for use with music production applications. These are called ASIO (Audio System Input Output) on Windows, and Core Audio on OS X.
If you have checked your cables and ports and are still hearing audio glitches, pops or clicks, the first thing to check is that you are using the correct audio driver. For example on Windows, in whichever audio application you are using there will be a setting to select the driver. Make sure this is set to ASIO, and is using the driver supplied with your interface.
Here is an example from the Reaper DAW on Windows, showing where to select the driver…
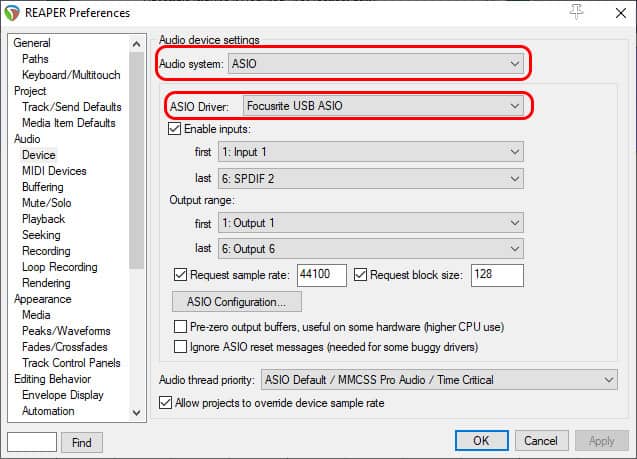
If you don’t have the ASIO driver showing up as an option, you probably don’t have it installed on your system. Go to the manufacturer’s website for your audio interface, and you should be able to download the appropriate driver and install it.
If all this sounds like gobbledygook, don’t worry! I have a full article on how to start learning a DAW. It takes you through the best ways to learn the software as quickly as possible, eliminating any confusion on the way. If you are new to DAW software, it is highly recommended reading.
Increasing buffer size to fix audio pops and clicks
Your audio driver will most likely have some settings you can change through the audio settings in your application. For example in the screenshot above, clicking the “ASIO Configuration…” button will bring up the following dialog for my Focusrite Scarlett audio interface on my music production PC…
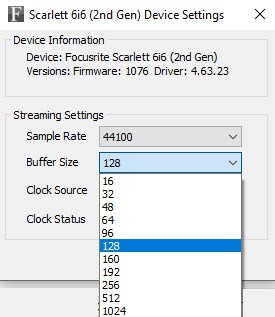
The most important of these settings as far as eliminating audio clicking and popping is concerned is the Buffer Size. You can think of this as a bit like a bucket for processing audio data. Basically, the higher the buffer size the more latency you will encounter i.e. the time between when you play a note on an instrument and when you hear it. But, you also get higher sound quality with a larger buffer size.
The potential problem comes when the buffer size is set too low. You may reach a particular setting where your computer cannot keep up with the speed required to work with such a low buffer size, resulting in audio glitches – clicks and pops.
So it is always worth trying a higher buffer size in your audio driver if you are suffering from the dreaded popping. You can see above there are options ranging from 16 up to 1024. 128 is usually a good starting point, but it will depend on your particular interface and other computer hardware.
A low buffer size and correspondingly low latency is only required for recording, where you want to hear the note you play at the same time as you play it on your instrument. When mixing or listening back to your music, latency is irrelevant – you want to have as high a quality sound as possible.
Occasionally, changing the sample rate for your project can also help fix glitches. You can see the Sample Rate setting in the screenshot just above the Buffer Size. For example, you could try changing the rate from 48000Hz down to 44100Hz.
Talking of mixing, I have written a beginners guide to mixing in general. I highly recommended you check it out if you are new to mixing. It clears up some of the confusion novice mixers often have, and helps you avoid some common mixing pitfalls.
Updating drivers can clear audio glitches
Keeping your audio drivers up-to-date is a good way of ensuring the best possible audio performance. Using an older driver can sometimes cause pops and clicks, particularly if you have a very new audio interface where the latest driver might be needed to get the best out of it.
Visit your audio interface manufacturer’s website to see if you have the latest driver. Looking in the application provided with your interface should tell you which version of the driver you currently have, and whether you need to update.
Even if you do have the latest available driver, re-installing it can sometimes help clear up audio glitches. It is worth a try as a last resort if you have tried everything else.
Sometimes it’s not just pops and glitches that cause you grief; sometimes you get no sound at all! Lots of people encounter this issue when working with the excellent audio editor Audacity. If this happens to you, check out my article on reasons Audacity might not play audio for help in tracking down and fixing the issue.
Insufficient computing resources causing audio glitches
It is possible that when you hear audio clicks or pops, that your computer is too busy doing other things to process the audio properly. Computing resources such as CPU availability, RAM and hard disk read/write speed could be being used up by other things running, starving the audio process(es) of what they need to run effectively.
This is less of a problem with modern PCs than it used to be. Even off-the-shelf budget PCs are very powerful these days, and can handle basic audio production tasks and software without problems.
But it still can be an issue, especially if you are running a lot of applications at the same time or if you have a very complex audio project with many tracks, Virtual Instruments, effects or other plugins all running together.
I have written an article on what sort of PC specification you need for music production these days. I highly recommend you check it out if you are considering buying a new computer for music-making.
To help you see if this is your particular problem, most DAWs have a performance or CPU meter built-in. Here is the one in Reaper (View->Performance Meter)…
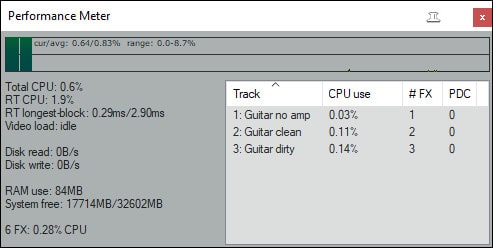
If your meter indicates using 50% or more of any particular resource, this could be your issue. You can also use the Task Manager built into Windows (right-click the taskbar -> Task Manager) to give you an idea of which applications are consuming the most resources.
Here are some possible solutions to the lack of computing resources causing audio pops and clicks…
- With tracks with many plugins on, consider converting them to pure audio (rendering or freezing them) and disabling/deleting the original tracks
- Bounce several tracks down to one track
- Only play the tracks/enable plugins that you need to hear for the task you are doing at the time
- Ensure you are only running the application(s) that you need – close down everything else
- Make sure your power options settings are set to High Performance
While we’re on the subject of computers for music production…if you are using an audio interface with a laptop, there are some specific issues you should consider. That’s why I have a whole guide on using audio interfaces with laptops. It takes you through exactly how to use an interface with a laptop, the best interfaces to use and the issues you may encounter and how to solve them.
Prevent audio glitches with regular computer maintenance
Maintaining your computer, both software and hardware, is something that many of us neglect, myself included. But taking a few minutes regularly to perform some basic tasks can really help prevent issues building up over time, and can prevent any audio glitches from happening in the first place.
These are the maintenance tasks I recommend you regularly perform to help prevent audio issues from appearing…
- Defragment HDDs (note this is just for traditional magnetic hard drives, not SSDs which should not be defragmented)
- Remove/uninstall unused applications and data that you no longer need
- Clean dust out from fans and vents
- Ensure that other system device drivers (not just audio drivers, e.g. USB) are up-to-date
- Install Windows updates
- Keep your audio applications up-to-date with the latest available version
Audio interface fault causing audio popping
It is unlikely but possible that if you have eliminated any other cause, your audio interface may have developed a hardware fault.
Try swapping it out with another audio interface to see if the issue persists. If you don’t have another one, try begging and borrowing from fellow musician friends. If the replacement audio interface seems to not exhibit the same audio issues, then that is a good indication that the original unit is faulty.
Hopefully, it is still in warranty and you can send it back for repair/replacement. If not, I suggest contacting the manufacturer and/or supplier where you bought it from to see what they suggest.
If you are in the market for a new audio interface, it can be difficult to determine just what type you need. My article on how many audio interface inputs you need will help you choose the right sort for you, and should help ensure you don’t spend any more money than you need to.
Why is my recording clicking?
Your recording clicking usually occurs because your computer cannot process audio fast enough for smooth playback. The audio driver buffer size set too low can cause this. Also, too many applications or processes running can leave insufficient computing resources available for audio processing.
Work through the steps above in the rest of this article, particularly those concerning audio drivers and computing resources.
Finally, if you are relatively new to the world of home music recording and production, you might like to check out my comprehensive guide to recording music at home. This is a beginner focussed article that takes you right through from the equipment you need, setting it up, selecting the best location in your home, up to making your first recording.
Here is some of my favorite home studio gear…
Thanks for reading this article. I hope you found it helpful in your home music-making activities. Here are a few of the tools that I personally use in my home studio. These are affiliate links, so if you decide to use any of them I’ll earn a small commission.
Audio interface: My personal choice for audio interfaces are the Focusrite Scarlett series. I have been using these for years, and they have always given me great-sounding recordings. For a very reasonable price from Amazon you can buy the excellent Focusrite Scarlett 4i4, or if you don’t need MIDI capability the Focusrite Solo is a great choice.
Amp sim: Guitar amplifier simulator software has come on leaps and bounds in recent years, such that I record all my electric guitar parts using amp sims these days. One of the very best is the incredible Amplitube from IK Multimedia, which I have used on many of my songs.
Headphones for recording: My favorite headphones for recording are the Sony MDR-7506s, which I use for monitoring during all my recording sessions. They can also be found in many pro recording studios. Get the Sony MDR-7506 headphones from Amazon here.
General-purpose microphone: You can’t go wrong with a good ol’ Shure SM-57, one of the most versatile and ubiquitous microphones around. I’ve been using one in my home studio for as long as I can remember. Amazon offers the Shure SM-57 for a very competitive price.
To see all of my most up-to-date recommendations, check out this resource I made for you!