
DISCLOSURE: This post contains affiliate links. If you buy through these links, I may earn a small commission.
Over the years I have worked with many different audio systems such as audio interfaces, PA systems and guitar amplifiers. Two of the most commonly confused terms applicable to all those systems are volume and gain, and it has taken me many years to fully understand the difference.
Volume is how loud the audio output sounds. Gain is how loud the signal is at the audio input. Adjusting the volume control will affect how loud the sound is perceived by the listener’s ears. Adjusting the gain control will change the tone, but not necessarily the overall volume.
In this article, we take a look in detail at exactly what volume and gain are, and the differences between them. We’ll also look at several different examples of using gain and volume, and how an understanding of both can help you achieve the best sound quality in your own music-making activities.
If you are interested in checking out the best recording gear such as audio interfaces, studio monitor speakers, microphones, etc., you can find them at Amazon by clicking here.
Volume vs gain
Let’s start by defining what exactly volume and gain are…
Volume
Think of your car stereo, your Bluetooth speaker or your hi-fi system. If you turn up the volume control on any of these devices, your ears tell you that the sound has got louder. That sounds blatantly obvious, but it leads us to a very important point to grasp…
The volume control controls the signal level at the output of the system, i.e. the loudness of the sound at its output.
Adjusting the volume control only changes the loudness; it does not affect the tone or character of the sound.
As well as consumer-level audio devices, this applies equally to pro music equipment such as audio interfaces, mixers, power amps and guitar amps.
In the circuitry of all these systems, the volume control is pretty much the last component in the circuit before the electrical signal gets converted into sound by your speakers or headphones.
This idea of changing the level of the signal at different points in an audio system or circuit is the key point to understand. This leads us nicely onto…
Gain
Gain is how loud the signal is at the input of the system. Note the difference to volume, which is the signal level at the system’s output.
Strictly speaking, gain is the ratio of the output signal level to the input signal level. However, thinking of it as the loudness at the input is usually sufficient in most audio applications.
This simple diagram illustrates the different points gain and volume are applied in an audio system or circuit…
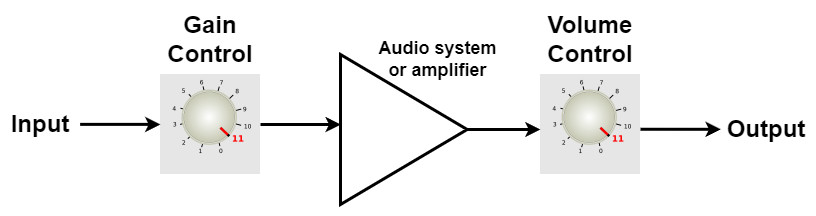
Notice the direction of the signal flow and that the gain control is hit first, before the main audio circuit. Correspondingly the volume control is hit after that circuit, and is the last item in the chain.
Gain and volume both control the level of the signal, it is just the position in the system where the level is changed that determines whether we are controlling gain or volume.
What does gain do?
While it’s conceptually very easy to understand what volume does, it is trickier to get your head around the effect that gain has in an audio system.
Gain will increase the volume coming into your audio system. Up to a certain level, this will likely also increase the volume at the output i.e. how loud the sound you hear is.
If you keep increasing the gain, at some point you will reach the limit that the circuit is designed to cope with. Past this point, the output volume will stop increasing, and clipping will start to occur. Clipping is unpleasant distortion, popping or clicking sounds that happen when the circuit’s input has a level too high for it to properly cope with. This is something you should usually try to avoid, especially with digital recording.
If you are suffering from audio clicks or pops in your recordings, chances are that you have some clipping in your audio interface. Check out my “How to stop clicks and pops” article for help in eliminating these annoying sounds and getting the sound quality that your song recordings deserve.
It is also important to realize that, unlike volume, gain can also affect the tone or character of the sound. The classic example of this is with a guitar amplifier, where the gain control affects how overdriven the sound is.
Gain when recording
It is very important to set gain correctly when recording, to get the best sound quality and to avoid clipping.
On a typical modern audio interface, you have individual gain controls for each channel. This is a typical process for setting the gain for recording…
- Plug your sound source (microphone or instrument) into a channel
- Play or sing at the loudest volume you will record
- Start to turn up the channel gain control, watching the clipping indicator carefully
- As soon as clipping occurs, back off the gain a touch until clipping stops
- Repeat 2-4 until clipping never occurs, however loud you sing or play
This process will ensure you set a strong signal level, but not so strong as to cause unpleasant audio artifacts to be recorded.
You will also have to watch the levels inside your DAW carefully. Ideally, you want to record at an average level of about -18dB. This does not seem like much, but it is the level that modern digital recording platforms are optimized to work best at.
As using the gain to set the recording level is so crucial to getting the best sound, I have a whole article on how to get recording levels right every time. The article is based on setting guitar recording levels specifically, but the information applies just as well to recording any instrument or voice.
Gain stages
In any real-world practical audio system, whether that’s a PA system, mixing desk, power amp, audio interface or anything else, there are multiple amplifying stages in that system.
These are sometimes referred to as gain stages. The different stages all have an input and an output, with a signal level (i.e. how loud it is) at both of these points
Let’s look at the example of a typical guitar amplifier, as it’s a very common and easy-to-understand audio system. This is much simplified, but basically a guitar amp is made up of a pre-amp stage and a power amp stage…
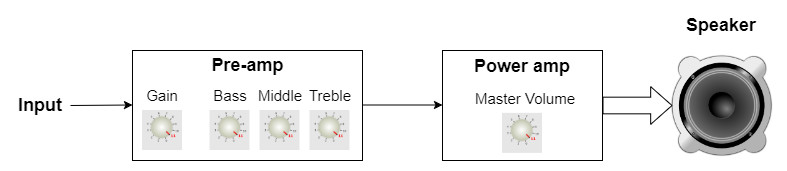
The pre-amp is one gain stage, and the power amp is another. The Master Volume control in the power amp sets the overall output volume of the guitar amp. The pre-amp’s Gain control sets the input level, and hence how much overdrive there is in the guitar’s sound.
Notice also the 3-band EQ controls (bass, mid, treble) in the pre-amp, which is often found in pre-amp style gain stages in lots of different types of audio hardware.
As another example, think of a typical home-recording setup with a computer running DAW software and an audio interface. Again this is simplified but in this setup, you have the following gain stages…
- The pre-amp on the audio interface (this is where the channel gain control is)
- The channel strip in the DAW’s mixer
- The master channel strip in the DAW’s mixer
- The volume control on the audio interface
If you are doing any sort of home recording, an audio interface is an absolutely essential piece of equipment. I have been using Focusrite Scarlett interfaces for many years, and they have always given me great-sounding recordings for not very much money. You can buy the Focusrite Solo from Amazon (affiliate link) for a very reasonable price.
Gain or volume…?
Now a word of warning…just to add in some confusion, volume can effectively be gain and vice versa depending on which system or setup you or talking about.
For example, as you will see later, it is very common to connect two or more different audio devices together. In this situation, the volume control for the first device is effectively the “gain” control for the system as a whole. The 2nd device’s volume control is the system’s “volume” control.
Think of an audio interface plugged into a hi-fi amplifier – exactly the setup I have in my home studio. The volume control on the audio interface is the “gain” control for the system, and the volume control on the hi-fi amplifier is the “volume” control.
This will become clearer in the examples later on.
In addition, sometimes a gain control is actually a volume control. On compressors, you will often see a control labelled “make-up gain” or similar. Really this is just a control to increase the volume, to make up for the loudness lost by the action of the compressor.
This is something to be aware of – it is not always clear-cut when a control is acting as “gain” and when it is “volume”.
To accurately judge the levels to set your gain and volume, a quality pair of headphones is essential. I highly recommend the AKG K-702 Reference Headphones (affiliate link), which you can get at Amazon for a very reasonable price. These are the headphones that I have been mixing on for years, with great results.
Practical gain and volume examples
Examining some real audio systems and looking at how gain and volume work in them should help with your understanding and clear up any confusion.
Phone into Bluetooth speaker
Gain and volume do not just appear in pro audio equipment. They appear wherever there is some device that outputs some form of audio.
Let’s take a modern example; a smartphone connected to a Bluetooth speaker…
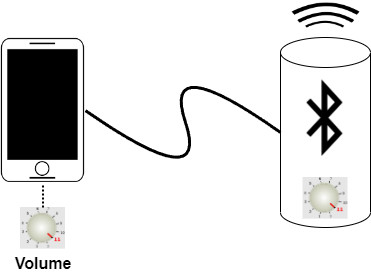
Here we effectively have two gain stages; the smartphone and the Bluetooth speaker.
In this scenario, as the phone’s output is the Bluetooth speaker’s input, the phone’s internal volume control can effectively be thought of as the “gain” control for the Bluetooth speaker.
It will vary from device to device, but the best way to set the controls for the highest sound quality in this example will probably be to turn up the phone volume to full or nearly full. Then adjust the Bluetooth speaker volume to set the volume level you wish to listen at.
Mixing in a DAW
When mixing, you typically have multiple channels of recorded instruments that all feed into one master bus or channel. Each individual channel volume can be thought of as a gain control, as they are all inputs to the master channel. The master channel fader is the overall volume control…
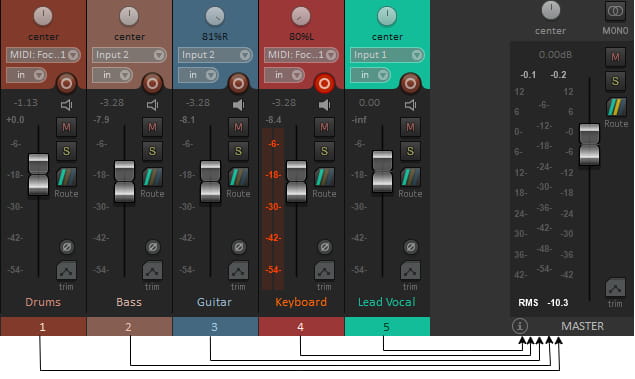
This is a little different to the other systems we have looked at so far, in that we effectively have multiple gain stages (the instrument channels) feeding into one gain stage (the master channel).
Each channel volume (a “gain” for the master channel) needs to be carefully set to ensure the best sound quality and to avoid clipping. The practice of doing this is called gain staging, and is a very important technique to learn if you are going to be performing any sort of mixing. I have a whole article dedicated to gain staging, which is recommended reading.
Mixing is one of those activities that is very confusing for beginners and takes a lot of practice. It took me several years to develop any level of confidence in mixing. That’s why I have written a beginner’s guide to mixing to help novices learn the basics quickly. I highly recommended you check it out if you are new to mixing.
Microphone into PA system
Our final example, is that of a very common live music setup – a microphone amplified by a PA system. The PA system consists of some sort of mixer, a power amp and some speakers…
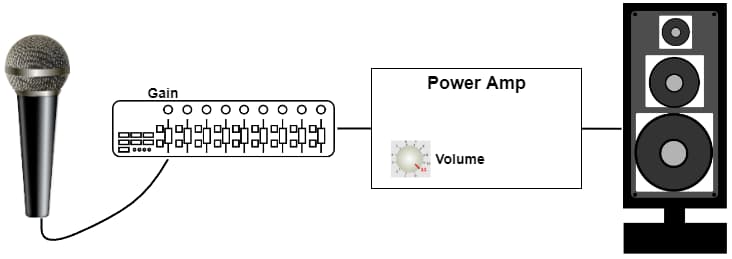
Here, the microphone is plugged into a channel on the mixer. The volume fader for that channel effectively becomes the “gain” control for the power amp. Ideally you would want to set this as high as possible without clipping or distortion occurring.
The volume control on the power amp will control the overall volume you hear through the speakers.
Further reading
Congratulations on making it this far! Hopefully, you now have a clearer understanding of gain and volume and the differences between them.
Finally, if you are looking for more information on recording in general, including how to apply gain and volume, I highly recommend you check out my beginner’s guide to recording music at home. A huge amount of work has gone into this guide! It is a complete resource to take you from never having recorded before all the way through to making your first home recording.
Here is some of my favorite home studio gear…
Thanks for reading this article. I hope you found it helpful in your home music-making activities. Here are a few of the tools that I personally use in my home studio. These are affiliate links, so if you decide to use any of them I’ll earn a small commission.
Audio interface: My personal choice for audio interfaces are the Focusrite Scarlett series. I have been using these for years, and they have always given me great-sounding recordings. For a very reasonable price from Amazon you can buy the excellent Focusrite Scarlett 4i4, or if you don’t need MIDI capability the Focusrite Solo is a great choice.
Amp sim: Guitar amplifier simulator software has come on leaps and bounds in recent years, such that I record all my electric guitar parts using amp sims these days. One of the very best is the incredible Amplitube from IK Multimedia, which I have used on many of my songs.
Headphones for recording: My favorite headphones for recording are the Sony MDR-7506s, which I use for monitoring during all my recording sessions. They can also be found in many pro recording studios. Get the Sony MDR-7506 headphones from Amazon here.
General-purpose microphone: You can’t go wrong with a good ol’ Shure SM-57, one of the most versatile and ubiquitous microphones around. I’ve been using one in my home studio for as long as I can remember. Amazon offers the Shure SM-57 for a very competitive price.
To see all of my most up-to-date recommendations, check out this resource I made for you!
