Gain staging – a step-by-step tutorial for a modern DAW
DISCLOSURE: This post contains affiliate links. If you buy through these links, I may earn a small commission.
Mixing has always been the most difficult part of home recording for me. I have got better and better at it over the years though. One of the things that has enormously helped me to achieve better mixes is learning how to properly perform gain staging.
Gain staging is the process of setting signal levels to ensure high sound quality in a multi-component audio system. It is performed at every component in the sytem. The levels are set so as to minimize unwanted noise, and provide the optimum level to the next component in the chain.
Gain staging in a home studio is most commonly performed at the mixing stage. But it actually applies to any audio system where you have more than one audio component connected together.
This article examines what gain staging is in detail, why we need it and the problems it is trying to solve. It goes on to provide a repeatable process for you to use to perform gain staging when mixing in your DAW (Digital Audio Workstation) software.
If you are interested in checking out the best recording gear such as audio interfaces, studio monitor speakers, microphones, etc., you can find them at Amazon by clicking here.
What problems is gain staging trying to solve?
Gain staging is trying to solve some potential problems with levels when mixing audio signals together.
Imagine you have two recorded audio tracks; one that has been recorded at a very loud level, and one that has been recorded very quietly. When it comes to mixing those tracks together, you are going to have a hard time balancing the levels.
Either you are going to have to boost the level of the quiet track somehow – there may not be enough room on the fader to turn it up as much as you need to. Or you’ll need to make the louder track much quieter to get it to a level where it isn’t drowning out the quiet track.
In addition, there may have been background noise when you were recording the quiet track. As you are probably going to have to turn up the level a lot on this track, you will also turn up the background noise. This may cause a problem in your mix, with a lot of unwanted noise you cannot get rid of.
Finally, modern DAW plugins are designed to work best at a particular signal level, producing their best sound quality at this level. If the loud track has been recorded at a level much higher than this, your plugins are not going to produce a great quality sound.
However you record your tracks, you will need an audio interface. My personal choice is the Focusrite Scarlett series. I have been using these for years, and they give great sounding recordings for not very much money. You can buy the Focusrite Solo from Amazon (affiliate link) for a very reasonable price.
What is gain staging?
Gain staging is a process designed to eliminate the above problems as much as possible.
Gain staging is the process of setting the signal levels such that…
- Each component is outputting the optimum signal level for the best sound quality
- Unwanted noise and distortion are minimized
- Enough “headroom” is available to increase a component’s volume sufficiently
- All the components are at (roughly) the same volume to give us a good starting point for a mix
These are the fundamental goals of gain staging for a mix.
In modern digital recording systems noise is not really a problem, providing you have recorded the sound source correctly in the first place.
In traditional analog recording, noise was a much bigger consideration. It was very important to achieve a high Signal-To-Noise (SNR) ratio, such that the instrument or voice you were recording would drown out the background noise or hiss.
That’s why you typically record much hotter (louder) in an analog system than a digital one. In our modern digital DAW-based home studios, we can record at a much lower level. Typically this is at an average level around -18dB; more on this later.
You may be wondering….what is this mysterious thing called gain, and how does it differ from volume? That’s why I wrote a whole article on the topic! Check out my article on the difference between gain and volume. You’ll learn exactly what the difference is, and how to use this knowledge to improve your own recordings and mixes.
This article focuses on gain staging within a DAW. However, gain staging applies to any audio system where you have an audio component feeding into another one. Some examples are…
- PA system for a band
- Guitar rig (guitar, effects pedals, amplifier)
- Hardware-based pro recording studio
To properly judge your mix for gain staging or anything else, a quality pair of headphones or studio monitor speakers are essential. I highly recommend the AKG K-702 Reference Headphones (affiliate link), which you can get at Amazon for a very reasonable price. These are the headphones that I have been mixing on for years, with great results.
What is a gain stage?
Unsurprisingly, gain staging refers to gain stages. You can think of a gain stage as a component in an audio system where you can set the level.
Think of a DAW, with some recorded tracks. Some of the gain stages are…
- The channel fader for a track in the mixer
- An effects plugin’s volume control
- A Virtual instrument volume control
- The master channel fader

At each of these points you can adjust the signal level, which feeds into the next stage in the chain. It is at these points that we will be performing our gain staging activities.
More generally, you can think of a gain stage as…
- A circuit that has a control where you can adjust the signal level
- An amplifying component
- Anything that has a fader, gain control, volume slider, etc.
The whole concept of gain and volume is a little confusing. That’s why I have a whole article dedicated to the difference between gain and volume, which will help you understand what each one refers to. I highly recommend you read it before you undertake any type of gain staging.
The importance of recording level
Although this article concentrates on gain staging during mixing, it would be incomplete without a mention of recording level.
It is very important to get the level right during the recording process, and to capture a high-quality recording. If your recording has some unpleasant distortion or background noise on it, it is there for good! No amount of gain staging or other mixing technique will solve this. The phrase “fix it in the mix” is a myth, and is a phrase I loathe with a passion.
So make sure when recording that your signal level is high enough to be much louder than any background noise, but not so high as to cause distortion.
I have a whole article on setting the recording level correctly. This article focuses on setting guitar recording levels, but the techniques discussed apply equally to recording any instrument or voice. Read this article to learn a technique for setting the recording level correctly every single time.
If you are new to home recording in general, I highly recommend you check out my beginner’s guide to recording music at home. A huge amount of work has gone into this guide! It is a complete resource to take you from never having recorded before all the way through to making your first home recording.
Gain staging steps for a DAW
Here’s a process for performing gain staging in a modern DAW. It assumes that you have several tracks already recorded in a project.
Note that this is not the only way to do gain staging, but it is the process that I have been personally using for several years with excellent results…
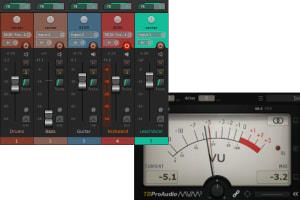
1 Open your DAW’s mixer window.
All DAWs contain a mixer application within them. This is where we will do our gain staging work.
2 Set all faders to 0dBFS (unity gain)
The aim is to have all recorded parts at roughly the same volume when the faders are at their 0dBFS position.
3 Play a track and observe it’s level
Play the first track, and observe the level on the meter in the mixer. We want it to be averaging roughly around -18dbFS, peaking at no more than -15dbFS. This is not a hard and fast rule; very transient instruments like drums may peak quite a bit higher than this. Be careful that you’re not peaking over about -10dBFS for these types of instruments.
4 Adjust the track’s level
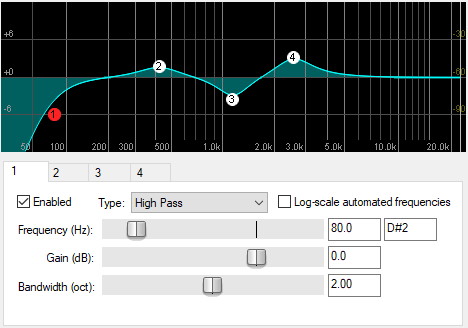
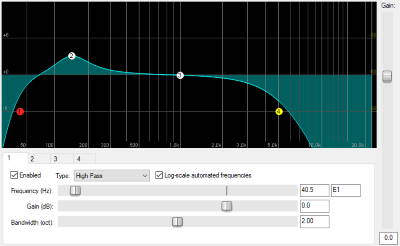
If the meter does not show the levels in step 3, adjust the track’s volume until it does. Do not use the fader to do this! Use one of the following methods…
- Use the EQ pre-gain control
- Use the output volume control on a plugin on the channel
- Add a volume plugin to the channel, and adjust its level
- If the channel is playing a virtual instrument, adjust its output volume control
5 Repeat for all other tracks
Once you have the level averaging at roughly -18dBFS, repeat steps 3-4 for the next track until all your tracks are at this level.
6 Use your ears to confirm the levels
Have a listen to all the tracks, and make sure they sound roughly the same volume. If they do not, adjust using one of the methods in step 4 until they do.
You now have fully gain-staged tracks, set at the optimum level for sound quality and ready for mixing. All your tracks will now be at roughly the same volume with the faders in the 0dBFS position. You are now free to use the faders as part of the mixing process to set the required levels for your mix.
Mixing is a complex process, and can be very confusing for newcomers. I have written a beginner’s guide to mixing to help newbies learn the basics quickly. I highly recommended you check it out if you are new to mixing. It clears up some of the confusion novice mixers often have, and helps you avoid some common mixing pitfalls.
What level should you gain stage at?
Gain staging at an average level of -18dBFS is a commonly accepted standard. Peaks of up to -15dBFS are allowable in general. With certain very transient instruments like drums, peaks can be as high as -10dBFS without causing any problems.
-18dBFS may seem very low to you, but it is perfectly fine for a digital recording system. This is actually the level that most modern audio plugins are designed to work best at.
The days of recording everything at as close to 0dB are long gone. In fact, this is one of the most common mistakes that beginner home recordists make.
Here is some of my favorite home studio gear…
Thanks for reading this article. I hope you found it helpful in your home music-making activities. Here are a few of the tools that I personally use in my home studio. These are affiliate links, so if you decide to use any of them I’ll earn a small commission.
Audio interface: My personal choice for audio interfaces are the Focusrite Scarlett series. I have been using these for years, and they have always given me great-sounding recordings. For a very reasonable price from Amazon you can buy the excellent Focusrite Scarlett 4i4, or if you don’t need MIDI capability the Focusrite Solo is a great choice.
Amp sim: Guitar amplifier simulator software has come on leaps and bounds in recent years, such that I record all my electric guitar parts using amp sims these days. One of the very best is the incredible Amplitube from IK Multimedia, which I have used on many of my songs.
Headphones for recording: My favorite headphones for recording are the Sony MDR-7506s, which I use for monitoring during all my recording sessions. They can also be found in many pro recording studios. Get the Sony MDR-7506 headphones from Amazon here.
General-purpose microphone: You can’t go wrong with a good ol’ Shure SM-57, one of the most versatile and ubiquitous microphones around. I’ve been using one in my home studio for as long as I can remember. Amazon offers the Shure SM-57 for a very competitive price.
To see all of my most up-to-date recommendations, check out this resource I made for you!