
EQ (equalization) is one of the most powerful tools we have to adjust our mixes. But should we always EQ every track in the mix, or should we be a bit more selective?
You should not EQ every track in your mix automatically. Each track should be listened to on its own merits, and if it requires some EQ to sit in the mix well, then apply some to that track. If a track sits well in the mix without any EQ, then do not apply any.
EQ can be thought of as very specific volume controls for individual frequency ranges. As such, it is a wonderful tool for giving us very fine-grained control over every element of our mixes. It is ok to apply EQ to all your tracks if you have determined they all need some. However, it is easy to overdo it and end up with a worse-sounding mix than if you took off all the EQ altogether.
If you’re reading this article, clearly you are interested in EQ and you are probably at the novice level. These other two articles on EQ should also be of interest to you, and will help you understand EQ and its terminology…
If you are interested in checking out the best recording gear such as audio interfaces, studio monitor speakers, microphones, etc., you can find them at Amazon by clicking here.
EQ only the tracks that need it
The ideal situation when mixing is as follows. After you’ve tracked all your parts and you sit down to mix your project for the first time, everything sits perfectly, all the parts are nicely balanced, you can hear everything clearly and you don’t need to do anything. Mix finished!
In over 20 years of mixing, that has never happened to me. Maybe it does if you have an absolutely ideal acoustically-treated room to record in, are an expert in mic placement, and have lots of experience in combining tracks together. But somehow I doubt it!
So back in the real world, we have several tools at our disposal to get all our tracks sitting nicely together. Ideally, we want all the instruments nicely balanced, where nothing is overpowered or overpowering, and everything can be heard clearly. We have two essential tools to achieve that aim…
- Track level (volume) controls – the faders
- EQ
Our first mixing move should be “gain staging”, or making all the tracks a similar volume when the faders are all in their default 0 dB positions. This then allows us to perform a (very) rough mix, where all we do is adjust the volume of each track using the faders so all the instruments are roughly balanced how you want them.
It’s at this point, and only at this point, that we can start to look at EQ.
As you’re listening to your mix, focus your ears on each track in turn and ask yourself the following questions…
- Can I hear the track clearly?
- Are there frequencies the track doesn’t have much of and can safely be removed with an LPF or HPF (Low or High Pass Filter)?
- Is the track fighting with another track to be heard?
- Is the track overpowering any part of the mix e.g. the lower mid-range?
- Is there something specific I want to hear more of e.g. more high-end sparkle from the hi-hats?
- Are there any unpleasant sounding frequencies that I don’t want?
If the answer to any of the above questions is “yes”, that is a good indication that a track would benefit from some EQ. If the answer to all the questions is “no”, then leave that track alone.
A similar attitude to using EQ in this way can also be adopted with the other most commonly used mixing tool – compression. Check out my article on if you should compress every track to learn how to decide when to use compression. As compression and EQ are often used together in a mix, I highly recommend reading the compression article along with this one.
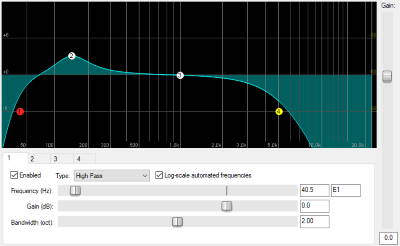
What are HPFs and LPFs?
HPF and LPF stand for High Pass Filter and Low Pass Filter respectively.
An HPF reduces all frequencies below a certain threshold frequency, leaving the frequencies above the threshold alone i.e. it passes the frequencies higher than the threshold.
An LPF does the reverse; it reduces all frequencies above a threshold, leaving the frequencies below the threshold alone i.e. it passes the frequencies lower than the threshold.
This is not a comprehensive mixing tutorial, but here are several moves you might consider when you have determined that one or more of your tracks need EQ’ing…
- Cut unused frequencies with an LPF or HPF (low or high pass filter) e.g. on vocals, the only thing below 80Hz is likely to be rumble from the mic stand, so apply an HPF at 80Hz
- If you have 2 similar-sounding instruments e.g. 2 rhythm guitars, pick 2 frequencies…
- Cut frequency 1 in guitar 1/boost it in guitar 2
- Cut frequency 2 in guitar 2/boosd it in guitar 1
- If you have a part with an unpleasant frequency in it, sweep the frequencies until you find the offender i.e.
- Set your EQ to a huge boost
- Starting at very low bass frequencies, slowly move the huge boost up through the frequencies, right up to the very high end
- Listen carefully as you do this; when you hear the unpleasant sound, you have identified the offending frequency
- Make an EQ cut at that frequency
In general, favor cutting rather than boosting frequencies. If 2 tracks A and B are fighting for space at the same frequency, reduce that frequency in track A to give track B room, rather than increasing it on track A. Boosting lots of frequencies will result in your mix getting louder and louder, and eventually you will run out of headroom to increase the volume any more. When cutting use a narrow bandwidth, and when boosting use a wider bandwidth. Remember: cut narrow, boost wide.
Try to make your EQ moves as subtle as possible. Huge boosts or cuts at any particular frequency range are more likely to destroy your mix than to be helpful in balancing tracks.
All the above are guides, they are not hard and fast rules. The ultimate decision-maker should be your ears; if it sounds good to you, it is good. Trust your own hearing and taste.
Mixing involves not only EQ, but a thousand other things as well. I have written a beginner’s guide to mixing to help newbies learn the basics quickly. I highly recommended you check it out if you are new to mixing. It clears up some of the confusion novice mixers often have, and helps you avoid some common mixing pitfalls.
The most dangerous button in your DAW

Any guesses as to the most dangerous button in your DAW (Digital Audio Workstation)? The solo button!
Why do I say that? It is very important that all EQ moves, in fact all moves taken when mixing, are performed in the context of the whole mix. What sounds good when listened to on its own, will almost never sound good when listened to in the mix, and vice versa.
A classic example of this is electric guitar parts. If you take a guitar part that sounds great in a full band mix then solo it, it will likely sound a bit thin and lacking in bass. If you then made it sound good on its own and put it back in the mix, it would probably make the bass end sound a bit muddy and overpower the lower-mid range, making the whole mix unclear and a bit flat sounding.
Avoid soloing individual tracks when mixing if you can. Your goal is to make the whole mix sound good, not individual tracks.
EQ’ing the master track
In addition to using EQ on individual tracks, you can also use it on the master track i.e. the master bus with the fader that controls the volume of the whole mix.
The same rule applies here; if your master track doesn’t need any EQ then leave it alone. Hopefully your EQ moves on the individual tracks have solved any problems such that they don’t exist by the time the signal gets to the master bus.
Generally favor EQ’ing individual tracks over the master track. If a problem frequency exists in one track, why would you remove that using EQ on the whole mix, effectively removing it from every track? Try to make any EQ moves on the master bus even more subtle than on the individual tracks.
EQ and almost all other effects today are most commonly applied using DAW plugins. There are many of these available, both “stock” plugins supplied with your DAW and third-party plugins that you download or purchase. Check out these articles to learn more about working with plugins…
- Are third-party plugins better than stock?
- Is it better to record with or without effects?
- What is the difference between VST and VSTi plugins?
Possible exceptions to the rule
Mixing is a personal thing. If we got 10 professional mix engineers in a room and asked them to explain their process to us, we would get 10 different answers. So there are no hard and fast rules, only guidelines and recommended common practice.
So in your own mixing activities, you may determine that there are a few EQ moves that you always make. That is fine, as long as you are making these moves based on your own ears and what you think sounds good for your mix, rather than because you read somewhere that you should always make a -4 dB cut at some particular frequency.
Some examples of common EQ moves….
- Use an HPF to cut below 20Hz to remove low end “boom”
- Boost around 5kHz to add some “presence” to a track
- Roll-off an instrument’s low end to bring it forward in the mix
- Roll-off an instrument’s high end to push it back in the mix
- Use an LPF to cut below 10kHz to remove high end hiss and sibilance
It’s your mix and your EQ
Your mix is yours, no-one else’s. While general advice on EQ moves can be useful in pointing you in the right direction, every mix is different. What works on one mix, might not work on another.
That holds true for the decision on whether to EQ a track or not. The important thing is that you don’t just automatically EQ every track regardless, and each move you do make should be based on a clear objective to achieve something in your mix.
If a track doesn’t need EQ, then don’t use any!
Here is some of my favorite home studio gear…
Thanks for reading this article. I hope you found it helpful in your home music-making activities. Here are a few of the tools that I personally use in my home studio. These are affiliate links, so if you decide to use any of them I’ll earn a small commission.
Audio interface: My personal choice for audio interfaces are the Focusrite Scarlett series. I have been using these for years, and they have always given me great-sounding recordings. For a very reasonable price from Amazon you can buy the excellent Focusrite Scarlett 4i4, or if you don’t need MIDI capability the Focusrite Solo is a great choice.
Amp sim: Guitar amplifier simulator software has come on leaps and bounds in recent years, such that I record all my electric guitar parts using amp sims these days. One of the very best is the incredible Amplitube from IK Multimedia, which I have used on many of my songs.
Headphones for recording: My favorite headphones for recording are the Sony MDR-7506s, which I use for monitoring during all my recording sessions. They can also be found in many pro recording studios. Get the Sony MDR-7506 headphones from Amazon here.
General-purpose microphone: You can’t go wrong with a good ol’ Shure SM-57, one of the most versatile and ubiquitous microphones around. I’ve been using one in my home studio for as long as I can remember. Amazon offers the Shure SM-57 for a very competitive price.
To see all of my most up-to-date recommendations, check out this resource I made for you!
