What do EQ numbers mean? An illustrated guide
DISCLOSURE: This post contains affiliate links. If you buy through these links, I may earn a small commission.
Equalization (EQ) was always one of the most challenging aspects of music production for me to learn when I was first starting out. However, I found if the meanings of EQ numbers and settings are laid out simply and clearly, then EQ becomes a lot less difficult to understand and much easier to use.
EQ numbers state how a cut or boost affects the sound. The three most important numbers are frequency, gain, and bandwidth. A cut/boost is made to a frequency (in Hz), the gain (in dB) is the amount of cut/boost, and the bandwidth (in octaves) is how many surrounding frequencies are affected.
With it being such a powerful tool, EQ is essential to learn early on in your music recording, mixing or production journey. Continue reading to discover what EQ numbers mean, and how to interpret them.
Mixing in general, not just EQ, can be incredibly confusing and overwhelming for beginners. That’s why I wrote a beginners guide to mixing. I highly recommended you check it out if you are new to mixing. It clears up some of the confusion novice mixers often have, and helps you avoid some common mixing pitfalls.
If you are interested in checking out the best recording gear such as audio interfaces, studio monitor speakers, microphones, etc., you can find them at Amazon by clicking here.
EQ: a basic definition
We can’t really start discussing EQ numbers and settings in detail unless we are fairly clear on what EQ actually is.
Every sound has particular unique characteristics. A piano, human speech, a car engine, a pneumatic drill, a whistle, all have their own distinctive sound. This unique sound is made up of certain frequencies. Which frequencies, and how much of each of them there is, give the sound its particular character. It is how our ears can tell the difference between the sound of say, a flute and a trumpet.
We can change the character of that sound by changing the amount of a particular frequency in it that we choose to alter. We can either increase the amount of that frequency (a boost), or decrease it (a cut).
This is what EQ does: controls the amount of each frequency in a sound. It is EQ’s fundamental purpose.
EQ can be done in a physical hardware equalizer, or much more commonly today in an EQ plugin in a DAW. There are many, many EQ plugins available. The vast majority of DAWs come supplied with stock EQ plugins, which are usually excellent. If you are unsure what a DAW is, I highly recommend reading my guide to music recording software which should help give you a firm understanding of what a DAW can do.
There are also many paid EQ plugins available, some of which have become considered to be industry standard. For example, the FabFilter Pro-Q 3 EQ plugin is used by many producers in pro studios all over the world.
I use stock EQ plugins, as they have always been perfectly capable for my needs. All the screenshots in this article are of ReaEQ, which is the stock EQ plugin in Reaper, my DAW of choice.
There has long been a debate about whether stock plugins are good enough, or if you should really use 3rd party plugins for the best results. My article comparing 3rd party and stock plugins answers this question, and is recommended reading if you are considering using any sort of plugin in your next musical project. It will help you make an informed choice to get the best results for your music.
EQ numbers and parameters
When you open up an EQ plugin for the first time, it can look like a whole lot of gibberish numbers and graphs that don’t mean diddly squat to anyone!
Actually, all the settings are there to help achieve the fundamental purpose of EQ; cutting and/or boosting frequencies. Every single one of the numbers or parameters controls some aspect of this cutting/boosting. Let’s take a look at each of the settings in turn and discover exactly what each number means and what it controls…
Frequency
This one is reasonably simple to understand; this is the frequency you have chosen to cut or boost.
Frequency is measured in Hertz (Hz), with 1 kiloHertz (kHz) being the same as 1000 Hz. The range of frequencies you can choose in a typical EQ plugin goes from about 20Hz up to about 20kHz. This is roughly the range of human hearing.
Look at this example screenshot from the ReaEQ plugin from the Reaper DAW…
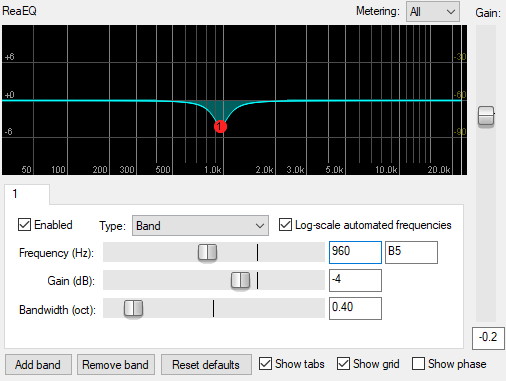
I have made a cut of -4dB at the frequency 960 Hz. You can change the frequency by typing in the actual value in the text box, moving the slider or actually dragging the number around on the graph with your mouse. Most EQ plugins operate in a very similar way, so if you have used one then you will probably be absolutely fine using a different one.
How do you know what frequency to choose? This is a combination of experience, educated guesswork and experimentation. The lower numbers are bass frequencies and the higher ones are treble frequencies. So for example, if you want to remove some bass then you would generally start at the low end of the scale.
Here are a few hints at the frequency you might like to start with based on what particular EQ move you are trying to make. These are very general guides intended as rough starting points, not definitive instructions. All mixes are different, so let your ears be the ultimate judge…
- 60 Hz – 250 Hz : Bass. Increase to add more bass punch or warmth. Decrease to reduce boominess.
- 250 Hz – 800 Hz : Low mid-range. Boost to add bass clarity. Cut to remove muddiness.
- 800 Hz – 2 kHz : Mid-range. Boost to make an instrument stand-out. Cut to reduce honkiness.
- 2 kHz – 6 kHz : High mid-range. Boost to add presence and definition. Cut to reduce harshness/brittleness.
- 6 kHz – 10 kHz: High frequencies. Boost to add sparkle and air. Cut to reduce shrillness and sibilance.
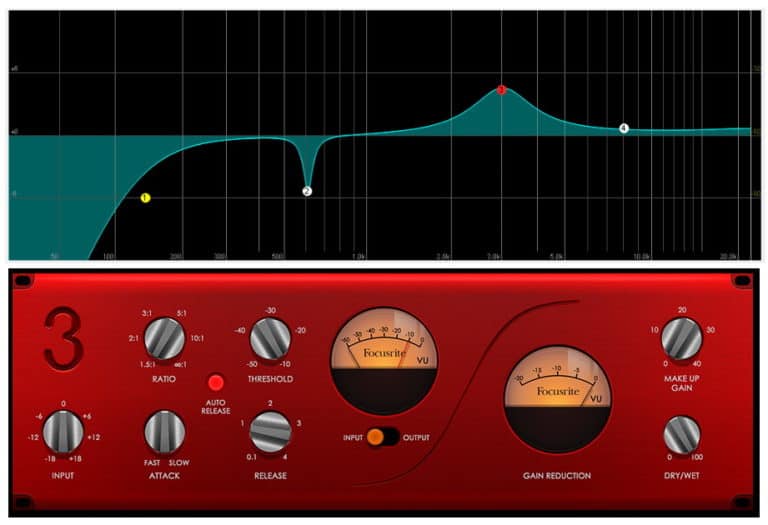
Whatever mixing or recording activities you do in your home studio, you will need a good audio interface. My personal choice is the Focusrite Scarlett series. I have been using these for years; they have proven very durable and they sound great. You can buy the Focusrite Solo from Amazon (affiliate link) for a very reasonable price.
Gain
The amount by which you choose to boost or cut at a frequency is called the gain. That’s all it is, simple as that. Gain is measured in decibels (dB). Positive numbers are a boost, and negative numbers are a cut. For example, 4.2dB is a boost whereas -3.6dB is a cut. 0dB would mean no change at all; this is sometimes called unity gain.
Here’s another example screenshot from ReaEQ, illustrating a -4dB cut at 960Hz and a 3dB boost at 3.24kHz…
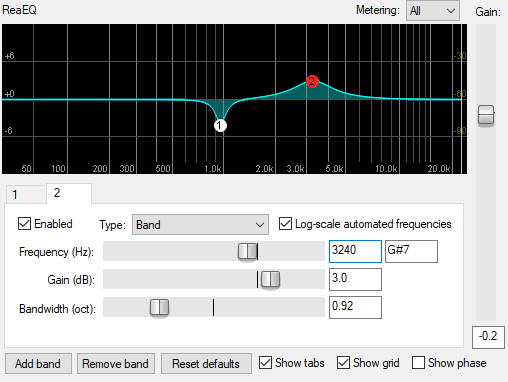
You can see on the EQ graph in the screenshot that a cut makes the line go below 0dB, whereas a boost brings it up above 0dB.
The bigger the magnitude of the gain number, the bigger the cut/boost at that frequency will be. So 4dB is a bigger boost than 1dB, and -3dB is a bigger cut than -2dB.
It is usual to cut/boost maybe up to about 3 or 4 dB. Anything more would be considered quite an aggressive EQ move. But this is only a generalization. Your particular song could have a 6dB boost at some frequency and sound great.
It is important that you trust your ears, and not rely on tables of frequencies and gains for common instruments. Every mix is different and there is no standard set of rules to apply to get a great sound. If there was, a computer could be programmed to do all your EQing and mixing for you.
You use EQ to manually control the volume of each frequency, whereas you would use compression to control the overall volume automatically. Compression is a tool used just as often as EQ, and is vital to understand in modern music production. Check out these two articles for more information on using compression in your projects…
Bandwidth
You may have head people referring to how “wide” to make your EQ boost or cut. This “width” is essentially what EQ bandwidth means. Bandwidth is how many frequencies near the frequency you are changing also get affected. Bandwidth is usually measured in octaves.
Confused? This is best illustrated by example…
You select a frequency to EQ. A narrow bandwidth means the cut/boost won’t affect much of the surrounding frequencies. Whereas a wide bandwidth means the cut/boost affects a lot of the surrounding frequencies.
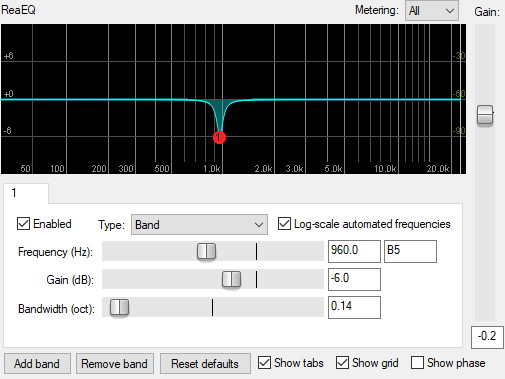
Look at this example of a fairly narrow cut with a bandwidth of 0.14 octaves at 960Hz…
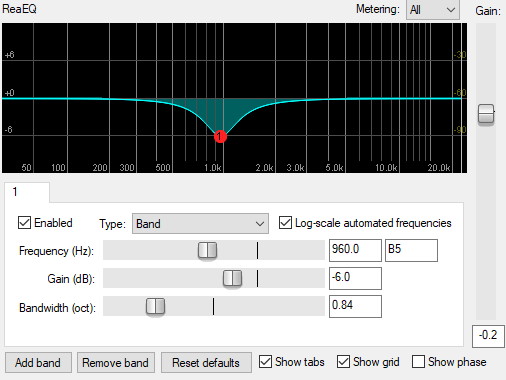
If I now increase the bandwidth of that cut to 0.84 octaves, you can observe the difference…
With the narrow cut, if you observe the EQ graph line there are not many surrounding frequencies affected. The lowest frequency that has changed from 0dB is about 800Hz, and the highest is about 1.2KHz.
Compare that to the wide cut. The lowest frequency that has changed from 0dB is about 300Hz, with the highest affected being about 3.2kHz. This is a much wider range of frequencies affected, purely because we have changed the bandwidth setting to be much wider.
There is an often stated general rule with bandwidth and EQ; that is to cut narrow and boost wide. Meaning that for a cut the bandwidth should be quite small, but for a boost it should be considerably larger. This is only a general rule though; as always trust your ears to inform you if a change sounds good in your song.
One last thing to mention on bandwidth – sometimes you will hear of an EQ number called Q factor. This is essentially another way of specifying bandwidth, but it is the inverse of it. i.e. the bigger the bandwidth the smaller the Q factor, and the smaller the bandwidth the bigger the Q factor. Don’t let this confuse you when working with EQ; you can think of it the same as bandwidth, just that the numbers work the opposite way round.
EQ is such a powerful tool, but it is easy to overdo. To help you decide what to EQ and what to leave alone, I highly recommend reading my article on whether or not you should EQ every track.
How to read EQ? Interpreting the EQ graph
Before we go on, lets make absolutely sure that we know how to read and understand the EQ graph that you often see in EQ plugins.
The green line represents all the frequencies in your sound. If the line is flat at 0dB, this means that no EQ changes have been made and the sound is exactly as it was recorded.
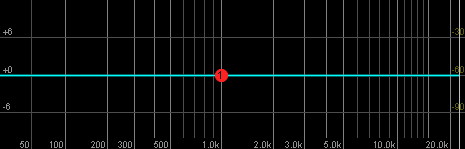
When changes are made, the green line indicates the frequencies that have been changed. The green shaded area between the green line and the 0dB line shows you all the frequency ranges that have been altered and by how much.
To make the right EQ decisions, you are definitely going to need either a decent pair of open-back reference headphones, or a pair of quality studio reference monitor speakers. The headphones and speakers I recommend for all aspects of mixing are…
- AKG K-702 Reference Headphones (affiliate link)
- Kali LP-6 Monitor Speakers – link is for one speaker (affiliate link)
Types of EQ
There are different types of cut/boost you can apply. These refer to the shape of the change to the EQ curve you are making i.e. exactly how the frequency and surrounding frequencies are altered. The type of EQ selected will determine how exactly the EQ numbers you have chosen will be used.
EQ types are best illustrated using examples…
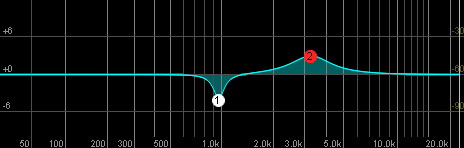
Band
We have already seen this type in all the above examples. It is like a spike, where the point of the spike is the frequency you have chosen to change. The frequencies around the spike are changed less and less as you move away from that point. How many frequencies are changed (i.e. how wide the cut/boost) depends on the bandwidth setting.
Here is a previously used example, with 2 band EQ changes applied…
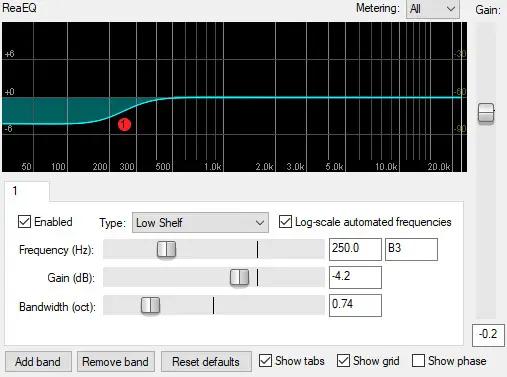
Low shelf
A low-shelf EQ applies the change you are making to every frequency below your chosen frequency. So if you are making a cut at 250Hz, every frequency below 250Hz will be cut by the amount you specify. If you are making a boost at the same frequency, every frequency below 250Hz will be boosted.
It is called a shelf as the graph looks a bit like a shelf when the change is applied. Observe the following example of a low shelf applied at 250Hz…
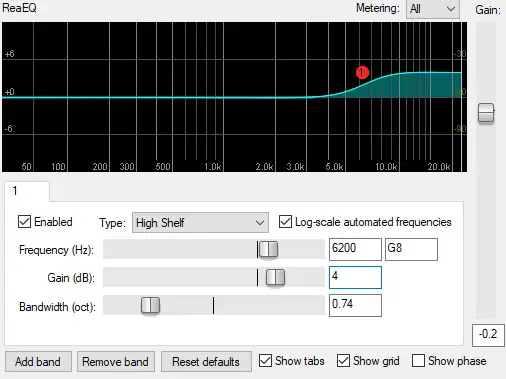
High shelf
A high-shelf is essentially the opposite of a low-shelf. Instead of making the change to every frequency below the selected frequency, it makes the change to every frequency above it. So if you are making a boost at 6kHz, every frequency above 6kHz will be boosted. If you made a cut there, every frequency above 6kHz would be cut.
Here’s an example of a high shelf applied at 6kHz…
Low pass filter
A low-pass filter (LPF) cuts all the frequencies above your selected frequency, ultimately down to nothing, and leaves all the lower frequencies alone (lets them pass unaltered). As usual, this is best illustrated with a diagram…
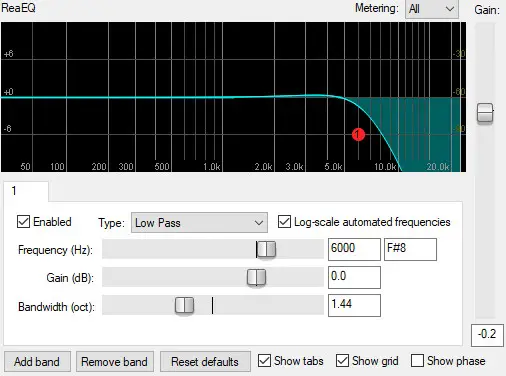
You can see that everything above the selected 6kHz point has been cut, with an increasing amount of cut as the frequency increases.
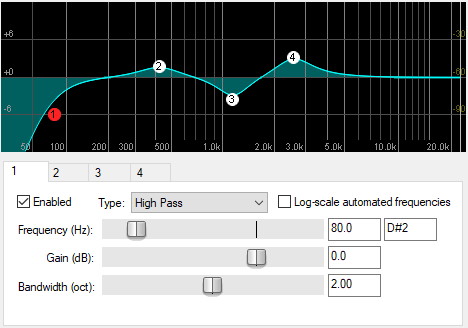
High pass filter
A high-pass filter (HPF) is essentially the opposite of a low pass filter, in that it cuts all the frequencies below your selected frequency, ultimately down to nothing, and leaves all the higher frequencies alone (lets them pass unaltered). Here’s the diagram illustrating a high-pass filter…
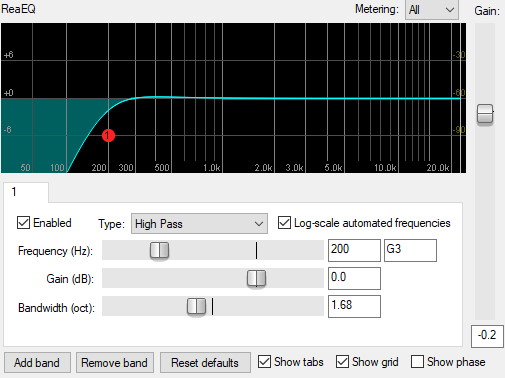
Everything below the selected 200Hz point has been cut, with an increasing amount of cut as the frequency decreases.
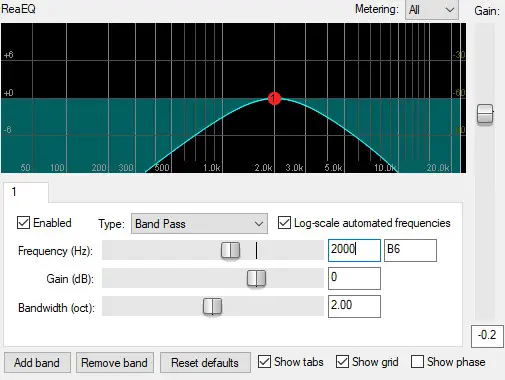
Band pass filter
A band-pass filter can be thought of as a low-pass and a high pass filter combined. A “band” of frequencies will be allowed through (passed), with frequencies both above and below the selected frequency cut ultimately down to nothing.
Here’s a screenshot illustrating a band-pass filter at 2kHz…
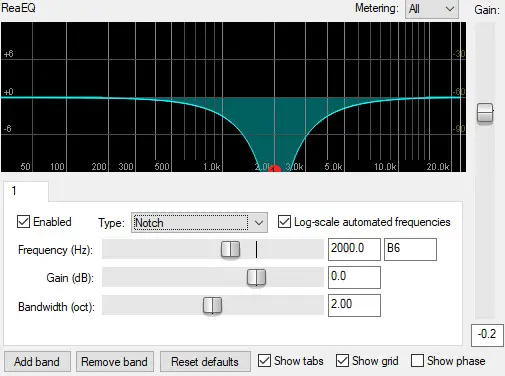
Notch filter
A notch filter is essentially the inverse of a band-pass filter. Instead of the band being passed and everything else cut, here the band or “notch” is cut and everything else is allowed to pass.
As always, the screenshot should make it clearer…
Multiple EQ changes in one plugin instance
In most of the examples in this article, just one EQ change has been shown. This is for clarity to aid the explanations of the EQ number or setting.
More usually, you would make several EQ moves in the same instance of an EQ plugin. Most EQ plugins allow you to do this. ReaEQ allow you to make 4 changes by default, but you can always add more by clicking the “Add band” button.
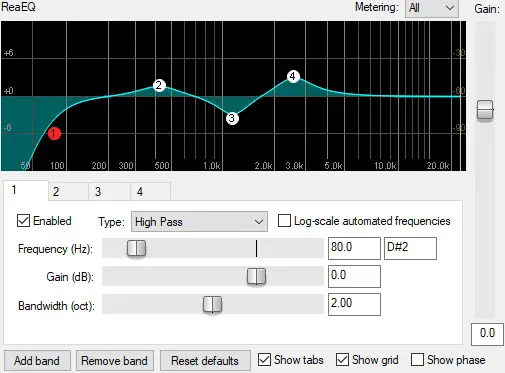
It’s also important to note that you can apply EQ to individual tracks, groups of tracks or to your whole mix.
Related articles
There is so much to learn about using effects plugins in DAW-based music productions. Check out these articles if you are new to the world of plugins. They offer tips on their use, and help clear up some of the most confusing aspects for beginners…
Commonly asked questions
What are EQ levels?
EQ levels are by how much each frequency has been cut or boosted. Levels are measured in dB (decibels), with positive numbers indicating a boost, and negative numbers indicating a cut. For example, -3.2dB at 1250Hz indicates that the level of the 1.25kHz frequency has been cut by 3.2dB.
What Hz is bass?
As a general rule, bass frequencies are considered to be from roughly 60Hz up to about 250Hz. Below this range is the sub-bass range, which contains mainly rumble rather than any musical sounds. Boosting the lower mid-range (roughly 250-800Hz) can give bass sounds more punch to help them stand out.
Here is some of my favorite home studio gear…
Thanks for reading this article. I hope you found it helpful in your home music-making activities. Here are a few of the tools that I personally use in my home studio. These are affiliate links, so if you decide to use any of them I’ll earn a small commission.
Audio interface: My personal choice for audio interfaces are the Focusrite Scarlett series. I have been using these for years, and they have always given me great-sounding recordings. For a very reasonable price from Amazon you can buy the excellent Focusrite Scarlett 4i4, or if you don’t need MIDI capability the Focusrite Solo is a great choice.
Amp sim: Guitar amplifier simulator software has come on leaps and bounds in recent years, such that I record all my electric guitar parts using amp sims these days. One of the very best is the incredible Amplitube from IK Multimedia, which I have used on many of my songs.
Headphones for recording: My favorite headphones for recording are the Sony MDR-7506s, which I use for monitoring during all my recording sessions. They can also be found in many pro recording studios. Get the Sony MDR-7506 headphones from Amazon here.
General-purpose microphone: You can’t go wrong with a good ol’ Shure SM-57, one of the most versatile and ubiquitous microphones around. I’ve been using one in my home studio for as long as I can remember. Amazon offers the Shure SM-57 for a very competitive price.
To see all of my most up-to-date recommendations, check out this resource I made for you!