
DISCLOSURE: This post contains affiliate links. If you buy through these links, I may earn a small commission.
Mixing and mastering are crucial parts of the music production process, yet they are often confused with each other. It has taken me many years of making music in my home studio and releasing music commercially, to achieve a good understanding of the differences between mixing and mastering.
Mixing and mastering differ in their purpose. Mixing is the process of balancing the volumes of recorded tracks, aiming to optimize your song’s sound. The purpose of mastering is to prepare your song for distribution, particularly to bring the track’s volume up to commercial levels.
Although often confused with each other, mixing and mastering are two separate but related processes. Once you realize their purposes and when they are done in the music production workflow, it is not that difficult to understand their differences and to start learning how to mix and master yourself.
If you are interested in checking out the best recording gear such as audio interfaces, studio monitor speakers, microphones, etc., you can find them at Amazon by clicking here.
Quick comparison of mixing and mastering
Before we get into the details, as a handy at-a-glance guide this table summarizes the differences between mixing and mastering…
| Production Process | Purpose | Input(s) | Output(s) | When performed |
|---|---|---|---|---|
| Mixing | Balancing track volumes | All recorded tracks | Stereo audio file | After tracking, before mastering |
| Mastering | Prepare for distribution | Mixed stereo audio file | Mastered stereo audio file | After mixing, before release |
The purpose of mixing and mastering
Let’s expand on the purpose of mixing and mastering. Understanding this is really the key to appreciating mixing and mastering as separate processes.
The purpose of mixing
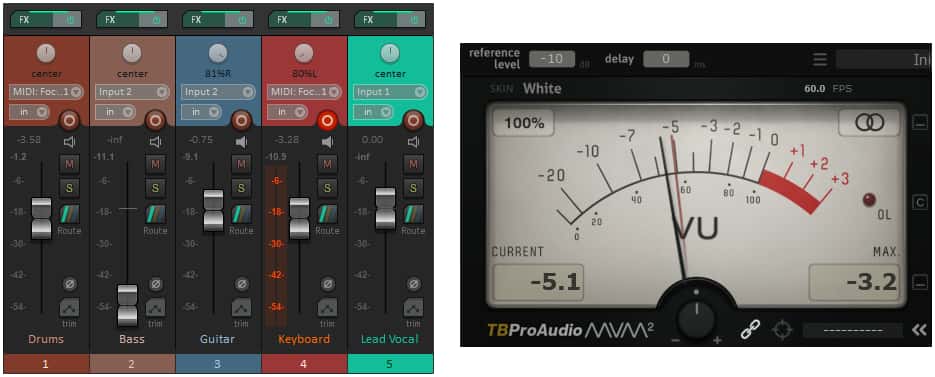
Mixing’s primary purpose is to balance the relative volumes of all your recorded tracks so that they sound as good as they can together.
This means that parts are heard when they should be and are not drowned out. During mixing you will ensure that parts that should be prominent and heard above everything else e.g. a lead vocal, are at the forefront of the mix.
Some parts may need to be loud at one point in a mix, but quiet at another. This is controlled during mixing, either manually or using automation.
The main tool used for mixing is your DAW’s mixer application. But you will also use tools such as EQ, compression and automation.
The purpose of mastering
The primary purpose of mastering is to prepare your song for distribution to the public.
The most important part of this is getting the track’s volume up to a level suitable for playing alongside other commercially released songs on the radio and streaming services. Your mastered track will always be louder than your mixed track.
Most of the changes to the audio characteristics of your song will have been performed during mixing (e.g. applying EQ, compression, effects, etc). However, some subtle tweaks are often performed during mastering, to add additional polish to the overall sound of your track.
Mastering will ensure your song sounds good on a variety of different audio systems, from a car stereo to a smartphone speaker and everything in between.
Your song may be part of a collection such as an E.P. or an album. It is during mastering that you will make sure it sounds sonically similar to the other songs and that the overall flow works well.
One thing is for certain; you need to be able to hear your song clearly to be able to perform mixing and mastering effectively. For this purpose, you are definitely going to need either a decent pair of open-back reference headphones, or a pair of quality studio reference monitor speakers. The headphones and speakers I recommend for mixing are…
- AKG K-702 Reference Headphones (Amazon affiliate link)
- Kali LP-6 Monitor Speakers – link is for one speaker (Amazon affiliate link)
Where mixing & mastering fit in music production
It’s helpful to look at where mixing and mastering fit in the overall music production process to understand when you would typically perform them…
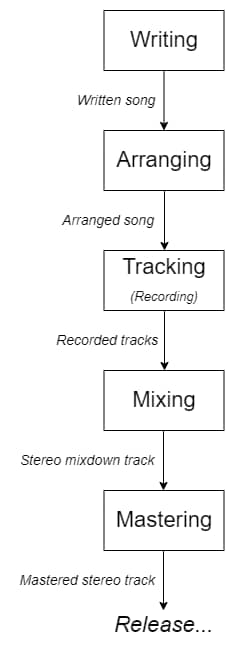
Bear in mind that this diagram is just an illustration. I’ve shown it as a linear process where you finish one step before starting the next. In practice, you may go back and forth between the early steps. e.g. you may do some tracking, which causes you to go back and change your arrangement. Mixing and mastering are usually complete independent steps though.
Once your song has been written, arranged and is ready for recording, the steps occur in the following order…
- Tracking (recording)
- Mixing
- Mastering
Mixing takes all your recorded tracks as its inputs. During mixing you control each track’s volume, and get the tracks to sound good together. One of the fundamental differences between mixing and mastering is that in mixing you can control each track individually, whereas with mastering any changes are made to the song as a whole.
The output of the mixing stage – a fully mixed stereo track – forms the input to the mastering stage.
Mastering is always the last step in the process. As already stated, a fully mixed track is the required input to the mastering stage. Once mastering is finished, your track is ready for release. It’s at this point you have a final stereo audio file (the output of the mastering stage) that you can upload to streaming services, burn to a CD, etc.
Both mixing and mastering can be undertaken by professionals, if you have the funds to afford those services.
There are also automated mastering services available on the web, both free and paid. With these services, you upload your mixed track to them and clever software algorithms master your track for you. Here are a few examples…
- BandLab (Free)
- CloudBounce
- LANDR
- Aria Mastering
Or you can of course choose to undertake mixing and/or mastering yourself.
Throughout the music production process, you will require a quality audio interface. My personal choice for audio interfaces are the Focusrite Scarlett series. I have been using these for years, and they give great-sounding recordings for not very much money. You can buy the Focusrite Solo from Amazon (affiliate link) for a very reasonable price.
Mixing and mastering process overviews
To fully understand the differences between mixing and mastering, it’s useful at this point to examine the basic workflow in both the mixing and mastering processes. These are very much quick overviews, just to give you a summary of the steps involved.
Mixing overview
Mixing in a home studio is almost always performed in your DAW (Digital Audio Workstation). You will be using your DAW’s mixer application. I’m assuming that you have recorded all the tracks in your song in your DAW. Here are the steps for mixing…
- Get your tracks at roughly the same volume (this process is called gain staging). This gives you a nice even starting point.
- Perform an initial static mix – while listening to your song, use the faders to balance the track volumes to where your song sounds good most of the time. Only listen to your 1 or 2 times to do this – the idea of this step is to quickly get a basic mix done.
- Apply EQ (use an EQ plugin for each track) to any tracks that need it. This can get rid of unpleasant sounding frequencies, and can help tracks that were fighting for space in the mix to sound good together. Check out my “Why does my mix sound muffled?” article for detailed instructions on how to fix this issue.
- Apply compression to any tracks that would benefit from it. Compression evens out differences in volume on a track, and can help enormously if a track is very dynamic i.e. has very quiet and/or very loud sections.
- Use automation if necessary. Automation can automatically change the volume on a track for you, without you having to manually use the fader. It’s great if you have a track that should sometimes be loud and prominent, and should sometimes be quiet and in the background.
- Export your mixdown. This gives you your stereo track output which you will use in the mastering process.
This is a very basic overview of the mixing process. For a more in-depth tutorial, I highly recommend my beginners guide to mixing article. It is aimed at newbies, and takes you right through the mixing process from recording with mixing in mind right up to walking you through making your first mix.
Mastering overview
Once you have your mixed stereo track, you are ready to start mastering. Here are the basic steps…
- Create a new project in your DAW, just for mastering
- Import your mixed stereo track from the mixing stage into a track in your new project
- Apply any subtle EQ tweaks as necessary
- Apply any subtle compression if it is needed
- Add a limiter to bring the track volume up to commercial levels
- Export your track to a stereo file
You now have your mastered track ready to upload to streaming services, burn to a CD, share on a file sharing site, etc.
As with the mixing overview, this is a very basic overview of mastering. For a more in-depth tutorial, check out my “How to master a song” guide. It guides you through all the steps involved in mastering, teaching you how to master your first track.
Are mixing and mastering actually necessary?
Mixing and mastering are essential in modern music production!
An unmixed track can have the balance between the recorded tracks all over the place. Sometimes you wouldn’t be able to hear what you should. Some parts would be drowned out. Some parts would be far too loud and overpowering. Some parts could vary wildly between too loud and too quiet. And the song could sound quite muddy where instruments are fighting with each other for space.
The mixing process can sort all that out, with the use of the mixer’s faders, EQ, compression and automation.
An unmastered track will be too quiet to release commercially – it will be much quieter than other songs played alongside it on the radio or on streaming services. It could also not sound great across a variety of playback systems. Mastering will bring up the volume to commercial levels and ensure a good sound on most audio systems.
If you are interested in learning more, check out my article on how long it takes to learn mixing and mastering. You’ll discover the skills you need to learn, some resources to help you learn them, and how long you can expect to take to get to different levels of proficiency.
Here is some of my favorite home studio gear…
Thanks for reading this article. I hope you found it helpful in your home music-making activities. Here are a few of the tools that I personally use in my home studio. These are affiliate links, so if you decide to use any of them I’ll earn a small commission.
Audio interface: My personal choice for audio interfaces are the Focusrite Scarlett series. I have been using these for years, and they have always given me great-sounding recordings. For a very reasonable price from Amazon you can buy the excellent Focusrite Scarlett 4i4, or if you don’t need MIDI capability the Focusrite Solo is a great choice.
Amp sim: Guitar amplifier simulator software has come on leaps and bounds in recent years, such that I record all my electric guitar parts using amp sims these days. One of the very best is the incredible Amplitube from IK Multimedia, which I have used on many of my songs.
Headphones for recording: My favorite headphones for recording are the Sony MDR-7506s, which I use for monitoring during all my recording sessions. They can also be found in many pro recording studios. Get the Sony MDR-7506 headphones from Amazon here.
General-purpose microphone: You can’t go wrong with a good ol’ Shure SM-57, one of the most versatile and ubiquitous microphones around. I’ve been using one in my home studio for as long as I can remember. Amazon offers the Shure SM-57 for a very competitive price.
To see all of my most up-to-date recommendations, check out this resource I made for you!
