
Sometimes, you can have worked for hours and hours on a mix, yet whatever you do it just sounds muffled, muddy and lifeless. There are several common reasons for this, and some actions you can try to defeat the dull in your mix.
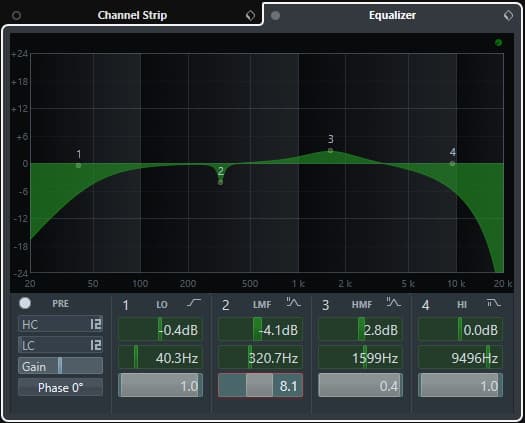
Mixes usually sound muffled due to a build-up of frequencies in the lower mid-range, between 200-500Hz. Applying a narrow EQ cut to selected tracks in this range can help. Using a High Pass Filter (HPF) on instruments that have little presence at these frequencies can also help increase clarity.
EQ is the first tool to reach for to fix a muffled or muddy mix. But there are other things to try, including steps you can take at the tracking stage to make sure the sounds you capture won’t give you trouble when you get around to mixing.
More generally, if you are completely new to home recording I highly recommend you check out these three beginner’s articles…
- How to record your own music at home – an illustrated guide
- Mixing – where to start? A guide for the confused
- 11 Reasons why songwriting is so hard
Defeating the dull
When several instruments with a significant part of their sound in the lower mid-range (generally regarded as between 200-500Hz) are played together, they can start to sound unclear or muddy. Even if the tracks sound great when solo’d, when played together the build-up of frequencies in that problem range can cause the whole mix to sound muffled.
Take each track in turn with a significant portion of their sound in the lower mids – guitars are a common culprit – and try making a narrow cut at a frequency in that range. Experiment with the exact frequency to cut, and don’t cut exactly the same on each track. It’s important to do this without soloing the tracks so you can judge the effect the cut has on the mix as a whole.
It is often a good tactic to leave just one of the tracks without a cut. Decide which track you want to be dominant in this range and leave that one alone. It could be a bass guitar, or maybe a rhythm guitar or a keyboard. The idea is to have just one source “own” this part of the frequency spectrum in your mix.
Even tracks that don’t on the face of it have much of their audio content in the lower-mid space can cause issues. A track that mainly has much higher frequencies will have at least some content in the lower-mid space, even if not very much. This can contribute to the muddiness, especially it you have a high track count in your project.
This is where an HPF (High Pass Filter) can be a very useful tool. An HPF passes high frequencies (i.e. leaves them alone), but reduces lower frequencies below a certain frequency threshold that you can set. This way you give the instruments that you want to dominate the lower mids as much space as you can. Instruments that add little to that range other than potential muddiness can be safely filtered.
In your EQ plugin there will be a setting for an HPF. Try adding an HPF to one of these higher tracks, with a starting threshold around 100Hz. Gradually increase the threshold into the lower mids, being careful not to go too far otherwise you will start to destroy the main body of the sound that you actually want to keep.
Some people advise to always making these EQ and filtering moves. I would caution against doing this; in general it is better to only apply EQ when it is needed. Otherwise you risk removing a fundamental part of your mix and ending up with a thin overall sound. These actions are great when used in the right context, but only try to fix a problem if there is a problem that needs fixing!
Minimize the mud right from the start
If you make sure you record your instruments correctly at the tracking stage, you can prevent introducing muddiness into your mix in the first place.
This means taking the time to eliminate as much of the lower mid frequencies in instruments that don’t need them naturally before you record them. Here are some examples of actions you could take.
- Choose a microphone carefully – some mics emphasize lower frequencies
- Don’t get the microphone too close to the source – the proximity effect increases bass response
- Be careful where you place the mic in the room – stay away from corners, don’t place the mic dead center, try to angle the mic away from walls
- Roll-off some bass on guitar amps – a good guitar sound in a mix is not the same as a good guitar sound solo (a great sounding guitar in a mix will probably sound thin when solo’d)
Mix in mono
By mixing at least some of the time in mono, you will get a good idea of the relative levels of all the tracks and the frequencies where there are problems.
Stereo can mislead the ears into thinking there isn’t a problem as the sounds are spaced away from each other, especially when listening in headphones. It’s only when you hear all the sounds coming from the same physical space that some problem frequencies may become apparent. For this reason, I would recommend at least starting your mixing process in mono.
It is almost certain that the tracks you are mixing will be at different volumes. That’s why gain staging is important. This is the process of getting all your tracks at a similar volume before you start mixing. For a repeatable gain staging process that you can use again and again, I highly recommend checking out my step-by-step gain staging tutorial.
By the way, it takes a long time to train your ears to tune in to what is good and bad in a mix. That’s why I wrote the following articles, which will give you tips and tricks on what to listen out for and the best ways to learn mixing…
- What makes a good mix? 11 things your mixes need
- How long does it take to learn mixing and mastering?
Once you have got an initial mix in mono, you can then move on to…
Use panning to give each track its own stereo space
Once you have a good balance achieved in mono, it’s time to switch your mix to stereo and start positioning each instrument in the stereo space. This can further help clean up a muffled mix by physically separating the sounds contributing to the mud.
Lead vocals and bass instruments are usually left in the center. Instruments that are likely to cause problems in the lower-mids area such as guitars are often panned to the extreme left and right. This is more of an enhancement at this stage – hopefully by this point you will have dealt with most of the muddiness already when you were mixing in mono.
I’d just like to a quick note on mastering here. Mixing never exists in isolation; you will always master your track before release, and ultimately it is this mastered track you will want to check is not muffled. Mixing and mastering are complementary processes. To learn more, check out this article I wrote on the difference between mixing and mastering.
Get to know your room and your speakers
Your room that you are mixing in could be the cause of some of your muddiness problems. The same can be said for the speakers that you are listening on.
Your environment and equipment could be adding or removing bass and lower mid frequencies, not giving you a true representation of the sound of the mix. This could lead to a tendency to increase or decrease these frequencies too much, resulting in either a boomy or thin sounding mix.
You could be getting your mix to sound great on your system, but once you listen to it on another system (in the car, kitchen stereo, living room hi-fi, etc), suddenly you are hearing a muffled or brittle mix.
To help combat this….
- Get to know your room, what it does to your mixes and how it compares to other systems
- Keep a consistent position in the room when you mix
- Try using reference headphones to mix on instead
- If you have control over EQ on your audio system/speakers, keep it as flat as possible
I highly recommend you read my guide on the best place to record at home. This should help you decide on which room to record in if there is a choice, and how to set-up and make the most of your room for the very best results.
Compression
You might have a mix that is inconsistent e.g. at some points it sounds great, but at others it sounds muddy and others it sounds thin.
This is usually an indication that one or more tracks would benefit from some compression. Compression evens out the sound, making quieter sections of a track louder and louder parts quieter.
Listen carefully for the problem instruments. Hopefully by this stage you have identified the tracks that were causing the muddiness, and may have applied some EQ to them. Compression can add the final touch, making that EQ stay consistent throughout the whole song.
Adding high end
Maybe you have got your lower mids to stop fighting and you’re happy with your levels and overall balance, but there’s still something missing. Although the mix no longer sounds muffled, it just sounds a little bit flat or lifeless. This may be a time to consider boosting the high-end of one or more of the higher instruments.
Try boosting with your EQ plugin somewhere above 6kHz, maybe around 8kHz, maybe around 10kHz. Be careful here though; it is easy to overdo it and end up with a mix that is too bright or even hissy.
Some potential candidates for this treatment are…
- Hi-hats
- Lead vocals
- Pianos
- Acoustic guitars
And finally, you may be thinking what a huge hassle mixing really is. Do I really have to bother? Well yes, you really do if you want to do justice to your music. Take a look at these two articles for more information on why mixing and mastering are so important and so difficult to learn…