
DISCLOSURE: This post contains affiliate links. If you buy through these links, I may earn a small commission.
Mastering is probably the most misunderstood aspect of music production, particularly by home recording musicians. It was only a few years ago when I had to prepare some of my songs for commercial release, that I really learned what mastering is for and how to do it.
To master a song, add EQ and Limiter plugins to the master bus in your DAW. Use the EQ to perform subtle tonal tweaks. Set the Limiter’s output ceiling to -0.5dBFS. Play the song, and increase the Limiter’s gain until about 3dB of gain reduction is achieved. Finally, export to stereo WAV file.
If you are going to release your music to the public in any way, then you need to learn about mastering. There are several ways you can get your songs mastered, and we will cover them all in this article. We’ll also look in detail at a simple process for mastering your song yourself.
If you are interested in checking out the best recording gear such as audio interfaces, studio monitor speakers, microphones, etc., you can find them at Amazon by clicking here.
What is mastering?
Before we continue, let’s state what exactly mastering is and what it is trying to achieve.
Mastering is making your song suitable for distribution. It is the last stage of audio processing performed before releasing your song to the public. The mastering process increases the volume up to commercial levels, and tweaks the tonal characteristics to suit the genre and desired sound.
The result of the mastering process should be…
- Your song is at a similar volume to other songs in the same genre, that might get played alongside it on the radio
- Your song should sound good on many different audio systems (e.g. home hi-fi system, car stereo, smartphone, bluetooth speaker, earbuds connected to a phone, etc)
If your song is part of a collection of songs such as an album or E.P., it should fit in with and sound sonically compatible with the other songs in the collection. Mastering the songs on an album or E.P. should be done together to help achieve a cohesive sound across them.
It’s worth pointing out that in this article we are referring to mastering for modern digital releases in formats such as wav, mp3, flac, etc. for streaming platforms. Mastering for release on vinyl, for example, is a far more complicated process requiring specialist knowledge and equipment, and beyond the scope of this article.
For any mastering, mixing or recording activities, a good audio interface is absolutely essential. I have been using Focusrite Scarlett interfaces for years, and they have always given me great-sounding recordings for not very much money. You can buy the Focusrite Solo from Amazon (affiliate link) for a very reasonable price.
Ways to get your song mastered
There are three main methods to get your song mastered…
1 Pay a professional mastering engineer
In my opinion, the ideal way to master your song is to pay a professional to do it. This gets you the benefit of years of knowledge, skills and experience. This method will almost certainly get you the best possible results.
An added benefit is that you will get a fresh pair of ears listening to your music. This is ideal as they will be much more likely to make good, objective decisions for what’s best for your song. Their opinions won’t be colored by all the biases about how your song should sound that you have built up over the writing, recording and mixing processes.
There is one fairly obvious problem with paying a professional though; the cost. Most of us are hobbyist home recording musicians and do not have the money available. Professional mastering costs can quite easily run into hundreds of dollars per song.
2 Use an automated mastering tool
There are several websites that you can submit your song to, that will automatically master it for you. These are much cheaper than using a professional mastering engineer; some of them even have free mastering services available.
Automated mastering tools run clever software algorithms that will bring your track volume up to commercial levels. They also perform some limited tonal manipulation. For example, they often have some configuration settings where you can pick the style of sound you want, such as…
- Genre (rock, pop, hip-hop, classical, etc); this will give you a typical tonal balance for that genre of song
- Bright, bass-boost, dark, etc.
Here are some examples of available automated mastering services…
- CloudBounce
- LANDR
- BandLab (Free)
- Aria Mastering
While these tools are impressive, will never be as good as a professional mastering engineer who can make decisions individual to your song. However, you can still get impressive results. They are usually self-explanatory and quite easy to use.
I have used an automated mastering tool myself for songs that I have then commercially released (I used BandLab). You can listen to some of those songs on my “Smile!” E.P. here.
3 Master your song yourself
The final option is to undertake the mastering yourself. Fortunately, all the tools you need are commonly available today and can be run as plugins inside your DAW (Digital Audio Workstation). There any many of these tools available, both free and paid.
We will concentrate on self-mastering for the rest of this article. Self-mastering is the most difficult option. However, if you follow the guide below you should not have too much trouble understanding the process. As with anything, the more you do it the better you will get at it.
If you do choose this option, it is vital that you can hear your mix clearly. For this purpose, you are definitely going to need either a decent pair of open-back reference headphones, or a pair of quality studio reference monitor speakers. The headphones and speakers I recommend for mastering are…
- AKG K-702 Reference Headphones (affiliate link)
- Kali LP-6 Monitor Speakers – link is for one speaker (affiliate link)
How to master a song yourself
If you prefer your guides in video format, check out this video I made demonstrating how to master a song in the Reaper DAW…
It’s not as detailed as the guide below, but does take you through a basic mastering process that you can use for your own songs. For those of you who prefer text, read on.
Before we start, bear in mind that at the mastering stage we do not make drastic changes! The vast majority of tonal changes will have been done at the mixing stage. Here, we are subtly enhancing the mix. Make sure you work with what is already there, and don’t destroy the work that has already gone into your song.
Mixing can be complex and confusing for newcomers. That’s why I wrote my beginners’ guide to getting started with mixing. It will lead you from simply explaining basic mixing terminology, all the way up to making your first mix.
1 Prepare your mix
It’s important to start from a good place when mastering. As mastering is the last step in the production of your song, you should already have a good-sounding mix that you are happy with. Your mix should…
- Have a good balance between the parts where everything can be heard clearly
- Have no unwanted noise
- All parts should have been properly tidied and edited
- The master bus should not be peaking above -4dB
- The master bus should definitely not be clipping
2 Create a new DAW project
Export your mixdown to a stereo WAV file. Create a new project in your DAW, and import the mixdown file into this new project as a stereo track.
You’re probably thinking why create a new project? Couldn’t I just master in the existing project I used for recording and mixing?
Well, yes you could. However, I would recommend creating a brand new project with just the mixdown track in it. This is to stop you from being tempted to start doing further mixing tasks, such as balancing levels between instruments.
The new project lets you concentrate completely on the job in hand i.e. mastering. It gives you a nice, fresh, clean slate.
I would also advise leaving some time between finishing mixing and starting mastering. A week or more is ideal, but a few days is the bare minimum. Don’t listen to your track during this time. This is so you can come at it as fresh as possible, minimizing the biases and opinions you will already have built up during the recording and mixing phases.
If you need some help using DAWs in general, a great place to start is my article on the best way to start learning a DAW. It will give you lots of tips and tricks to get you productive in your DAW in a relatively short amount of time.
3 Import a reference track
A reference track is a track released by someone else that you want your song to sound sonically similar to. It could be a track from one of your favorite bands. For example, if the song I am mastering is a classic rock track, I might choose a reference track by AC/DC, Guns ‘n’ Roses or Aerosmith.
This gives you something to aim for with the sound of your track.
Import the reference track into your new mastering project, on a new track separate from your song’s track.
Then importantly, adjust the volume of the reference track in your DAW so it is at a similar level to your song’s volume. This is necessary as human ears perceive “louder” as “better”.
If the reference track is louder, you will think your track sounds worse compared to it. We need to eliminate that bias so you can accurately judge your track against the reference track.
4 Apply subtle EQ if necessary
Listen to your track and the reference track, switching between the two. As you do this, make some notes on where you think your track might need its tonal character tweaking, e.g…
- Does it need a bit of high-end sparkle?
- Is the low-end punchy enough (bass drum, bass guitar, etc)?
- Is there any frequency range you can’t quite hear clearly enough?
A pro tip here is to listen in mono as well as stereo. Your song will not just be listened to in stereo e.g. through a smartphone, so it’s important that you know how your song sounds through just one speaker.
Remember, we do not make drastic changes at the mastering stage. So if your listening tells you that your instrument level balance is not right, that’s an indication that your mix needs some work. Go back and re-mix if necessary.
It’s also entirely possible that your track needs no EQ at all at the mastering stage. That is absolutely fine. If you’re happy with your track’s tonal character, move on to the next step without applying any EQ.
If you do need to apply a few EQ tweaks, add an EQ plugin to the master bus. Your DAW’s stock EQ plugin will be fine, but any EQ plugin will work. Remember these points when applying EQ during mastering…
- If something needs to be boosted/cut, perform subtle EQ gradually
- Cuts/boosts should ideally be no larger that about ±3dB
- Presets can be useful as a starting point, but be wary – don’t automatically apply them
Here is a table of possible EQ mastering moves. These are only rough suggestions – do not automatically apply any of these! Only use them if your song requires them, and remember every song is different. Make sure EQ decisions are made using your ears, specific to your unique song.
| Symptom | Action |
|---|---|
| Sounds dull; needs high-end sparkle | Small shelf boost at 9 – 15kHz |
| Too much top end; sounds brittle | Small cut at 3.5 – 7.5 kHz |
| Sounds muddy or unclear | Small cut at 150 – 350Hz |
| Sounds thin or weedy | Small boost at around 500Hz |
I will stress again that EQ is optional at the mastering stage.
If you are new to EQ, my guide to what EQ numbers mean will help you understand the terminology.
5 Apply subtle compression if necessary
Compression is another optional step in the mastering process. Listen to your song again, bearing in mind the following…
- Are there any sections that are too quiet and you can’t really hear?
- Are there any sections that are very loud and overpowering?
If your song suffers from either of those, it’s a sign it might benefit from some compression. But remember, we only make subtle changes during mastering. If your song doesn’t need any compression that’s absolutely fine; simply move on to the next section.
To apply some compression, add a compressor plugin to your DAW’s master bus, after the EQ plugin if you used one. Your DAW’s stock compressor will work just fine, although so should any other compressor plugin. Bear these points in mind…
- Use a low ratio (no higher than 3:1)
- Adjust the threshold so you see no more than about 3dB of gain reduction
- Use a slow attack (~100ms)
- Use a fast release (~5ms)
- Use the make-up gain to compensate for the gain reduction
6 Consider using enhancer plugins
Some plugins exist with the purpose of enhancing the overall sound of your song. There are two main types – saturation plugins and stereo wideners.
Saturation plugins attempt to emulate old analog tape equipment, which was famed for adding a “warmth” to recordings.
Stereo wideners do what their name suggests; they enhance the use of the stereo space. They can make your song sound fuller and bigger.
As you would expect, there any many plugins available both free and paid. A Google search will reveal a ton of options. Feel free to try these out on your song. But as with everything at the mastering stage, use them subtly.
And if they are not necessary or do not add anything to your song, don’t use them.
7 Apply limiting
This is the only compulsory stage during mastering. You can’t skip this one!
Limiting brings the volume of your song up to commercial levels. It is the final step in mastering, so any plugins used should be the last one in the chain.
A limiter is a compressor, but with a hard limit beyond which no signal is allowed through. You set a dB limit and it is guaranteed that your song will never go louder than that volume. You can think of it as a compressor with an infinite ratio if that helps.
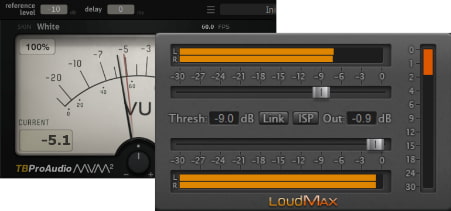
Add a limiter plugin to your master bus. Any will do, but a great free one that I have used many times is LoudMax by Thomas Mundt.
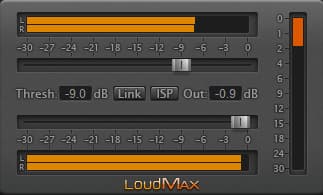
To apply limiting…
- Set output ceiling to -1.0 dbFS or -0.5 dbFS (not 0.0 dbFS). This gives you a little bit of space/headroom for when played on audio equipment that might add a little bit of gain
- Play the loudest part of your track
- Slowly increase the input gain/decrease the threshold, until the meter is showing around about 3dB of gain reduction
You should hear your track get noticeably louder during this process.
8 Export to stereo audio file
That’s it! The final step is to export your newly mastered track to a stereo audio file, ready for distribution.
Your DAW will have many formats to choose from – WAV, MP3, FLAC, etc. I would suggest exporting as a 24-bit WAV file, but the format you choose will depend on where you submit your song to and how you will use your file.
9 Optionally check with a VU meter
You can check your final mastered song in your DAW with a VU meter. This is not necessary, but it is sometimes nice to have a visual confirmation of your work.
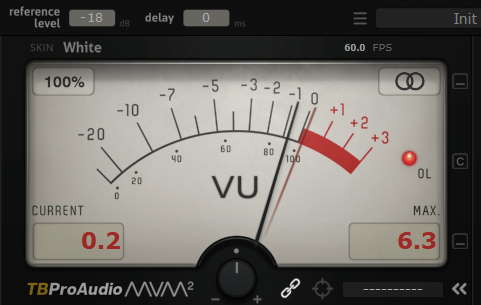
The image shows a fairly typical VU meter. This one is a freely available plugin called TBPPro Audio mvMeter2.
Add the plugin to your master bus. Then set the reference level or calibration setting to -10dB.
Play your song, and you should see the needle on the meters spend most of the time in your song somewhere in the middle of the meter’s range.
It can go into the red briefly and occasionally. But if it is spending a long time in the red, that’s an indication that your song has been mastered too loud. Go back through the steps and check you have done everything correctly.
Here is some of my favorite home studio gear…
Thanks for reading this article. I hope you found it helpful in your home music-making activities. Here are a few of the tools that I personally use in my home studio. These are affiliate links, so if you decide to use any of them I’ll earn a small commission.
Audio interface: My personal choice for audio interfaces are the Focusrite Scarlett series. I have been using these for years, and they have always given me great-sounding recordings. For a very reasonable price from Amazon you can buy the excellent Focusrite Scarlett 4i4, or if you don’t need MIDI capability the Focusrite Solo is a great choice.
Amp sim: Guitar amplifier simulator software has come on leaps and bounds in recent years, such that I record all my electric guitar parts using amp sims these days. One of the very best is the incredible Amplitube from IK Multimedia, which I have used on many of my songs.
Headphones for recording: My favorite headphones for recording are the Sony MDR-7506s, which I use for monitoring during all my recording sessions. They can also be found in many pro recording studios. Get the Sony MDR-7506 headphones from Amazon here.
General-purpose microphone: You can’t go wrong with a good ol’ Shure SM-57, one of the most versatile and ubiquitous microphones around. I’ve been using one in my home studio for as long as I can remember. Amazon offers the Shure SM-57 for a very competitive price.
To see all of my most up-to-date recommendations, check out this resource I made for you!
