What is the difference between EQ and compression?
DISCLOSURE: This post contains affiliate links. If you buy through these links, I may earn a small commission.

In many years of mixing my musical projects, probably my most commonly reached-for tools in my DAW are the EQ and compression plugins. These have been vital in getting my mixes to sound clear and consistent. But it wasn’t until I had been using them for quite a while, that I could really appreciate the differences between EQ and compression and when to use each one.
EQ differs from compression in that EQ controls how much of each frequency is in a song. Compression, however, controls the overall volume. EQ changes apply to the whole song (i.e. they are static), whereas compression changes the volume on the fly as the song is playing (i.e. dynamically).
EQ and compression are absolutely essential tools to learn to have full control over how your music sounds. Unfortunately, they are also two of the most confusing tools for beginners. Read on to discover the differences between them, the key features of each and when to use each one.
Mixing involves not only compression and EQ, but a thousand other things as well. I have written a beginner’s guide to mixing to help newbies learn the basics quickly. I highly recommended you check it out if you are new to mixing. It clears up some of the confusion novice mixers often have, and helps you avoid some common mixing pitfalls.
If you are interested in checking out the best recording gear such as audio interfaces, studio monitor speakers, microphones, etc., you can find them at Amazon by clicking here.
EQ and compression compared
Sound is vibration through a material. That material can be air, which is how sound travels from its source to our ears. Or it can be a thin piece of metal like a guitar or violin string. Or it could be a piece of wood being struck by a beater like a xylophone. I am sure you can think of lots of examples yourself.
Each of those sounds contain lots of different frequencies. The particular combination of, and how much there is of each one of those frequencies, gives a sound its character. That’s how you can tell the difference between the sound of a flute and a trumpet, or a guitar and a piano.
EQ or equalization is all about controlling these frequencies. You could use it to reduce some of the bass frequencies in your song, or maybe add some high-end to add a bit of “sparkle”. This is what EQ is all about- it’s essentially a very sophisticated, accurate and versatile tone control.
Compression is all about volume. Sound is incredibly dynamic i.e. it can be very loud, and it can be very quiet. Think about a singer. The human voice is an extremely expressive instrument, capable of going from whisper-quiet to screamingly loud.
This volume difference is a problem with recorded music. Unless you want your listener to have a hand permanently on the volume control and constantly moving it, you need to do something about those inconsistencies in volume. You don’t want to get rid of them completely – that would make your track boring, lifeless and devoid of expression.
What you ideally want is for the loudest parts to be quieter, and the quietest parts to be louder. This makes the volume much more consistent. That is exactly what compression does – smooths out the volume of a track so the differences between the quietest and loudest parts are not as big.
As you can see, EQ and compression do two fundamentally different things. EQ controls the amount of each frequency present, and compression controls the overall volume.
The other main difference is that EQ is static whereas compression is dynamic.
What on earth does that mean?! Well, when you make an EQ change to alter the amount of a particular frequency, that change stays the same throughout the whole song i.e. static. With compression, the compressor is constantly changing the volume as the song is playing, i.e. dynamic.
When discussing any effect such as EQ or compression, the question is often raised of whether to apply the effects during recording or to wait until the mixing stage. For more details, check out my article on if it’s better to record with or without effects. It will help you decide the best approach for music, and to devise a way of working that suits your style.
More on EQ
All audio signals are combinations of many different frequencies, with different amounts of each of those frequencies. For example, you would expect a bass guitar to have mainly low frequencies, whereas a piccolo would have mainly high frequencies.
Frequency is measured in Hertz (Hz). So you often see numbers like
- 100Hz
- 1000Hz (1kHz)
- 2.5 kHz
- 6kHz
- …etc…
The “k” means 1000, so 2kHz is the same as 2000Hz. The higher the number, the higher the sound. So 100Hz is a very low bass frequency, and 6kHz is a very high treble frequency.
Human beings can hear frequencies from about 20 Hz up to about 20 kHz. Although the range of frequencies we can hear decreases with age from about age 16 onwards. So me being in my late forties, there is no way I could hear a frequency of 20 kHz!
These numbers used to describe EQ can be very confusing, especially for a novice in mixing or music production. That’s why I wrote my guide to what EQ numbers mean. It’s essential reading if you are just starting out with EQ, and you’ll learn exactly what EQ terminology actually means in a simple and easy-to-understand way.
An equalizer (EQ), whether that’s a plugin in a DAW or an actual physical hardware unit, allows you to select a range of frequencies and very precisely increase or decrease the amount of them in the audio signal. For example, see the screenshot from the EQ plugin from the Cubase DAW below…
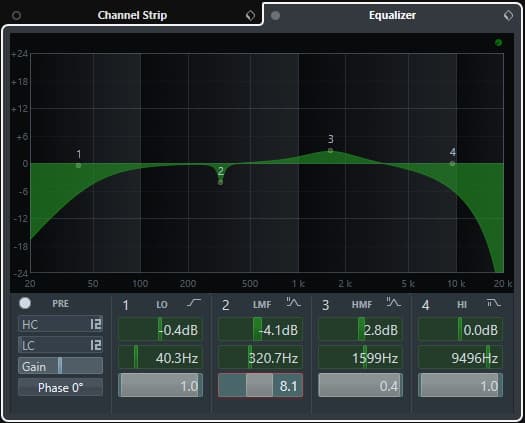
Four EQ moves have been applied here…
- Frequencies reduced around 40Hz (using a “low shelf” filter)
- A small reduction (cut) around 320Hz (quite narrow, so it doesn’t affect many frequencies near it)
- An increase (boost) around 1599Hz (quite wide, so it affects quite a range of frequencies near it)
- Frequencies reduced around 9496Hz (using a “high shelf” filter)
The green in the screenshot shows you a graphical representation of what is happening to each frequency. This gives you an at-a-glance visual representation of what your EQ settings are doing to your signal.
The basic workflow for using EQ is as follows…
- Determine a frequency requiring attention
- Select the type of cut or boost to use
- Select how wide you want your change to be (how big the range around the selected frequency will be affected)
- Cut or boost the amount of dB you deem appropriate…
- …Listening all the time to make sure your changes are improving things. Adjust as necessary.
Whatever EQ you are working with, a good audio interface is essential for capturing all the frequencies in your recordings accurately. I have been using Focusrite Scarlett interfaces for years, and they have always sounded great and proven extremely reliable. You can buy the Focusrite Solo from Amazon (affiliate link) for a very reasonable price.
When to use EQ
In a mix of a song, all the frequencies combine to create the overall sound you hear. When you put all the instruments together in your song, there may be too much of one particular frequency range or not enough of another. One particular frequency may be overpowering the mix, making other instruments unclear. This would be an ideal situation to use some EQ.
For example, electric guitars often have quite a lot of bass frequencies in their tone. Added together, these can make your song too bass-heavy, especially when combined with the bass guitar. If you use an EQ to cut the frequencies on the guitar tracks below say 150-200 Hz, this will let the bass guitar take care of the bass end of the mix and should help the higher frequencies stand out more.
Note that it’s not just individual tracks such as a guitar or a vocal that you can apply EQ to. You can also apply it to your mix as a whole.
For example, maybe your mix sounds a little lifeless, perhaps a little dull. Boosting the frequencies above say 6kHz can add a bit of “high-end sparkle”, giving your track a bit more energy and making it seem brighter.
EQ is such a powerful tool that it is easy to overdo it. Take it easy with EQ. Make all your changes quite conservatively, and don’t apply any unless your track really needs it. This is a key point; you shouldn’t always apply EQ regardless! Trust your ears; if there seems to be too much or too little of a particular frequency range, then reach for your EQ. If it sounds just right, then it is just right. In that case, just leave it alone.
The temptation with EQ is to apply it to absolutely everything. As such, it is often overused. I have written a guide on whether you should EQ every track. It’s recommended reading for newbies to EQ trying to decide what you should apply EQ to and when.
More on compression
We know that compression is smoothing out the volume of an audio signal, so that the loudest bits aren’t quite as loud, and the quiet bits aren’t quite as quiet.
It’s not just the human voice that has a huge range of volumes. Drums, pianos, guitars, brass instruments can all be played very quietly or very loud. This is generally not a problem if you’re in the same room as the instrument being played solo.
But it is a problem on a recorded medium, especially when combined with other instruments in a mix. Quieter parts could get completely drowned out and be inaudible, while louder parts could overpower the mix and prevent you from hearing other instruments.
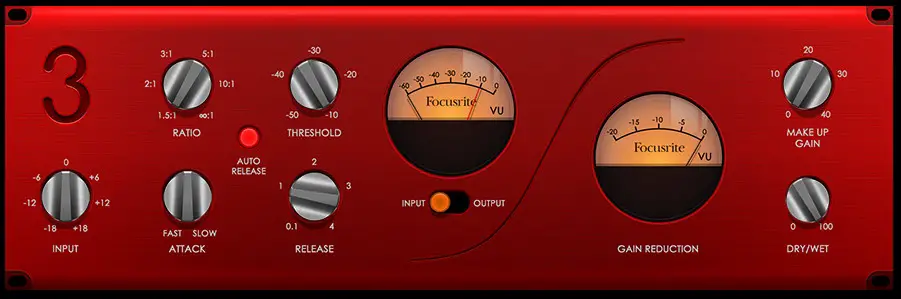
We can use a compressor to do this for us dynamically as the track is playing. Compressors usually have settings similar to this…
- Threshold: A volume level above which the signal will be made quieter. Below this volume the signal will be unchanged.
- Ratio: Sets by how much the signal volume above the threshold will be reduced. For example, a ratio of 3:1 means a signal 3dB louder than the threshold will be reduced in volume to be 1dB above the threshold.
- Attack time: How quickly the compressor changes the volume, usually measured in microseconds or milliseconds
- Release time: How quickly the compressor returns the volume to unaffected after the volume drops below the threshold, usually measured in milliseconds or seconds
- Make-up gain: Increases the volume level of the whole signal. Combining the make-up gain with the threshold/radio settings, has the effect of making the overall signal louder but more consistent i.e. less difference between the quietest and loudest parts.
The basic workflow with a compressor is as follows…
- Identify a track with uneven volume
- Set the threshold above which you want the volume to be reduced
- Set the ratio to how much you want to reduce the volume
- Set the attack and release times to how fast you want the compression to start/finish
- Increase the make-up gain to the level that gives you the overall volume level you want
- Experiment with the above, going back through steps 2-5 until you are satisfied with the result
It is very unusual to set the compressor settings absolutely right first go. It is important to trust your ears and to experiment with the settings.
With all plugins, not just compressors, there is always a choice between using the stock plugins that come with your DAW or to use 3rd party plugins. A debate has been raging for years in music production circles about which are better. Check out my article on stock vs 3rd party plugins for the lowdown on using each type, and whether stock plugins are sufficient to get a high-quality sounding mix.
When to use compression
If there is a track in your mix that sometimes you can hear fine, but other times it seems to disappear into the background, then that track is a prime candidate for compression. Similarly, if a track sounds just the right level for most of the track but occasionally sounds too loud, compression could well help to fix that for you.
You can’t just turn the volume of the track up or down in these situations. If you turn down the volume on a track with some too loud bits, you will very probably make the quiet parts of that track too quiet and you now have the opposite problem. You need to use a compressor to reduce the volume difference between the loudest and quietest parts.
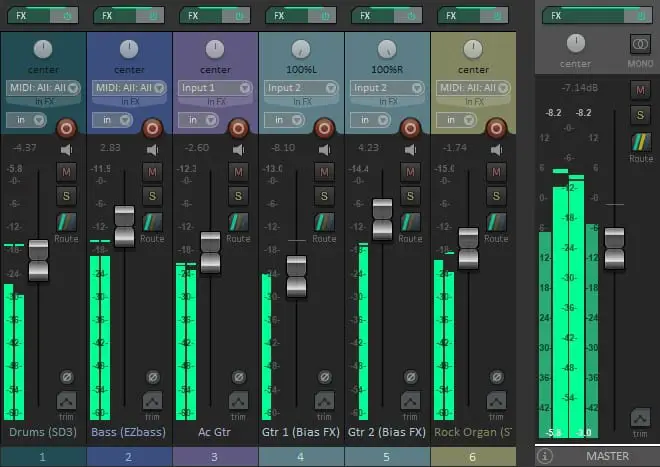
Much like EQ, compression is very often applied to a whole mix, probably on the master bus or fader in your DAW. Typically the settings for a whole mix are not as aggressive as when used on one track. The intention is to subtly make the overall volume more consistent, so it doesn’t sound out of place when played against other tracks on a streaming service or on the radio.
It’s important to stress that compression is a hugely powerful instrument that can destroy as well as enhance your mix. Only use compression if you think your track needs it. It is perfectly acceptable to listen to a track and think the volume levels are absolutely fine and no compression is required.
As compression is an often misused tool easy to overdo, I have written a guide on whether you should apply compression to every track. I highly recommend you read it if you are new to compression and wondering when and how often to use it.
Using EQ and compression together
It is incredibly common to use EQ and compression together. EQ is used to get the desired amount of each frequency range in your track. Compression is then used to control the overall volume of that track, smoothing out volume differences to make the volume more consistent.
An important consideration when working with EQ or compression is the effect on your whole mix. You may be tempted to solo a track and adjust your EQ and compressor settings listening to just that track. Please don’t do that! Change the settings for the track whilst listening to the whole mix.
You don’t actually care what an individual track sounds like, only what it sounds like in the whole mix. A track may sound great on its own, but terrible when combined with the other instruments in the song. Combining a track with other tracks will affect how it sounds, so work on getting the whole song to sound great, not individual tracks in isolation.
EQ, compression, and other effects and instrument plugins come in various different formats. One of the most common formats is VST. There is often confusion on the difference between VST and VSTi plugins. My guide on the difference between VST and VSTi explains, and should clear up any confusion you have between the two types.
EQ before compression, or compression before EQ?
Do you make the output of your EQ feed into your compressor, or the other way round?
There is no correct answer to this. Think about the effect of each. You either have the volume getting changed on the sound with the desired frequencies boosted/cut (EQ before compression). Or you have the frequencies getting boosted/cut in a sound with the volume made more consistent (compression before EQ).
My personal preference is to put EQ before compression, but neither is wrong. My advice is to experiment, and see which way round sounds best to you and which you find easier to work with.
To accurately hear the effect of your compression, EQ, and other plugins clearly, you are definitely going to need either a decent pair of open-back reference headphones, or a pair of quality studio reference monitor speakers. The headphones and speakers I recommend for mixing are…
- AKG K-702 Reference Headphones (affiliate link)
- Kali LP-6 Monitor Speakers – link is for one speaker (affiliate link)
Multi-band compression
I couldn’t finish this article on comparing EQ and compression without mentioning a multi-band compressor.
What on earth is that? I have repeated throughout this article that compression works on the whole signal, whereas EQ works on particular frequency ranges.
A multi-band compressor is a compressor that works on particular frequency ranges. So you can control the volume of different frequency ranges dynamically, not just the overall volume. It is like an EQ in that it works on selected frequencies, and like a compressor in that it works dynamically i.e. alters the volume on the fly.
I like to think of a multiband compressor as an EQ and a compressor combined.
Here is some of my favorite home studio gear…
Thanks for reading this article. I hope you found it helpful in your home music-making activities. Here are a few of the tools that I personally use in my home studio. These are affiliate links, so if you decide to use any of them I’ll earn a small commission.
Audio interface: My personal choice for audio interfaces are the Focusrite Scarlett series. I have been using these for years, and they have always given me great-sounding recordings. For a very reasonable price from Amazon you can buy the excellent Focusrite Scarlett 4i4, or if you don’t need MIDI capability the Focusrite Solo is a great choice.
Amp sim: Guitar amplifier simulator software has come on leaps and bounds in recent years, such that I record all my electric guitar parts using amp sims these days. One of the very best is the incredible Amplitube from IK Multimedia, which I have used on many of my songs.
Headphones for recording: My favorite headphones for recording are the Sony MDR-7506s, which I use for monitoring during all my recording sessions. They can also be found in many pro recording studios. Get the Sony MDR-7506 headphones from Amazon here.
General-purpose microphone: You can’t go wrong with a good ol’ Shure SM-57, one of the most versatile and ubiquitous microphones around. I’ve been using one in my home studio for as long as I can remember. Amazon offers the Shure SM-57 for a very competitive price.
To see all of my most up-to-date recommendations, check out this resource I made for you!