
DISCLOSURE: This post contains affiliate links. If you buy through these links, I may earn a small commission.
So you’ve been working on a song in Reaper for a while, and you are very pleased with the results. When it’s finished, you’ll want to give it to other people to listen to. Fortunately, you can export to the extremely popular mp3 format from within Reaper.
To export to mp3 in Reaper, select File->Render. In the “Source:” dropdown list, select “Master Mix”. Enter a name and location for your mp3 file. In the “Primary output format” tab, select MP3 in the “Format:” dropdown. Click “Render 1 file” to export an mp3 file with your chosen filename.
Exporting an mp3 file in Reaper is not difficult. But there are a lot of options to choose from, and it can get confusing to know which settings you need to use and which you can safely ignore. This article will guide you through the process, and have you exporting mp3 files from Reaper with confidence.
If you have landed on this page actually looking for how to import mp3 files into Reaper, I have that covered as well! Check out my “How to import an MP3 file into Reaper” guide to learn exactly how to do that.
If you are interested in checking out the best recording gear such as audio interfaces, studio monitor speakers, microphones, etc., you can find them at Amazon by clicking here.
Exporting to mp3 in Reaper – quick summary
This section is for those of you who don’t want the details, and just want to get an mp3 file as quickly as possible. We’ll ignore most of the settings, and just use the defaults. The numbers in the screenshot correspond to the numbered actions in the list below…
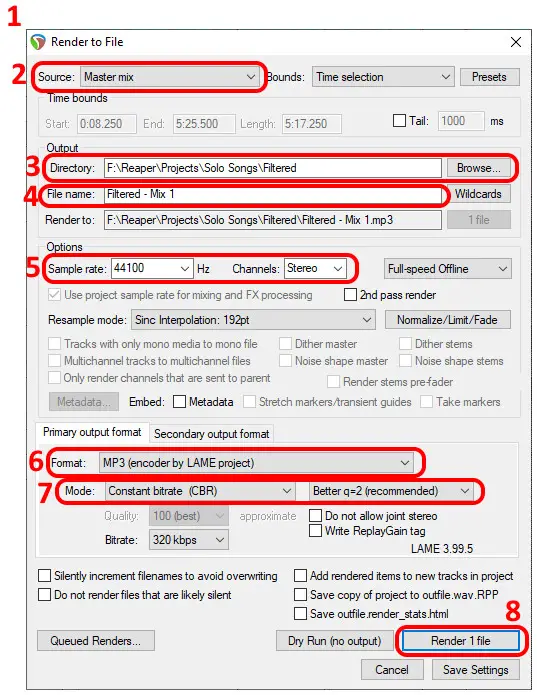
- Launch the “Render to File” dialog by going to “File->Render“…, or press Ctrl+Alt+R.
- In the “Source:” dropdown list select “Master mix”.
- Select a directory to output your mp3 file to by entering one into the “Directory:” text box, or select one using the “Browse…” button.
- Enter a name for your mp3 file into the “File name:” text box.
- in the “Options” section, select a “Sample rate:” of 44100 Hz and “Channels:” to be “Stereo“.
- Select the “Format:” to be “MP3 (encode by LAME project)“
- In the “Primary output format” section, you can leave the “Mode:” and “Bitrate:” at their defaults, otherwise I recommend setting them to…
“Mode:” “Constant Bitrate(CBR)“
“Bitrate:” “320 kbps“. - Click the “Render 1 file” button.
You should now have a shiny new mp3 file in your chosen location to distribute to friends, family and streaming services.
By the way, one essential piece of equipment to use with Reaper or any other DAW is a good audio interface. I have been using Focusrite Scarlett interfaces for years, and they have always given me great sounding recordings for not very much money. You can buy the Focusrite Solo from Amazon (affiliate link) for a very reasonable price.
Exporting to mp3 in Reaper in detail
Why export to mp3?
You’ve recorded a song, and now you want to be able to distribute it. This may be …
- to give to friends & family
- to put on online streaming services (e.g. Spotify, Apple music, Deezer, etc)
- to write to a CD to give to people
- to check your mix on other sound systems such as a car stereo, kitchen Bluetooth speaker, smartphone, etc.
You can’t distribute your DAW project and associated audio files for this purpose; whoever you give them to would need Reaper installed to be able to listen to your song. Instead, the ubiquitous mp3 file format is ideal for these purposes. Reaper has the ability to export to mp3 built into it.
Another use for mp3 export is if you want to give your audio tracks to someone else to work on. Maybe you’ve recorded a song, but you’re giving it to someone else to mix. Even if they don’t use Reaper, they could load the mp3 files into any other DAW to work on. Usually, you would use WAV format to do this, but mp3 will also work. You might use mp3 if you want to keep the file sizes as small as possible.
While this article is about mp3, there are many other formats you can export to. That’s why I wrote my “How to save a mixdown and export tracks in Reaper” article, which I highly recommend reading if you are doing any sort of exporting from Reaper. It will show you how to export different formats for both your whole song and selected tracks, and you’ll learn several different uses for exported files.
Settings for exporting a song as an mp3 in Reaper
Follow the process already explained in the quick summary section. For more control over what you export, you can use the options detailed in this section.
Selecting which part(s) of your song to export
Most of the time, you’ll probably be exporting your whole song to mp3. But you don’t have to. You could export just the 1st minute, or just the final chorus, or just the middle eight, etc. To select which part to export, we use the “Bounds” dropdown list in the “Render to File” dialog.
Here are its available options…
- Custom time range : When you select this option, the “Time bounds” settings underneath will be activated. Here you can specify the start and end times of your export, allowing you to output an arbitrary section of your song.
- Entire project : Selects your whole song from beginning to end for export.
- Time selection : Selects the area between the time selectors in Reaper’s track view. These are those lines you set by shift-clicking or dragging…the grey area between them is the region that will get exported.
- Project regions : In Reaper you can define “regions” of your song such as 1, chorus 2, bridge, etc. This option will select all the regions in your project for export.
- Selected regions : This will output only the regions you have selected. Select regions by clicking the Region Matrix button, then click on the relevant Master Mix square at the top of the grid to include the desired regions.
Source – saving a file for each track
As well as exporting your whole song as an mp3 in Reaper, you can output one file from each track, only output selected tracks, only output selected media items, etc. To select which of these you want, you use the “Source:” dropdown list.
The options most frequently used are…
- Master mix : This is the one to use when you are exporting your whole song to one mp3 file. The exported file will sound just like your song does in Reaper. This means if you have any tracks muted or solo’d, those settings will be copied into the mp3 file.
- Selected tracks (stems) : This is the option to use when you want to output separate tracks to give to someone else to work on, possibly using a different DAW to Reaper. A separate mp3 file will be output for each track you have selected in the Tracks view. e.g., six files will be output if you have six tracks selected. Any insert effects you have on the tracks will be in the exported mp3 files, but not send effects.
- Master mix + stems : You’ll get both of the above with this option i.e. an mp3 of your whole song, and a mp3 for each track in your song.
- Selected tracks via master : This is essentially the same as Selected tracks (stems) but with send effects included.
- Region render matrix : You can use this option to select which regions of your tracks you want to export, if you are using regions in your project.
- Selected media items : Your tracks consist of “media items”, and you can use this option to select which of these to export if you don’t want to export the whole track. Like Selected Tracks (stems) you will get insert effects but not send effects.
- Selected media items via master : The same as the above option but with send effects included.
I have not covered every option here, but these are the most commonly used ones and should cover everything you should need in an mp3 export.
Most of the time you’ll be exporting a single mp3 of your whole song (the “Master mix” option).
Before you export your mixed song to an mp3 file, hearing your mix through a quality pair of headphones or studio monitor speakers is essential. I highly recommend the AKG K-702 Reference Headphones (affiliate link), which you can get at Amazon for a very reasonable price. These are the headphones that I have been mixing on for years, with great results.
Output options
There are a few general output options we should consider. I won’t look at them all here; you can use the Reaper’s User Guide if you want to do that, so I’ll just explain the most common and useful ones.
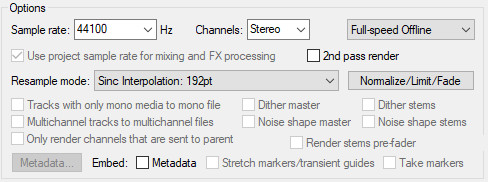
- Sample rate: How many samples per second will be contained in your output file. The most commonly chosen options are 44100 Hz (44.1kHz) and 48000Hz (48kHz). I recommend 44100 Hz for distributing music, as this is the same as a CD.
- Channels: Typically you will be choosing between mono and stereo, with stereo being the option you will almost always pick. Mono is however a good option for checking your mixes with on other sound systems.
Before you export your song, you should have gone through mixing. This is the important process of getting your tracks to sound good together. If you are new to mixing, my “Mixing – where to start?” beginner’s guide is recommended reading. You’ll learn a repeatable process for mixing, and will be guided right through the process up to creating your first mix.
MP3 specific format options
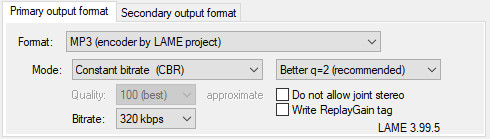
The mp3 options are all about sound quality. Generally, you can have higher quality output at the expense of a bigger file size and slower speed of rendering your file. This used to be important in the days of dial-up internet and small hard drives; you would try to keep the file size small to speed up transfer times and save disk space. These days I would almost always output a high-quality file.
MP3 is a lossy compression format. This means it will hugely reduce the file size when compared to the equivalent WAV file, but it will lose some audio information. The MP3 algorithm is very clever and only tries to remove audio that the ear cannot really perceive.
To avoid losing too much audio information, I would recommend the following settings:
- Mode: Constant bitrate (CBR) and Better q=2 (recommended)
- Bitrate: 320 kbps
Constant bit rate means the bits per second will be constant throughout your file. Compare this with “Variable bit rate”, which varies the bit rate through the file – parts that don’t contain as much audio information will have a smaller bit rate. This is another way to try to keep the file size small – again not really important these days with fast internet speeds and huge hard drive capacities.
To just talk about Reaper in general for a moment; if you are having any performance issues with Reaper you will probably want to check out my ways to improve Reaper’s performance article. This is recommended reading if you are having any issues, or just want to set up your computer to get the very best out of Reaper.
Conclusion
MP3 is still a great format to work with. It is perhaps less important these days than it was, as raw audio files’ (WAV, AIFF, etc) larger file sizes are not so much of a concern with today’s fast internet and big hard drives.
Nevertheless, mp3s are universally played by pretty much anything and are a great way to distribute your music. All DAWs, including Reaper, have an easy way to export mp3 built in giving you a simple option for testing your music on other devices and sending it to other people.
Here is some of my favorite home studio gear…
Thanks for reading this article. I hope you found it helpful in your home music-making activities. Here are a few of the tools that I personally use in my home studio. These are affiliate links, so if you decide to use any of them I’ll earn a small commission.
Audio interface: My personal choice for audio interfaces are the Focusrite Scarlett series. I have been using these for years, and they have always given me great-sounding recordings. For a very reasonable price from Amazon you can buy the excellent Focusrite Scarlett 4i4, or if you don’t need MIDI capability the Focusrite Solo is a great choice.
Amp sim: Guitar amplifier simulator software has come on leaps and bounds in recent years, such that I record all my electric guitar parts using amp sims these days. One of the very best is the incredible Amplitube from IK Multimedia, which I have used on many of my songs.
Headphones for recording: My favorite headphones for recording are the Sony MDR-7506s, which I use for monitoring during all my recording sessions. They can also be found in many pro recording studios. Get the Sony MDR-7506 headphones from Amazon here.
General-purpose microphone: You can’t go wrong with a good ol’ Shure SM-57, one of the most versatile and ubiquitous microphones around. I’ve been using one in my home studio for as long as I can remember. Amazon offers the Shure SM-57 for a very competitive price.
To see all of my most up-to-date recommendations, check out this resource I made for you!
