
DISCLOSURE: This post contains affiliate links. If you buy through these links, I may earn a small commission.

It has been a long time since I first started using DAW (Digital Audio Workstation) software – about 25 years in fact. Back then, it wasn’t easy to find out what the requirements for using a DAW were. Even today, it is not immediately obvious what you actually need to be able to use a DAW.
To use a DAW you need a computer running Windows, macOS, or Linux. Most consumer PCs built in the last 5 years should be powerful enough. You need good-quality headphones or speakers to hear your projects. An audio interface is also highly recommended to get the best out of DAW software.
This article will show you exactly what you need to use a DAW. You’ll learn what is absolutely necessary, and what is not strictly needed but can prove very useful, especially as you get more experienced and skilled with the software.
If you are interested in checking out the best recording gear such as audio interfaces, studio monitor speakers, microphones, etc., you can find them at Amazon by clicking here.
What you need to use a DAW
If you’re reading this article, I’ll assume you know what a DAW is. If not, my beginner’s guide to music recording software will explain what a DAW is and what you can do with one. It is highly recommended reading if you are unsure in any way about the purpose and capabilities of DAW software.
In one sentence; a Digital Audio Workstation (DAW) is a software application allowing users to record, edit, mix and master multi-track audio projects.
This is what you need to use a DAW…
1 A computer
DAW software needs a computer to run on. It used to be the case that a specialist high-spec music production PC was needed to run a DAW effectively. Fortunately, this is no longer necessary. These days, any consumer-level PC built in the last 5 years costing more than about $400 should be absolutely fine.
Either a laptop or a desktop will be suitable. The choice comes down to exactly what you will personally do in your music-making activities, and whether portability is an important consideration for you. My article comparing the pros and cons of laptops and desktops for music production should help you choose the right option.
The following types of computers are all suitable for running DAWs…
- Windows PC
- Apple Mac (Mac Book, iMac, Mac Mini, etc)
- PC running Linux
…although I would say that Linux is behind the others in terms of availability and support for plugins and virtual instruments. DAWs are also not as easy to use on Linux. If you are non-techy, I would stay away from Linux and run your DAW on Windows or macOS.
Although most off-the-shelf computers should run a DAW fine, the more powerful a computer you are using the more your DAW will be able to do. This includes…
- Using more tracks (read this article if you’re unsure what a track is)
- Using more effects
- Using more virtual instruments
These are the minimum specs I would recommend for a PC running a DAW. Lower spec machines will probably work to some degree, but these are as low as I would personally go to give you solid performance today and some future-proofing…
- Core i5 processor
- 8GB RAM
- 500GB SSD
- The graphics card is unimportant for DAW; built-in motherboard graphics will be fine
For more on the specs required, my article on PC specs for music production goes into much more detail on what you are likely to need depending on your particular circumstances.
As an example, here are the requirements listed on the manufacturer’s websites for some common DAWs running on Windows…
| DAW | CPU | RAM | HDD Space |
|---|---|---|---|
| Cubase Pro 11 | Intel® Core™ i5 | 8 GB | 35 GB |
| Studio One Pro 5 | Intel® Core™ i3/AMD A10 | 8 GB | 40 GB |
| Pro Tools | Intel® Core™ i5 | 16 GB | 15 GB |
| Cakewalk | Intel® Core™ i5/AMD A10 2.6GHz | 4 GB | 20 GB |
| Ableton Live | Intel® Core™ i5/AMD Multi-core | 8 GB | – |
Some simple recording tasks may not require a fully-featured DAW e.g. recording and editing a podcast. A simple audio editor/recorder application is sufficient for these types of tasks. Audacity is probably the most popular audio editor/recorder and is completely free. Check out this article looking into Audacity’s suitability for beginners for more information.
2 Headphones or speakers
Obviously, you need some way of hearing the music that you are creating in your DAW software. Some good quality headphones or speakers are therefore essential.
You may be thinking that you could use the speakers built-in to your laptop. I would strongly advise against this! They simply are not good enough quality to use for any serious audio application. They also have very little bass response as they are just too small. The same can be said for many standard cheap “computer speakers” that you may have connected to your PC.
You’re going to need something specially designed for high-fidelity audio listening if you’re going to stand any chance at all of making your music sound how you want it to. Otherwise, you simply won’t hear what your music actually sounds like, and won’t be able to make informed creative decisions.
I would actually start with headphones, rather than speakers. Headphones don’t require you to acoustically treat your room for the best performance, are cheaper than studio monitor speakers, and give you a consistent listening environment even if you take your computer elsewhere say, to a hotel.
Headphones
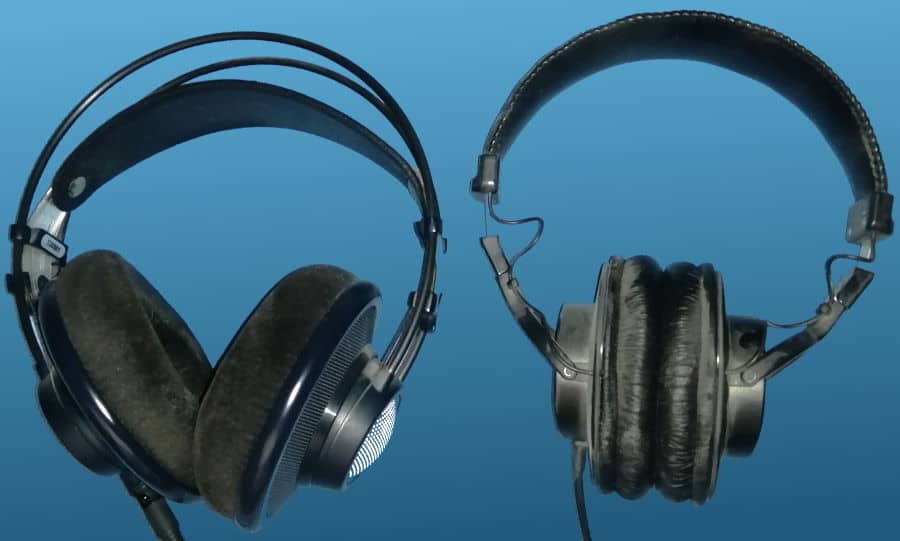
Fortunately, you don’t have to spend a huge amount of money to get a very good pair of headphones that will last you for years. There are two main types; open-back and closed-back. Open-back headphones are ideal for mixing, whereas closed-back headphones are best for recording.
I recommend the following headphones. I have used these in my home studio for years, including to produce 3 commercially released EPs.
- AKG K-702 Reference open-back headphones (affiliate link)
- Sony MDR-7506 closed-back headphones (affiliate link)
If you’re just starting out, I would go with the closed-back pair to start with.
Speakers
The ideal listening setup for your music production work is to use studio monitor speakers in an acoustically treated room. These are speakers specially designed to give a very accurate representation of the sound.
I recommend the Kali LP-6 Monitor Speakers – link is for one speaker (affiliate link), available from Amazon for a very competitive price. These are great value speakers, with excellent clarity and detail for their price range.
3 An audio interface
An audio interface is a box that connects to your computer, usually into a spare USB port or similar. It allows you to connect musical and audio equipment such as microphones, guitars, synthesizers, etc. so they can be used and recorded in your computer by software such as a DAW.
Audio interfaces also have some clever electronics in them to make sure the sound quality is as good as it can be, and to turn the analog signal from your audio devices into digital and vice versa. They often use some of the same hardware as much more expensive units, such as the microphone pre-amps that prepare a microphone’s signal to be processed.
At this point you may be thinking that your computer has a “mic” input; why couldn’t you just plug a microphone into that?
Well, you could, and it would work to a degree. The problem is that those audio inputs/outputs and related hardware built into computers are just not designed to work with specialist audio applications such as a DAW. You will probably suffer from poor sound quality, audio dropouts/glitches and latency issues.
Audio interfaces also offer the convenience of the ports you need being built right into the unit. XLR and standard ¼” jack connectors are the most common, and pretty much all audio interfaces, even the cheapest, have a least one of each of these ports.
You also get a lot of control over your audio signals, which is very important working with a DAW. Gain controls ensure you can set the correct signal level coming in from your microphone or instrument, to avoid clipping and unpleasant digital distortion. Some interfaces also have “pad” controls, which add another level of gain reduction for very hot signals e.g. those from an electric guitar with active humbucker pickups.
Some microphones such as condenser microphones require something called phantom power. This is an electrical signal sent down the XLR cable that actually powers the microphone. Audio interfaces will provide this signal.
Finally, you can get audio interfaces with MIDI interfaces built-in. This is very useful if you want to connect a MIDI keyboard or controller, and saves you having to buy a separate MIDI interface unit.
Fortunately, there are some excellent audio interfaces on the market that sound great whilst taking up very little space.
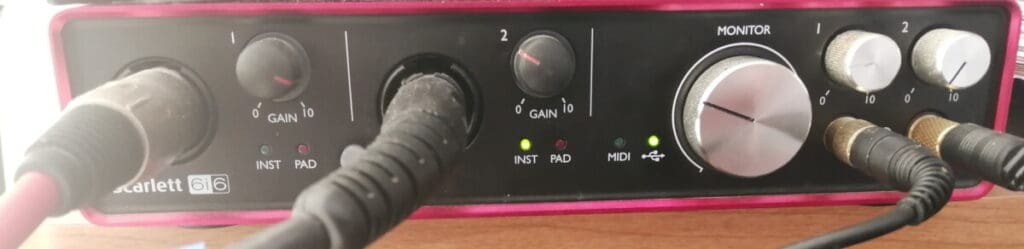
My personal choice is the Focusrite Scarlett series. I have been using these for years, and they give great sounding recordings for not very much money. You can buy the Focusrite Scarlett Solo from Amazon (affiliate link) for a very reasonable price. If you need one with a MIDI interface built-in, then the Focusrite Scarlett 4i4 (affiliate link) is highly recommended.
4 High-quality audio drivers
Audio drivers are small pieces of software in your computer that are responsible for processing the sound. The standard audio drivers that come with your PC are not suitable for working with high-end audio applications such as a DAW. They will likely cause performance (drop-outs, glitches, pops, clicks) and latency issues if you try to use them.
Fortunately, audio interfaces usually come supplied with suitable drivers. They either ship with the device on a CD-ROM or DVD-ROM, or they can be downloaded and installed from the manufacturer’s website. The installation process is usually very simple – just follow the manufacturer’s instructions.
These types of specialist high-end audio drivers are called ASIO on Windows and Core Audio on Mac. Along with the other software supplied with your audio interface, they allow you to configure settings such as buffer size, sample rate, output routing and line/instrument level selection.
Make sure you install the recommended drivers before starting to use your DAW.
5 Cables
In the excitement of kitting out a home studio, cables are an often overlooked but vital component. There is nothing quite as annoying for a home recording musician than starting a session and finding you don’t have the right cable, or that your appropriate cables are broken.
XLR and jack cables are the most common types of cable used when working with a DAW. You will use XLR cables when recording using a microphone, and jack cables when recording guitars, keyboards or other instruments.
Don’t skimp on quality with your cables! Cheap cables are almost always a false economy. Spend a little bit more money on a good quality cable today which should last you decades, rather than buying many cheap cables over several years which in the long run will cost you more.
Ideally, for every cable you have, you should have at least one spare. Cables are the most common thing to break for musicians, so having spares on hand is essential to avoid interruptions to your creative flow.
I have been using D’addario jack cables (affiliate link) for years, and have never had an issue with them. Coming with a lifetime guarantee, these really are buy once, then expect them to last a lifetime type products.
For XLR cables, I highly recommend this 2-pack of Gearlux Pro Audio cables (affiliate link). Again, these come with a lifetime guarantee, so you should be very confident of their durability and quality.
6 Tutorials and documentation for your DAW
DAWs are big, highly capable software applications with many, many features and capabilities. These range from the very simple to the very complicated, requiring considerable expertise and experience to master.
While you can pick up the basics of using your DAW in a few hours, at some point you will come across something that you get stuck on or that requires a bit of learning.
Luckily for us, modern DAWs have a wealth of material available on the internet for us to make use of. Introductory tutorials, YouTube videos, user manuals, forums and lessons can easily be found online for all the major DAWs.
I suggest finding the appropriate tutorials for your particular DAW and bookmarking any you find particularly useful. You will find that you will refer to these time and time again during your music creation activities.
I highly recommend you read my comprehensive guide to learning a DAW. This will show you the best way to learn your new software, and get you productive as quickly as possible. It also lists learning resources for each of the major DAWs such as beginner YouTube playlists, user manuals and forums.
7 Microphone (optional)
If you want to record any audio source that can’t plug directly into your audio interface, then you are going to need a microphone. I’ve listed this as optional, as you might not do any audio recording requiring a mic at all; you might just record DI’d electric guitars and MIDI keyboards. Or you could do all your music creation using pre-recorded audio or MIDI loops.
But at some point, you probably are going to want to record something with a microphone. Vocals are the most common thing recorded, but you could also record acoustic guitar, piano or any number of wind instruments.
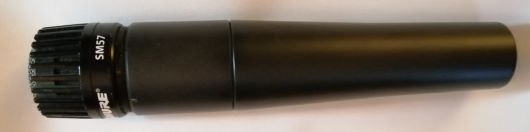
Fortunately, there are many excellent microphones available for not much money. I recommend two different microphones for those just starting out (affiliate links)…
- Shure SM57 – this is a studio standard dynamic microphone, suitable for recording just about anything
- Rode NT1-A – this is a condenser microphone, particularly suitable for vocals and acoustic guitars
8 Pop filter (optional)
You don’t need a pop filter if you are not recording vocals. However, if you are recording vocals then a pop filter is absolutely essential!
What is a pop filter for? It reduces “plosives”. These are the sounds resulting from the sudden rush of air that comes from your mouth when you say or sing “p” or “b” sounds or similar. These sounds have the potential to completely ruin a vocal take; imagine a sensitive emotional vocal with a sudden loud “b” sound in it.
A pop filter is a mesh panel that you put in front of your microphone when recording a human voice. It is very effective at hugely reducing those plosives before they reach the mic, preventing them from ever making it onto your recording.
This Auphonix pop filter (affiliate link) comes highly recommended, and is available for a very reasonable price at Amazon.
9 Microphone stand (optional)
If you are using a microphone, then no ifs, no buts; you need a mic stand.
You should never record vocals in a studio with the microphone held in a hand if you can avoid it. While fine in loud live situations, in the controlled quiet environment of even a home studio the handling noise will stick out like a sore thumb.
Whatever you are recording whether it’s a human voice, an acoustic guitar, a saxophone or something else, you need something to hold the mic in place. While you can improvise something, this will never be as good, stable or long-lasting as a proper microphone stand.
You can get pretty good microphone stands for not much money. This stand from Amazon (affiliate link) should do the trick, available for a great price and should keep those microphones in position for you for many years.
10 MIDI keyboard or controller (optional)
If you want to create MIDI parts in your DAW (e.g. for drum patterns, pad synth parts, bass lines, etc.), a MIDI keyboard or controller is not strictly necessary. You can use the mouse and keyboard to program in MIDI patterns in the DAW’s piano roll or other editors.
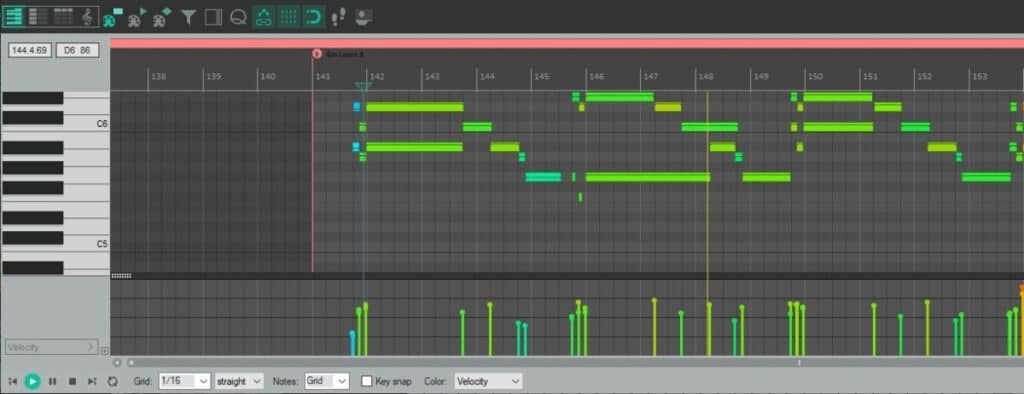
However, this is tedious, time-consuming and very error-prone. Imagine having to program a whole intricate piano part like that! Much better to actually play the part on a MIDI keyboard, and have the DAW record your performance. You can then fix any minor errors in the piano-roll editor afterward.
Piano, synth, strings, drums, bass – all can be played using a MIDI keyboard or controller. If you intend to use any quantity of MIDI data in your DAW beyond the very minimal, I would strongly advice getting a MIDI keyboard.
You don’t need to spend a lot of money on a decent MIDI keyboard. The AKAI Professional LPK25 (affiliate link) is a small 2-octave MIDI keyboard, available from Amazon for a great price. This is ideal if you need a small keyboard for recording simple synth lines or similar.
The Alesis Q49 MkII (affiliate link) is a larger 4-octave keyboard, ideal for keyboard players looking to play a little more expansive keyboard parts, perhaps more chord-based. This is an excellent choice for a good all-round keyboard, that should last you years.
11 Virtual instruments (optional)
There are many virtual instruments available to use in DAWs today. These are instruments implemented in software that your DAW can play using MIDI. Many DAWs come supplied with a few virtual instruments of their own.
Pianos, organs, synths, basses, orchestras, strings, brass, drums, percussion...you name it, there’s probably a virtual instrument for it. There are big paid commercial instruments such as EZ Drummer, Superior Drummer and Sampletank. There are also many, many free virtual instruments available; just search Google for “free virtual instrument” and you will most likely find something to fit your needs.
You do not need virtual instruments to make music using a DAW. But they are very useful if you want a particular instrument sound to appear in a song you are creating.
Drum parts are one of the most common things to use a virtual instrument for. That’s why I wrote my complete guide to creating drum tracks for non-drummers. It’s essential reading if you are not a drummer yourself but want to have drum parts in your songs without recording real drums.
If you’re interested in the difference between VST effects plugins and VST instrument plugins, I highly recommend my article on the difference between VST and VSTi. This should clear up any confusion, and show you what each one does and how they can be used.
12 Amp sims (optional)
If you are intending to record electric guitars in your DAW, the traditional way of recording is to place a microphone in front of a guitar amp’s speaker (“mic’ing up” the amp).
There is nothing wrong with doing that, and this is still the approach taken in many pro recording studios all over the world. However, these days we have a much easier way of recording electric guitars – using guitar amplifier simulator software, or “amp sims“.
These are exactly what they sound like; they simulate a guitar amp in software. They are plugins that sit inside your DAW that act as guitar amplifiers and pedalboards. In my opinion, this is the best way to record electric guitars in a home studio today.
If you are interested in using amp sims for recording, definitely check out my complete guide to recording guitar using amp sims. A lot of work has gone into this guide! It takes you through the full process of recording a track using an amp sim, right from connecting up your guitar to tweaking the recorded sound.
There are many paid and free amp sims available. Some of the big commercial paid ones have cut-down free versions available, which are perfectly usable for many applications.
As far as paid amp sims go, I highly recommend you check out the amazing Amplitube from IK Multimedia (affiliate link), which I have been using to record great-sounding electric guitar parts for years. There is a free version called Amplitube CS if you don’t want to fork out for a paid version straight away.
For free amp sims, this list is an excellent resource to help you find what you are looking for.
Here is some of my favorite home studio gear…
Thanks for reading this article. I hope you found it helpful in your home music-making activities. Here are a few of the tools that I personally use in my home studio. These are affiliate links, so if you decide to use any of them I’ll earn a small commission.
Audio interface: My personal choice for audio interfaces are the Focusrite Scarlett series. I have been using these for years, and they have always given me great-sounding recordings. For a very reasonable price from Amazon you can buy the excellent Focusrite Scarlett 4i4, or if you don’t need MIDI capability the Focusrite Solo is a great choice.
Amp sim: Guitar amplifier simulator software has come on leaps and bounds in recent years, such that I record all my electric guitar parts using amp sims these days. One of the very best is the incredible Amplitube from IK Multimedia, which I have used on many of my songs.
Headphones for recording: My favorite headphones for recording are the Sony MDR-7506s, which I use for monitoring during all my recording sessions. They can also be found in many pro recording studios. Get the Sony MDR-7506 headphones from Amazon here.
General-purpose microphone: You can’t go wrong with a good ol’ Shure SM-57, one of the most versatile and ubiquitous microphones around. I’ve been using one in my home studio for as long as I can remember. Amazon offers the Shure SM-57 for a very competitive price.
To see all of my most up-to-date recommendations, check out this resource I made for you!
