How to create drum tracks – complete guide for non-drummers
Recording most instruments these days is relatively easy in a home studio. One common exception is recording drums; this is still fairly difficult to do at home, for reasons of space, noise and the specialist knowledge required to get a good sound. Fortunately, there are several options available for us to create great drum tracks easily, even for non-drummers.
Drum tracks can be created in three main ways. One, by using pre-made loops. Two, by creating MIDI grooves manually and using drum virtual instrument software to play them. Three, by using virtual drummer software and arranging grooves from the software’s built-in MIDI library to make the track.
All of these options give us nice easy ways to create realistic drum tracks for our songs inside our DAW (Digital Audio Workstation) software. This article will explore these three methods in some detail, using examples where appropriate and comparing the benefits and drawbacks of each approach. If you find some of the terminology used in this article confusing or you need a primer on recording in general, check out this article on recording your own music at home.
If you are interested in checking out the best recording gear such as audio interfaces, studio monitor speakers, microphones, etc., you can find them at Amazon by clicking here.
Traditional drum recording issues
Let’s take a quick look at the issues involved with the traditional method of creating drum tracks; recording a real drum set being played by a real live drummer. This gives us the reasons why we are looking for other ways to create drum tracks. Feel free to skip this section and move straight onto the drum track creation sections.
For recording in a home studio, real drum sets present a few problems…
- Drums are loud and take up a lot of space – recording real drums in your home is likely to seriously annoy neighbors/family members, and not many of us have the space for a real drum set.
- Drums are difficult to mic up and get a good sound – if you have seen a photo of a drum set being recorded in a pro recording studio, you’ll see lots of mics on it. Probably one mic (at least) for each drum, one or more for the hi-hat, and several overheads to capture the cymbals. To set all this up and then to get a good sound from it is a highly skilled job, and takes an experienced studio engineer to do it right.
- Most of us are non-drummers – I am not a drummer, at least not to the level I’d need to be to play the sort of drum parts I want in my songs. You could get a drummer friend to play them for you, but that adds hassle and doesn’t solve the above two issues.
You can get around the first two problems to an extent by using an electronic drum set. This lets you plug straight into the audio interface without using any microphones. But you still need a drummer, and electronic kits still take up a lot of space. Plus they are not silent – if you lived in an apartment above anyone, even the clicks from the pedals and sticks on the pads will probably be loud enough to cause a few noise complaints.
These are the reasons why we are looking for other ways to create drum tracks for our songs. Lucky for us, we have several options available to us to create realistic, great sounding drum parts.
Three methods of creating drum tracks
In the summary at the beginning of this article, I laid out three ways of creating drum tracks. Let’s go into a little bit more detail about each one…
- Pre-made loops – there are many, many drum loops available on the internet in all sorts of different styles and sounds. These are both free and paid – just Google for “free drum loops” or similar and you will find thousands. You can download and use some of these loops in your song. The problem you are likely to have is finding what you want amongst the huge quantity of loops available out there.
- Drum virtual instrument software and create MIDI grooves manually – Inside your DAW (Digital Audio Workstation), create a MIDI or instrument track. Add a virtual instrument to the track, and select a drum sound in it. You can use the DAW’s MIDI editor to manually create MIDI parts using the mouse, or record yourself playing them using a MIDI controller of some kind (e.g. a keyboard or a pad controller). These can then be played back by the virtual instrument.
- Virtual drummer software with MIDI patterns from a groove library – Add virtual drummer software such as EZDrummer 2 (paid) or MT Power DrumKit 2 (free) to a MIDI or instrument track in your DAW. You then select grooves from the software’s built-in MIDI library, and drag those onto your track in the DAW to make the drum part. If the parts are not quite what you want, you can edit them in the DAW’s MIDI editor.
Which method you choose will depend on how you prefer to work, your style of music and how much time you are prepared to put into creating your drum track.
Using pre-made loops is usually the fastest way of getting a drum track into your song.
My preferred method is to use virtual drummer software, and to make use of its groove library. This gives me huge amounts of patterns that I don’t have to create myself, while still giving me the option to easily edit them if they are not quite what I want. I find it a good balance between control and having the bulk of the work done for me.
I created an E.P. where all the drum tracks were made using exactly this method. Go to my About Page if you’re interested in having a listen to what can be done with this approach, and follow the links to the Smile E.P.
For all of these methods, you will need a DAW (Digital Audio Workstation) program to create your drum tracks in. If you are not sure what a DAW is or are unfamiliar with recording on a computer, this article on music recording software should help give you a basic grounding in what you need to know.
How to create a drum track using pre-made loops
As already mentioned, there are a ridiculous amount of drum loops available for download on the internet. You can use your favorite search engine to find some yourself, but here are a few free options you might like to check out…
Here are the steps to follow to create your track using downloaded drum loops…
1 Find one or more appropriate drum loops
The first step is to find a drum loop that you think would work well for your song. These may be downloaded from a “cloud” library i.e. a collection of loops on a website, or in a loop pack that you may have already downloaded from the internet previously.
2 Drag the drum loop into your DAW
Once you have a loop that you like, it’s time to get that loop into your DAW. If you haven’t yet done so, create a new track in your DAW. The method to do this will depend on which DAW you’re using. Typical ways include going to the Track menu and selecting new, double-clicking on empty space in the track panel track list, or using the shortcut key (Ctrl-T in Reaper, the DAW that I use). If your DAW has different track types, you will want to select Audio as the track type.
From the file manager application (e.g. Windows Explorer), navigate to where your loop is located on your computer’s hard drive. Drag the loop from the file manager onto the newly created track in your DAW. If it doesn’t end up in the right place, simply move it to the correct place on the track inside your DAW.

In Reaper, when you have dragged the loop file onto the track, a dialog pops up asking if you want to adjust the tempo of the loop to the tempo of your project. This is a very useful feature, as it means you don’t have to find a drum loop that is exactly the right tempo – it will be adjusted automatically. I would almost always say yes to this. Other DAWs have a very similar feature.
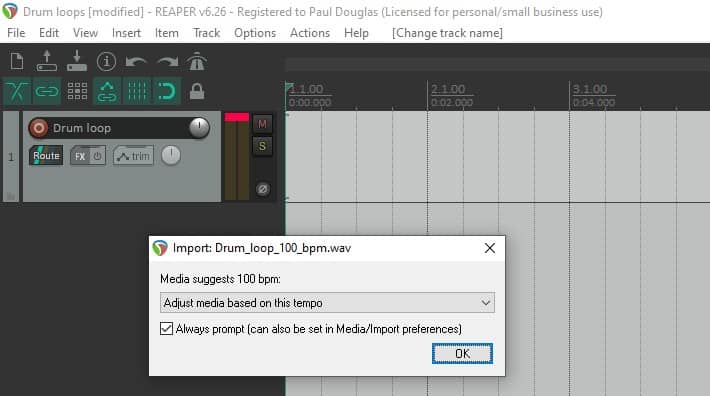
Once the loop has been imported into your project, you should be able to see its waveform in the part on the track.

There may well be other methods to import the drum loop file into your DAW e.g. an import menu or right clicking on a track and choosing “Import”. I think the dragging-and-dropping method is usually the easiest.
If you are using more than one loop in your project repeat the process in this step, and move each loop into the right place on the track in your DAW.
3 Duplicate and edit the drum loop(s) as necessary
Now you have one or more drum loops in your DAW project, you can duplicate and edit these to form your full drum track.
Typically you can duplicate a part in most DAWs by holding Ctrl and dragging to where you want the new part to be. You can also do this with multiple selected parts; to select multiple parts either drag a selection box around the parts (in Reaper you use the right mouse button to do this), or hold down Ctrl and click each part you want to select. You may also be able to hold Ctrl and drag the right side of the part to create multiple duplicates (this works in Reaper).
You can of course also cut parts, should there be a place in your song where you only need a portion of the loop.
4 Tempo – time stretching
You may be thinking that you are stuck with the drum loop at the tempo that you imported it at in step 2.
Fortunately, this is not the case. If you decide that you need to change the tempo (bpm) of your project, you can do that and the tempo of the imported loop will correspondingly change along with it. Most DAWs are intelligent enough to do this automatically these days, so changing the tempo of your song at this stage should not be an issue at least as far as imported drum loops are concerned.
Pros and cons of using imported drum loops
Using imported drum loops is probably the quickest way of creating a drum track for your song. Although if you are very experienced using virtual drummer software such as EZDrummer, it is possible to create full drum tracks incredibly quickly.
That’s this method’s big advantage; the speed of being able to create a full drum track. It is also the method that has the least amount of work involved, assuming you are not doing stupid amounts of editing. The bulk of the time is likely to be actually finding drum loops appropriate for your song, among the many thousands available.
One of the drawbacks of pre-made loops is that they are audio, not MIDI. MIDI is a lot easier to edit than audio, so if you think you will be doing a lot of editing to make your loops fit your song, one of the other approaches might be better. For example, imagine wanting to add another snare drum hit to a loop. You’d have to copy it from another hit in the loop, being very careful with the place where you copied it from and pasted it to. To do this using MIDI is trivial – you just use the mouse to add another snare drum hit where you want it using your DAW’s MIDI editor.
One final important thing to mention is the issue of rights and licensing. If you are planning on releasing your music in any form (on digital streaming platforms, on physical media, on YouTube, etc), you absolutely must make sure that you have the rights to use the loop(s) in your own released music. Check the license and terms and conditions of the loop carefully, and if in any doubt contact the source of the loop and make sure you can use it.
Getting and setting up a drum virtual instrument
For the second and third methods, we require some sort of virtual instrument to play our MIDI patterns. For the second method where we create our own MIDI patterns, any virtual instrument that has drum set sounds built into it will be fine – it doesn’t have to be dedicated virtual drum software. For example, I have used Sampletank many times for this purpose, which is essentially a huge sound library of lots of different instruments, not just drums.
Where we are using the groove libraries from virtual drum software in method 3, obviously we will need to get that virtual drummer software. You could also use them with method 2 and your manually created MIDI patterns.
For this reason, I’ll go through getting, installing and setting up a couple of examples of virtual drummer plugins. I will use EZDrummer 2 (paid) and MT Power DrumKit 2 (free) to illustrate this.
I have mentioned DAW (Digital Audio Workstation) software many times now, and you will need one to host your virtual drum instrument. If you are a novice with DAWs, these two articles will be of great help in giving you the knowledge you need to get the best out of your DAW as quickly as possible…
- How to start learning a DAW: the best way to learn quickly
- What you need to use a DAW – a complete guide
Downloading and installing EZDrummer
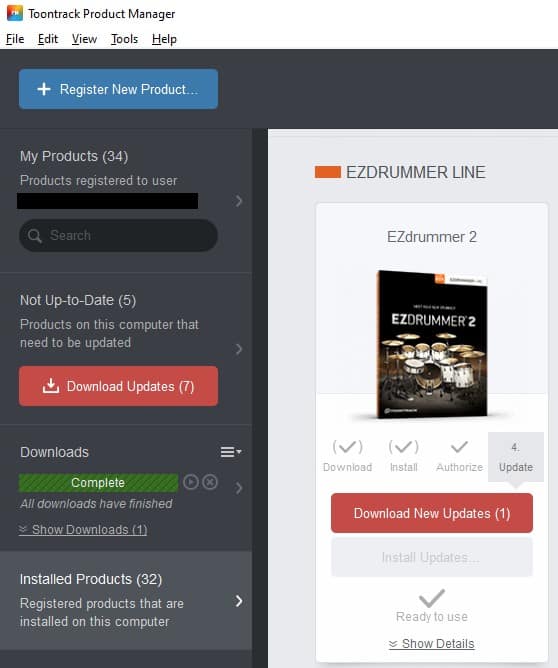
To get EZDrummer onto your computer, you use the Toontrack Product Manager application. Once you have purchased EZDrummer, it will appear in the Product Manager, and you can install it by clicking the “Install” button (I already have it installed, so there is no install button in the screenshot below).
During the installation process, the location where the plugin is going to be installed might be displayed to you. It is worth making a note of this for later, just in case your DAW doesn’t pick this up automatically.
Downloading and installing MT Power DrumKit 2
Although not as fully featured as EZDrummer 2, MT Power DrumKit 2 does have the major plus point that it is free. It can be downloaded from here. On the download page you will get an option to download either the VST or the AAX version; if you are using Pro-Tools then download the AAX version, for any other DAW get the VST version.
A file called something like MTPDK-2.0.9-VST-64bit-Win-FULL.zip will be downloaded to your hard drive. Extract the contents from the zip file, and you will see 2 files…
- MT-PowerDrumKit.dll
- MT-PowerDrumKit-Content.pdk
To install MT Power DrumKit 2 for your DAW, these 2 files need to be copied into a plugin folder for your DAW.
To locate the appropriate folder to copy the files into, look in the Preferences or Settings of your DAW. For example, in Reaper go to Options->Preferences, select Plugins->VST on the left hand side of the dialog. You will see a VST plugin-paths field on the right hand side (highlighted with a red border below) containing some folder paths. Copy the two MT_PowerDrumKit files into one of those folders, and the plugin will be installed for your DAW.
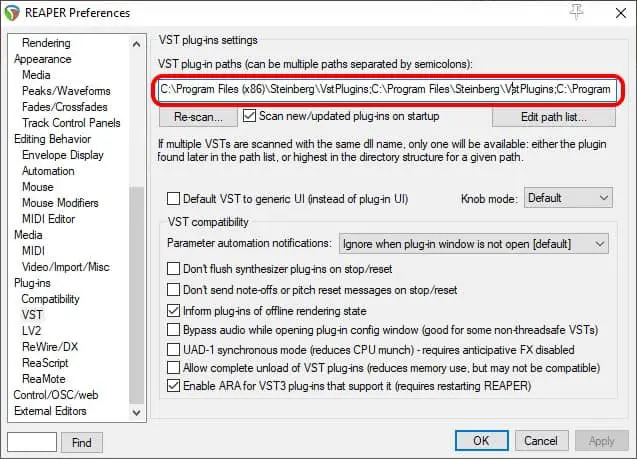
There will be a similar setting specifying plugin paths in your DAW. You may have to tell your DAW to re-scan for plugins once you have copied the files into the plugin folder.
With all this talk of tracks, you may be unsure exactly what a track is. That’s why I wrote my “What is a track?” article which will teach you what tracks are and how to use them. Closely related are something you may have heard of – stems. People think tracks and stems are the same, but they are not. Check out my article explaining the difference between tracks and stems to impress your musician friends!
Creating a track for the virtual drum plugin
Now you have the virtual drum plugin installed, we can get to actually using it in a project
In a project in your DAW, create a new track. This varies from DAW to DAW, but typically there are several ways you can do it – using a Track menu and selecting Track->New Track, double-clicking on an empty area in the DAW’s track area, using a shortcut key (e.g. Ctrl+T in Reaper), etc.
You may be prompted to select the type of track, if your DAW has different track types. If available, choose an instrument track, then select the drum plugin as the instrument for the track when prompted. If there is no instrument track type, choose a MIDI track. Then add the drum plugin as an insert effect on the track.
Some DAWs such as Reaper do not use track types – all tracks are fundamentally the same. What you can do in Reaper is right-click in the track panel, choose “Insert virtual instrument on new track“, and choose the virtual drum plugin from the list of available plugins when prompted.
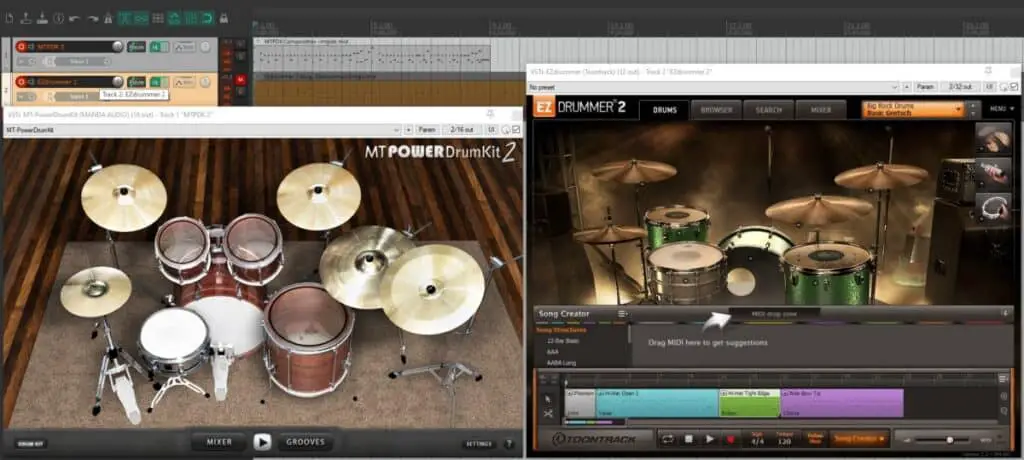
Test the plugin
As a quick test that everything has been set up correctly, click on a few of the drums in the plugin’s user interface. You should hear the sound of that drum through your headphones or speakers. If that is the case, then you’ve successfully set up your drum instrument ready to create your drum track!
If not, carefully check that the outputs on the track your track are setup correctly for your audio interface.
How to create a drum track by creating MIDI patterns yourself
Drum tracks consist of a sequence of one or more MIDI parts, patterns or grooves. These are essentially instructions to the drum virtual instrument to play a drum or cymbal at a particular time. Now that sounds a little bit abstract; in practice, what do we actually mean by this?
Here is a screenshot from Reaper of a very simple drum track, consisting of just one MIDI groove (highlighted with a red border)…

This is what we are trying to achieve – to create one of these grooves. To edit the groove, double-click on it. This will launch the groove in the MIDI “piano roll” editor…
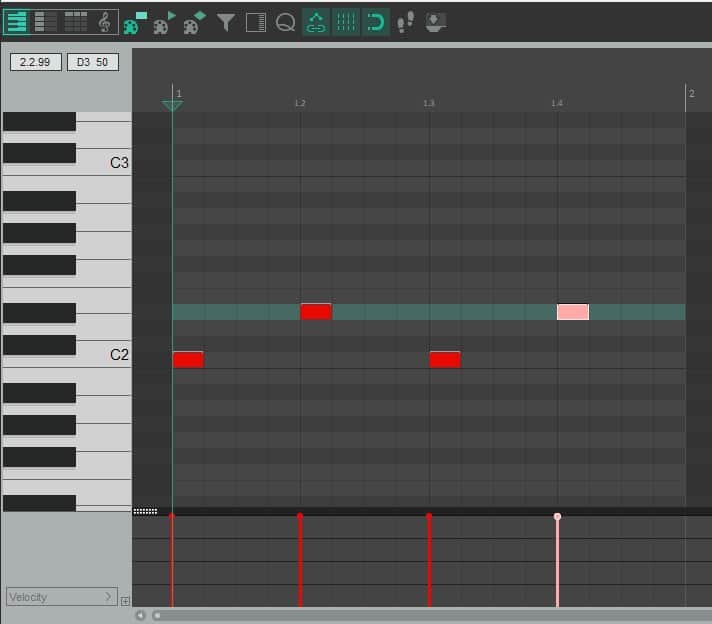
The two lower blocks on beats 1 and 3 of the measure are the kick drum (note C2), and the two higher blocks on beats 2 and 4 are the snare drum (note D#2). If we wanted to add another bass drum hit half way between beats 2 and 3, we could do that by double-clicking on the grid half way between 1.2 and 1.3 columns on the C2 row. The modified groove with the new note is shown below…
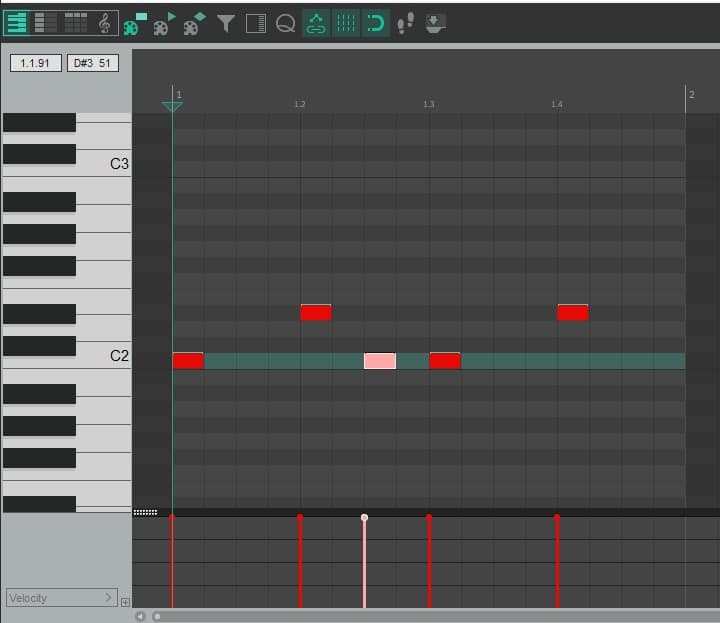
And really, that’s it! You can move each note by dragging with the mouse if you put it in the wrong place, and you can delete notes by selecting them and pressing delete.
Now at this point you may be asking “But how do I know which note plays which drum?”. That’s a good question. The answer is that there will be a MIDI map inside your drum virtual instrument, which shows you exactly which drum or cymbal is connected to which note.
For example in the MT PowerDrumKit 2 plugin, if you click the Settings button you will see this map…
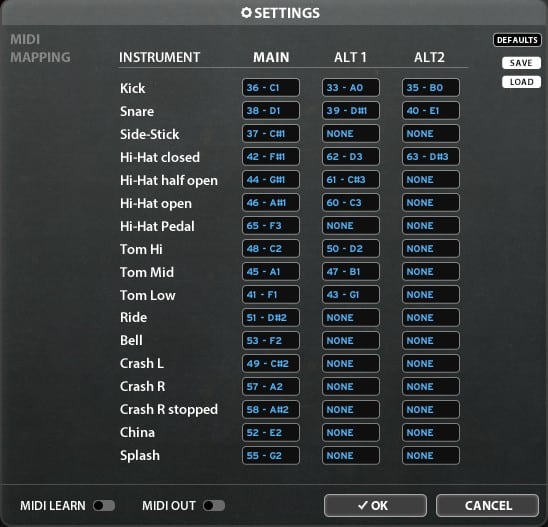
So you can see that note 36 or C1 plays the kick drum, with notes 33 (A0) and 35 (B0) playing an alternate kick drum sound, note 38 (D1) plays the snare drum, with notes 39 (D#1) and 40 (E1) playing and alternate snare drum sound, etc.
Beware! The eagle-eyed of you will have spotted a mismatch between the C1 note for the kick drum in the MIDI map, and the C2 note I used the play the kick drum in the MIDI groove I created. Sometimes this happens; there is a mismatch between what the instrument plugin calls C1 and what the DAW calls it – they are often an octave apart. The identifying number is usually correct though; it is 36 in both cases.
This isn’t a major problem; it is very easy to select all your notes and move them up or down an octave if you have to. But it’s something to watch out for if you’re either getting no sound from your groove, or it’s not playing the sounds you expect.
There are two ways to create your MIDI groove…
Creating a groove using the MIDI editor
You can usually create a blank MIDI item in your DAW by placing the project locator where you want the item to be created, then selecting “New MIDI Item” or similar from a menu (in Reaper you would do Insert->New MIDI item).
You can then enter all the drum and cymbal hits for the groove using the mouse in the DAW’s MIDI piano roll editor. Your DAW may have additional alternative styles of editors you could use, but the “piano-roll” style editor is pretty universal across all DAWs, which is why I’ve concentrated on it here.
Creating a groove by playing a MIDI controller
The alternative to creating your groove using the mouse in the MIDI editor, is to actually play it on a MIDI controller of some kind. This could be a traditional MIDI keyboard, or perhaps a MIDI drum pad controller such as the ones shown here.
Using the drum map shown earlier, you know which note relates to which drum. Or for a drum pad controller, you may be able to assign particular drums to each pad. You can then record in your DAW the usual way you would record a MIDI track, manually playing the drum virtual instrument using the keys or pads on your controller. Once your grooves are recorded, you could of course edit any mistakes using the MIDI piano roll editor.
This actually playing the groove is one way of getting some “feel” into the track, and making it sound like a human played it rather than a robot.
How to create a drum track using virtual MIDI groove libraries
Instead of creating the MIDI grooves yourself, you can use MIDI groove libraries where someone else has already done the hard work of creating the grooves for you. You then use these grooves to play a drum virtual instrument. This gives you the same speed of creation that using pre-made loops does, with the ease of editing that MIDI provides. There are two ways to get access to these collections of grooves…
- Search for and download them from the internet
- Use the libraries built in to drum virtual instruments
Searching for groove libraries on the internet is simply a matter of searching Google for “MIDI grooves” or ” MIDI groove libraries” or similar. There are many available, both free and paid. I used the search phrase “free midi grooves” in Google, and these were the top five results returned…
- Groove Monkey
- The best free MIDI drum loops and a guide to using them
- OddGrooves 153 Free MIDI Drum Grooves
- The best free MIDI drum loops on the internet
- Platinumloops Free MIDI Drum Loops Archives
The alternative to searching for MIDI grooves on the internet, is to use the groove libraries built into virtual drum instruments such as EZDrummer 2 and MT Power DrumKit 2. This gives you the convenience of everything in one package, and you can usually find a groove that is very close to what you want. With a little editing, you have the perfect groove for your song. And certainly in the case of paid options like EZDrummer 2, these patterns were recorded be being actually played by some fantastic session drummers in pro recording studios.
This is my preferred way of creating drum tracks. What follows are detailed instructions on how to create drum tracks using…
- A free option – MT Power DrumKit 2
- A paid option – EZDrummer 2
As with all virtual instrument software, the more instances of instruments and parts you have, the more of your computer’s processing and memory resources will be used. Check out these articles to discover exactly what sort of computer you require for your personal music productions…
- PC specs for music production – what do you actually need?
- Laptop vs Desktop for music production – which is better?
How to create a drum track using MT Power DrumKit 2
Assuming you have followed the earlier instructions in Getting and Setting up a Virtual Drum Instrument, you should have a track in your DAW with the MT Power DrumKit 2 plugin set up as an insert effect. Launch the plugin in your DAW, so you can see its user interface.
The first thing we have to do is find a suitable groove for your song. When MT Power DrumKit 2 launches it shows you the Drum Kit view. Click the Grooves button at the bottom of the window to switch to Grooves view.
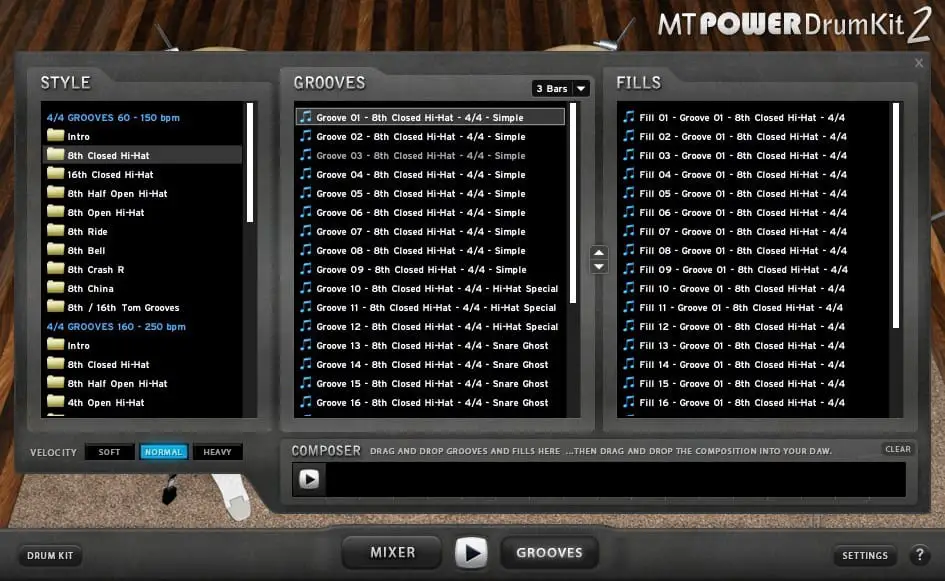
The Style tab on the left contains categories of grooves, based on time signature, speed and play style. Select one of the folders in the Style tab, and you will see a list of grooves in the middle Grooves tab appear. You can listen to one of these grooves either by double clicking on it, or selecting it and pressing the “Play” button in the bottom middle of the window, between the Mixer and Grooves buttons. Stop it playing by pressing Play again.
When you have selected a groove in the Grooves tab, the Fills tab will be populated with “fill” grooves related to the main groove you selected. You can listen to these in the same way (double click or select and click “Play”).
Finding a groove is simply a matter of finding the category that best fits your song in the Style tab, then auditioning the grooves until you find one you like. You can always edit it in the DAW’s MIDI editor later if it’s not exactly what you want. You can also specify how long you want the groove to last for by selecting the number of bars in the drop-down list at the top-right of the Grooves tab.
Once you have found a groove, you have two options…
- Drag the groove from the plugin straight onto a track in your DAW – you can repeat this as many times as you like with as many grooves as you need. You can then re-arrange the grooves on the DAW’s track, moving and copying them as necessary, building your full drum track using the DAW.
- Use the Composer feature with MT Power DrumKit 2 – this allows you to build the whole drum track within MT Power DrumKit 2. The composer tab is towards the bottom of the window. Drag grooves from the Groove or Fills tabs into the Composer tab. You can then re-arrange the grooves by dragging, or clear the whole track by clicking the Clear button. When finished, you can drag the whole track from the Composer tab onto the track in your DAW.
Which option you choose doesn’t really matter; it depends on how you prefer to work. Ultimately they both do the same thing.
You now have your full drum track! You can of course use 3rd party MIDI groove from libraries you have downloaded to play MT Power DrumKit 2, as explained earlier. But there is a lot to be said for the convenience of having everything contained within one nice user interface. It makes it very easy to build great-sounding drum tracks very quickly.
How to create a drum track using EZDrummer 2
Now on to a paid option. For me, the cost of EZDrummer 2 is worth it for the following reasons…
- Better sound quality
- More available sounds
- More available patterns
- Recorded professionally in pro studios by highly regarded session musicians
- Better user interface, features and ease of use
- Availability of add-on packs for both kits (sounds) and MIDI (patterns)
The corresponding downside is that there is a bit more of a learning curve with EZDrummer 2, to get the best out of the extra features.
Assuming you have followed the earlier instructions in Getting and Setting up a Virtual Drum Instrument, you should have a track in your DAW with the EZ Drummer 2 plugin set up as an insert effect. Launch the plugin in your DAW, so you can see its user interface.
Let’s find a suitable groove for your song. Like MT Power DrumKit 2, when EZDrummer 2 launches it shows you the Drums view. They are two basic ways to search for grooves; the Browser tab and the Search tab.
Using the Browser tab to find grooves in EZDrummer 2
Click the Browser tab at the top of the window to switch to the Browser view.
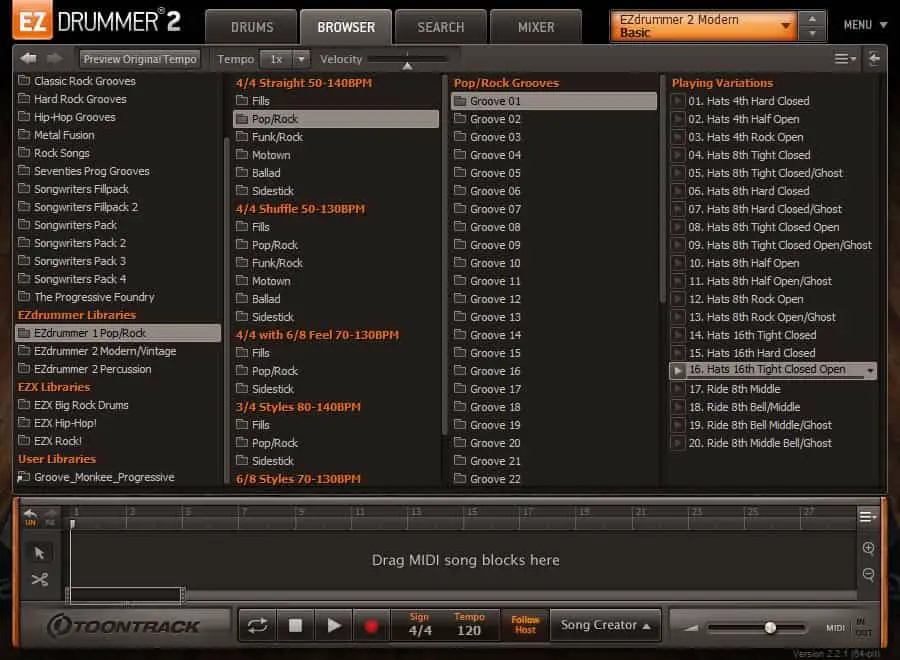
Grooves are arranged in libraries on the left hand side. Click on a library and you will see in the next column along groups of grooves based on style, time signature and tempo. Click on one of these, and you will see folders of grooves appear in the next column. Each folder contains variations on a particular base groove. Click on one of these folders, and in the right-most column you will see all the individual grooves in that folder. You can listen to each one by clicking their little play buttons. Stop them playing by clicking it again, or by clicking the main play button at the bottom of the window.
Finding a groove using the browser tab is simply a matter of finding the appropriate style, time signature and tempo and trying them out till you find a suitable one. You can then drag that groove straight onto the track in the DAW.
You can also drag the grooves onto the Song Track. This is the part of the window that says “Drag MIDI song blocks here“. You can build up your whole drum track in here, then select it all and drag it onto the DAW track when it’s finished. Play/stop the track by using the buttons at the bottom of the window. You can move parts by dragging, copy parts by holding Ctrl then dragging, and generally do all the operations you would expect. Right-click on a groove in the Song Track to discover more options.

There is also the Search tab for finding grooves…
Using the Search tab to find grooves in EZDrummer 2
Click the Search tab at the top of the window to switch to the Search view.
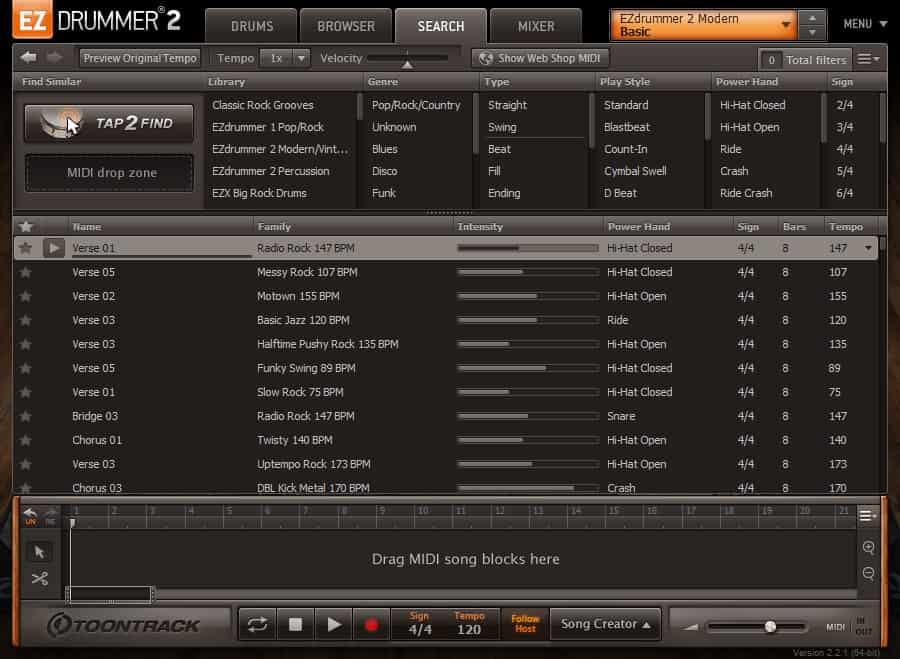
At the top of this window, you are given a similar categorized view to the browser tab, but with more categories. You can filter on any of these categories, and the appropriate grooves will be shown in the main middle section. For example, you could select Blues in the Genre column, Straight in the Type column, Standard play style, Ride power hand and a 4/4 sign. This would then show you just the straight standard blues grooves that are in 4/4 time and have a ride power hand. You can of course drag grooves into the Song Track, just like in the Browser tab.
This is a very powerful way of finding a groove for your song, but there is another way; using the Find Similar function. Drag any groove into the MIDI drop zone box under “Find Similar” at the top of the screen. The display will then change to show only grooves that are similar to that groove. Each one shows you a percentage score for how similar it is. This is a great way to find variations on a groove to use within your song.
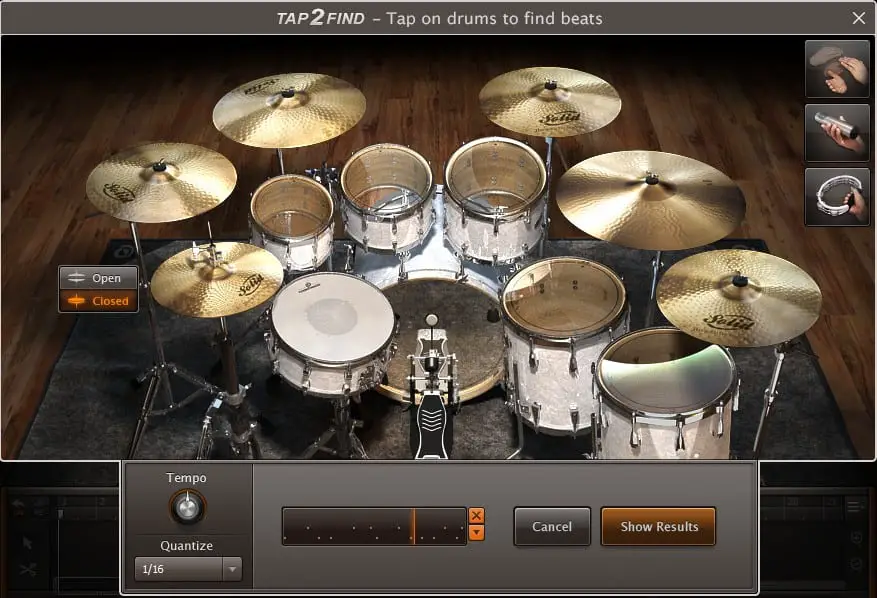
Also in the Find Similar section, there is the Tap2Find function. This allows you to actually play a groove using the mouse along to a metronome, then click the Show Results button and see all the grooves similar to the pattern you just played. It is difficult to explain just how useful this is in words – I recommend you try it out, experiment with it and see for yourself. It’s great if you have the basis of a beat for your song in your head, and want to quickly find similar patterns that an actual real drummer would play.
Using EZDrummer 2’s Song Creator
I cannot finish this section on EZDrummer 2 without talking about one of its best features – the Song Creator. This allows you to drag one groove into it, and will then give you suggestions for building a song around that groove, including suitable grooves for the intro, verses, choruses, bridge etc. It’s a fantastic tool for building a full drum track ridiculously quickly.

Click the Song Creator button at the bottom of the screen. The Song Creator pane will appear just above the Transport bar. Drag any groove into the MIDI drop zone area shown, and EZDruumer 2 will show you patterns suitable for the different sections of you song based on that groove.
You then have two options. You can manually drag the suggested grooves onto the Song Track to build up your full track. Or, you could use one of the suggested Song Structures in the left hand list shown above. Simply drag the song structure you want onto the Song Track, and you have a full drum track created in a few seconds.

As you can probably gather by now, EZDrummer 2 is an incredibly powerful piece of software. There is lots more it can do, far more than there is room to go into in this article. If this has whetted your appetite, I highly recommend checking out the 10-day demo version for free.
Tips for making good MIDI drum tracks
I’ll finish off this article with a few tips on making good MIDI drum tracks. These apply to those of you who are trying to make as realistic drum tracks as possible; the sort of parts that a drummer would actually come up with themselves and play. If you are making music where you want the sound of a very precise, drum machine, almost robotic type track then this section probably doesn’t apply to you.
Try to think like a drummer
A drummer has only two arms and two legs. It’s entirely possible to create a drum track using the methods outlined above that is actually impossible for a drummer to play. If you have the snare drum, a crash cymbal and a tom being hit at the same time; how would a drummer play that? They would need 3 arms!
So always keep in mind how a drummer could play your groove. Try to visualize a drummer playing it – what would their right hand do? What about their left hand? How would they be using their feet on the hi-hat pedal and the kick-drum pedal? It helps to watch lots of drummers and observe how they play their beats.
Use favorite tracks for inspiration
It can be difficult to create a drum track if you have never done it before. Listen to favorite tracks in your song’s genre for inspiration. Find a song you like with a drum beat that you think would fit your song, and try and make a groove that sounds like that. Listen carefully to what all the elements of the drum set are doing, particularly the kick drum, snare drum, hi-hat and/or ride cymbal. With practice you will get good at recreating your favorite beats, and start to develop a feel for creating good grooves.
Natural timing – don’t over-quantize
Human beings are not machines. Therefore they will make little timing errors all the time. This is what we call feel, and is difficult for a computer to replicate. A human can play just ahead of or just behind the beat, to create a sense of urgency or a laid-back vibe.
It is tempting to quantize all your drum hits to be exactly on the beat. I would caution against this; you remove all the little timing variations that a good drummer will give you, and is a good way to destroy any feel on your track. Sure, correct obvious timing mistakes, but be careful about doing this to every drum hit.
Vary velocity – humanize
Similar to the timing, humans do not hit the drum with exactly the same force every time. There will always be variations in how hard and whereabouts on the drum a hit occurs. You can replicate this in MIDI by varying the velocity parameter on your drum hits.
EZ Drummer 2 has a feature called humanize which effectively does this for you. It randomizes which sample is played for the drum hits, effectively reproducing the variations in hit strength and location you would get from a real drummer. It works very well. If you are trying to create a realistic drum track, I highly recommend you keep this feature turned on (it is on by default).
Here is some of my favorite home studio gear…
Thanks for reading this article. I hope you found it helpful in your home music-making activities. Here are a few of the tools that I personally use in my home studio. These are affiliate links, so if you decide to use any of them I’ll earn a small commission.
Audio interface: My personal choice for audio interfaces are the Focusrite Scarlett series. I have been using these for years, and they have always given me great-sounding recordings. For a very reasonable price from Amazon you can buy the excellent Focusrite Scarlett 4i4, or if you don’t need MIDI capability the Focusrite Solo is a great choice.
Amp sim: Guitar amplifier simulator software has come on leaps and bounds in recent years, such that I record all my electric guitar parts using amp sims these days. One of the very best is the incredible Amplitube from IK Multimedia, which I have used on many of my songs.
Headphones for recording: My favorite headphones for recording are the Sony MDR-7506s, which I use for monitoring during all my recording sessions. They can also be found in many pro recording studios. Get the Sony MDR-7506 headphones from Amazon here.
General-purpose microphone: You can’t go wrong with a good ol’ Shure SM-57, one of the most versatile and ubiquitous microphones around. I’ve been using one in my home studio for as long as I can remember. Amazon offers the Shure SM-57 for a very competitive price.
To see all of my most up-to-date recommendations, check out this resource I made for you!
