
DISCLOSURE: This post contains affiliate links. If you buy through these links, I may earn a small commission.
Setting up your first home studio can be incredibly intimidating. With so much equipment available, it can seem an impossible task to determine what you actually need. The good news is that it’s not as complicated as it first appears, and the equipment you initially need for a beginner home studio is actually quite simple.
A home recording studio requires a computer running DAW software, an audio interface, and a pair of headphones at a minimum. A microphone will be needed for recording acoustic instruments and vocals. Jack, MIDI, and XLR cables are necessary to connect instruments and microphones for recording.
A home recording studio can be as simple as a laptop, audio interface and a pair of headphones. Or it can be as complex as a soundproofed, acoustically treated dedicated room containing a mixing desk, monitoring speakers, multiple instruments, microphones, and amplifiers.
For a beginner, your studio will be on the simpler side! Read on to discover what you actually need for a starter home studio, what you can get away without, and what equipment the different types of home studios require.
If you are interested in checking out the best recording gear such as audio interfaces, studio monitor speakers, microphones, etc., you can find them at Amazon by clicking here.

What you really need for a home studio
The minimal equipment required for a home studio is probably less than you think. There are lots of articles and videos on the web telling you that you need a multitude of fancy equipment, but you don’t need a lot to get started. Of course, as you get more experience and your knowledge expands, your studio equipment will most likely expand and grow with you.
To cover this scenario, I have split the equipment required for a home studio into four different categories…
- Essential – all home studios will need these
- Required by most home studios – equipment that the most common home studio tasks require
- Project dependent – may be required depending on the type of projects you work on
- Nice to have – not necessary, but will make your home studio more professional (expensive!)
Once you have your first home studio equipment…what on earth do you do with it?! It can be very intimidating and confusing. That’s why I wrote a beginner’s guide to recording music at home. It will take you through the whole process right from the very beginning, assuming no knowledge at all. I highly recommend reading it if you’re taking your first steps into the world of home recording.
Essential home recording studio equipment
The absolute minimum you can get away with for a home studio is…
1. Computer
The heart of any home studio setup these days is a computer. There is other equipment you can use to record/produce music, but take it from me using a computer is by far the easiest option. Hopefully, you already own a computer that you can use. If not, the rest of this section is for you…
A decade ago, you would have needed quite a high-spec specialist PC for music production. Thankfully technology has advanced to the point where pretty much any off-the-shelf computer will do fine today. It is still advisable to get the best you can afford – the more RAM and the faster CPU you have the better. For more information, check out my article on what PC specs you actually need for music production.
You might be wondering if you should get a laptop or a desktop computer. Either will be fine, and both have their advantages and disadvantages.
Obviously, the laptop has portability on its side. Maybe you are thinking about having a mobile home studio, for example taking your computer when traveling and mixing a song while you’re in a hotel. A laptop is clearly the only choice here.
Desktop computers offer the advantage that you get a higher-performing machine for your money – you pay a premium for the portability of a laptop. Desktops are also easier to upgrade components in, and to repair.
I have a whole article comparing laptop and desktop computers for music production. I highly recommend reading it if you are looking to buy a machine for your home studio. You’ll learn in detail the pros and cons of each, and it will help you make the right choice for you.
The Mac vs PC argument often rears its ugly head when talking about music production PCs. Let’s cut to the chase: either will be absolutely fine. Some home studio owners will tell you that you really need a Mac. No, you don’t. I have been running a PC-based home studio for over 20 years, and it has always worked great.
I suggest ignoring the PC vs Mac argument altogether and going with what you know. If you’re a Mac person, go with a Mac. If you’re a PC person, go with a PC. Most music software is available for both platforms, and your other hardware will connect to either.
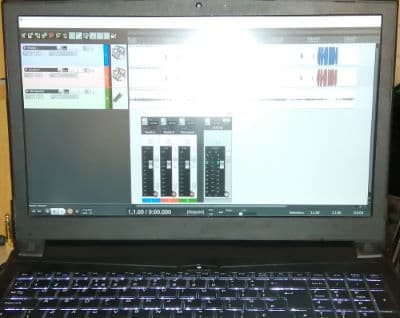
2. DAW software
The main software you will use on your computer for music production is known as a DAW (Digital Audio Workstation). These are very powerful applications, allowing you to record, mix and master your songs.
The key feature of a DAW is multi-track recording. This is recording one part, then another, then another, and being able to play them back at the same time. It allows you as a single musician to build up a whole song yourself, with perhaps drums, bass, multiple guitar parts, multiple keyboard parts, lead and backing vocals for example.
There are many DAWs available, both free and paid. The DAW I would recommend for a beginner is called Reaper. It is very cheap ($60), and has a 60-day free trial available. Don’t let its low-cost fool you though – it is very powerful. I have been using Reaper in my home studio for years.
Here is a selection of other DAWs…
- Cubase
- Logic Pro (Mac only)
- Pro-Tools
- Ableton Live
- Studio One
- Cakewalk by BandLab (Windows only)
DAWs can be quite intimidating when you first try one. That’s why I wrote these two articles, which will help you navigate this software and get you started as quickly as possible…
- How to start learning a DAW: the best way to learn quickly
- What do you need to use a DAW – a complete guide
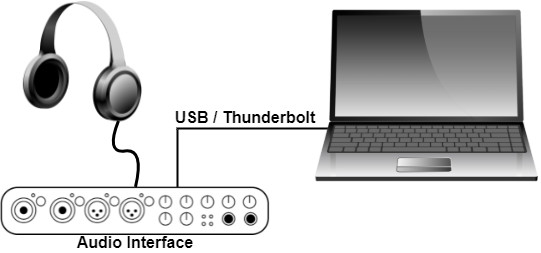
3. Audio interface
An audio interface is required to process the sound in your home studio. It connects to your computer via USB or Thunderbolt. Anything you record such as a microphone or a guitar is plugged into one of the audio interface’s inputs. It converts the sound to digital data which is then captured by your DAW software.
It also does the conversion in the opposite direction, i.e. taking the digital data from your DAW, converting that back into sound and outputting it through your headphones or speakers.
An audio interface isn’t necessary for every musical activity in a home studio. To help you work out if you do need an audio interface for your intended musical endeavors, I have written a whole article asking do you need an audio interface? It’s highly recommended reading before you part with any cash on an interface.
Audio interfaces are specially designed to work with high-quality audio, and come with special audio drivers that are made for that purpose. That’s why built-in sound cards are not really suitable for a home studio.
I have been using Focusrite Scarlett audio interfaces in my home studio for years and years. They have proven to be very reliable and durable and are built like tanks. They also sound great. You can pick up the Focusrite Scarlett Solo (affiliate link) from Amazon for a very competitive price.
4. Headphones (preferably closed-back)
You will need a pair of headphones to hear yourself. Even if you have speakers – get headphones: you will need them for recording. If you are listening back through speakers to something you have already recorded to record another part on top of it, the sound from the speakers would go into the microphone and would be recorded again. This is why you record using headphones.
There are two main types of headphones – closed-back and open-back. Closed-back headphones are for “monitoring” (listening when recording), and open-back headphones are ideal for mixing. I would start with a pair of closed-back headphones.
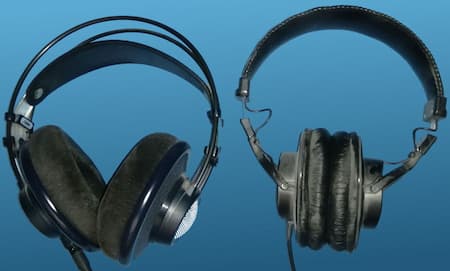
If you already have some headphones and are trying to save money, just use those. Even some crappy earbuds that came with a cheap phone are better than nothing. You will want to upgrade to a better pair at some point, but they’ll be fine to get you started.
The closed-back headphones that I recommend and have been using for years in my home studio are the Sony MDR-7506s (affiliate link), available at Amazon at a great price. These are industry standard, and can be found in many pro studios around the world. You often see photos and videos of famous musicians in recording studios wearing a pair.
5 A backup solution
Computers crash. Computers die unexpectedly. Hard drives stop working for no apparent reason. I’m sure if you’ve used computers for any length of time, you’ve experienced the horror of losing something you have worked hard on for hours due to some sort of unexpected computer failure. I know I have.
Assuming you would not be happy about losing a song you’ve been working hard on for weeks, you need to have some sort of backing-up system in place. This could be as simple as an external hard drive that you copy over every recording session to.
With the prevalence of online backup services these days, they could be a great option if you have a decent internet connection. Something like Backblaze, which will back up your whole computer automatically for you, could save you from that horrible moment when you realize you’ve lost all your work.
I would advise automating your backups, i.e. setting up your computer to do it automatically for you. This is something the online backup services are particularly good at. If you rely on doing it manually, you will at some point forget and that will probably be just before the point where you need the backup the most.
What can you do with essential home studio gear?
So what can you do with this computer, DAW, audio interface and headphones set-up?
You can do any non-recording activities. You could use samples, arrange songs, mix and master. If your DAW includes any virtual instrument plugins, you could program parts for them e.g. a drum track, bass guitar part, synth part, etc. You can even download free instrument plugins for your DAW to use.
You could record an electric instrument that you plug directly into the audio interface such as a guitar or keyboard. What you can’t do with this setup is record any acoustic instruments, such as a human voice or an acoustic guitar. For that, you’d need to add a microphone to the setup. We’ll come on to that in the next section.
I’m aware I may have used some terms there that you are not familiar with. Mixing is the process of getting your tracks to sound good together – my “getting started with mixing” article will point you in the right direction here. Mastering is getting your track ready for release, and I recommend my “How to Master a Song” article for a simple guide.
Equipment required by most home studios
Once you have the absolute minimum required, most home studios are in addition going to require the following…
6. Microphone
If you are only ever going to record electric instruments that can be plugged straight into your audio interface, then you won’t need a microphone and you could skip this section. I would argue that even if you don’t plan any doing any microphone-based recording now, you may do so in the future so it is probably still worth a read.
There are several different types of microphone, but the two main ones I’ll discuss here for a home studio are dynamic microphones and large-diaphragm condenser microphones.
Dynamic microphones are traditionally used live on stage. They are well suited to live vocals for example, as they are durable, directional (they only pick up sound from in front of them), and cope well with loud sounds. They are often used in studios too, for example recording guitar amplifiers and vocals.
Large-diaphragm condenser microphones are more of a studio tool. They are famed for how well they record vocals, giving a high-end shine and presence typically superior to that of dynamic microphones. They are less durable than dynamic microphones though (they are much easier to break), and more susceptible to background noise. They also require something called “phantom power”, which shouldn’t be an issue as you can just enable this on your audio interface.
If you only buy one microphone, I would actually advise getting a dynamic mic. They are better all-rounders than condenser microphones, and can take a beating. You can use them for just about anything, even if condenser mics are a little superior for a lot of vocal recordings. Don’t let that put you off though; I have captured many a great vocal take through an inexpensive dynamic microphone.

You can’t really go wrong with a Shure SM-58 (affiliate link), available from Amazon for a competitive price. I’ve used one of these for years, both live and in my home studio. They are industry standard, and many, many professional and amateur musicians have used them for their vocals for decades.
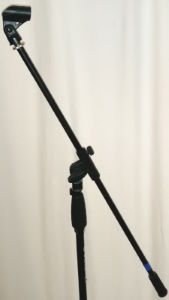
7. Microphone stand
If you are going to be using a microphone in your home studio, you need a microphone stand. Holding one in your hand just isn’t going to work – you’ll get too much handling noise, won’t be able to keep it still and your hands won’t be free to operate your DAW or other equipment.
You could try and improvise something with a flat surface and some duct tape, but I would strongly advise against this. Just spend the money and get a microphone stand. They start in price from about $25, and trust me that will be money well spent.
If you can, don’t just buy the cheapest mic stand you can find. It’s best to spend a little bit more for a more heavy-duty, durable stand. It will last longer and be less susceptible to falling over and damaging your microphone.
Some recommended brands are Gator, Hercules and QuickLok. The Quiklok MS/303 Microphone Stand (affiliate link) is available from Amazon for a great price.
8. Cables
Whenever you connect something to your audio interface, you will need to make sure you have the right cable for it. XLR cables for microphones, jack cables for instruments such as guitars, and MIDI cables for MIDI instruments like MIDI keyboards, drum machines and electronic drum kits.
Do not just buy the cheapest cables you can find, as they will need replacing sooner, will not be as well shielded and might cause background noise or hum issues. Spend a little bit more for good quality cables and you will thank yourself for it.
Some cables (such as Livewire guitar cables) come with a lifetime warranty, so in theory you should only ever have to buy one of them for your home studio! You’ll pay a premium initially for that, but in the long run it should be far cheaper than having to replace cheap, low-quality cables many times.
9. Studio monitor speakers / open-back headphones
I have bundled studio monitor speakers and open-back headphones together, as they are both tools that can be used for mixing. You can mix on closed-back headphones, but I would highly advise getting a pair of open-backs if you are going to mix on headphones. They give a far more accurate representation of the sound, and will lead you to make far better mixing decisions.
Some will tell you that you should never mix on headphones. I would actually advise beginners to mix on headphones, rather than studio monitor speakers.
This is because while a good set of studio monitor speakers in a room with well-placed acoustic treatment will give you the very best sound, most beginners will not have a great-sounding acoustically treated room. So they will probably get the best results, at least initially, from a quality pair of open-back headphones.
I mix on headphones all the time. The open-back pair I use are the AKG K702s (affiliate link), available for a very competitive price at Amazon. They have a great, clear, detailed sound. I have been using these for years, including using them to mix several of my commercially released songs.
10. Dedicated desk or permanent setup
Before long, you will need somewhere permanent to put your gear e.g. your computer, audio interface, stands, instruments, etc. It is much better if you have a place where you can leave these set up permanently. Having to set equipment up every time you want to record or mix is a real pain, and drains motivation from you.
It can be as simple as a table in a room in your house or apartment. You can buy expensive dedicated home music studio desks but for a beginner, these are probably huge overkill. Any old computer desk will do fine, and you can move on to bigger and better as your experience and equipment grow.
What can you do with “required-by-most” setup?
In addition to the activities enabled by the “essential” setup, you can now record anything acoustically, including vocals, acoustic guitars, guitar amplifiers, ambient sounds, etc.
You also have a permanent setup for your home studio, even if it is just a desk or a table in a multi-purpose room. That prevents you have to repeatedly set up your gear, which should let you get working straight away with the minimum of fuss.
Your open-back headphones or studio monitor speakers give you a much, much better platform for mixing – adding these will hugely improve your mixes. I would argue that one of these is essential if you do plan on mixing in your home studio.
Project dependent for home studios
There are certain items of equipment, that the type of project you undertake in your home studio will determine if you need them.
11. Pop filter
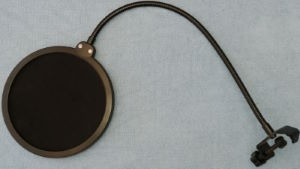
If you are going to record vocals, you need a pop filter. Period. Don’t argue, just get one!
Pop filters prevent the unpleasant rush of air associated with ‘P’ and ‘B’ sounds from reaching the microphone. The last thing you want is a great, emotional, passionate vocal recording spoiled by popping noises coming from those harsh consonant sounds.
Place the pop filter a few inches in front of the microphone, between the mic and the vocalist. You’ll be amazed at the difference it makes. For the price of about $10, it’s crazy not to have one if you are doing any sort of vocal recording.
12. MIDI keyboard
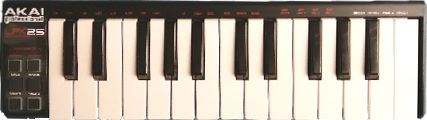
If you are any type of keyboard player, such as a pianist, synth player, organist, etc, I strongly recommend you invest in a MIDI keyboard. Most keyboards, synths and digital pianos have MIDI capability these days, so it’s highly likely that you already have one.
Recording MIDI is great, as it lets you edit the notes you have played inside your DAW very easily. You can correct any mistakes, change notes without re-recording and even use it as a compositional tool. For more information on MIDI keyboards and their capabilities, check out these two articles…
- Is a MIDI keyboard worth it? A guide to what it can do!
- Can a MIDI keyboard be used as a regular keyboard?
13. MIDI interface
If you have a MIDI keyboard, you need some way to connect it to your computer. There is some confusion about whether you need an audio interface for this, or a separate MIDI interface.
The confusion stems from the fact that some audio interfaces have a MIDI interface built into them, whereas some do not. If you have an audio interface with MIDI capability, you are good to go – you just need a MIDI cable to connect your keyboard to it. If not, you will need a separate MIDI interface.
I have a whole separate article looking at this in detail – check out “Does a MIDI keyboard need an audio interface?“. It teaches you exactly what equipment you need to connect your keyboard to your computer, for the various different musical tasks you might use it for.
Nice-to-have equipment for home studios
Perhaps this section doesn’t really belong in a beginner’s guide. It only really applies to those looking to seriously upgrade their home studios, perhaps to become more of a semi-pro setup or to start recording other bands and musicians in your studio.
14 Acoustic treatment
Most home studios are not dedicated rooms; they are often multi-purpose rooms that are also used for maybe watching TV, gaming, working out, general relaxing, etc. My home studio room often has drying washing in it!
So often the acoustics are not great in these rooms. It’s not like a pro studio where the room has been specially designed and acoustically treated to sound great.
Acoustic treatment can help you by preventing reflections off hard surfaces, and absorbing unwanted frequencies such as emphasized bass. This is important, as these sounds can lead you to make poor choices during mixing, as you are not getting a true representation of how your music sounds.
It is also important when doing any sort of recording with a microphone. Vocals, for example, should be recorded as “dry” as possible, i.e. without any added reverb or ambiance. One way to improvise a solution to this is to place as many soft furnishings (cushions, duvets, rugs, blankets, etc) behind a singer as they are being recorded. This will help to absorb unwanted reflections. I have been doing this in my home studio when recording vocals for years.
If you are a beginner, or even intermediate home recordist I wouldn’t worry too much about acoustic treatment at the moment. Just keep it in mind as something you might invest in in the future.
Here is some of my favorite home studio gear…
Thanks for reading this article. I hope you found it helpful in your home music-making activities. Here are a few of the tools that I personally use in my home studio. These are affiliate links, so if you decide to use any of them I’ll earn a small commission.
Audio interface: My personal choice for audio interfaces are the Focusrite Scarlett series. I have been using these for years, and they have always given me great-sounding recordings. For a very reasonable price from Amazon you can buy the excellent Focusrite Scarlett 4i4, or if you don’t need MIDI capability the Focusrite Solo is a great choice.
Amp sim: Guitar amplifier simulator software has come on leaps and bounds in recent years, such that I record all my electric guitar parts using amp sims these days. One of the very best is the incredible Amplitube from IK Multimedia, which I have used on many of my songs.
Headphones for recording: My favorite headphones for recording are the Sony MDR-7506s, which I use for monitoring during all my recording sessions. They can also be found in many pro recording studios. Get the Sony MDR-7506 headphones from Amazon here.
General-purpose microphone: You can’t go wrong with a good ol’ Shure SM-57, one of the most versatile and ubiquitous microphones around. I’ve been using one in my home studio for as long as I can remember. Amazon offers the Shure SM-57 for a very competitive price.
To see all of my most up-to-date recommendations, check out this resource I made for you!
