
DISCLOSURE: This post contains affiliate links. If you buy through these links, I may earn a small commission.
These days I record all of my electric guitar parts in my home studio using guitar amplifier simulators or “amp sims”, and they sound great. However that wasn’t always the case, and when I first started using them the results were not good when compared to mic’ing up a guitar amp. If you are having problems with your amp sims sounding bad, the suggestions below may help you get a better sound.
One of the most common applications for amp sims is to turn your computer into a guitar amplifier. Check out my comprehensive guide on using your PC as a guitar amp for instructions if this is something you would be interested in.
If you are interested in checking out the best recording gear such as audio interfaces, studio monitor speakers, microphones, etc., you can find them at Amazon by clicking here.
1 Use an IR (Impulse Response)
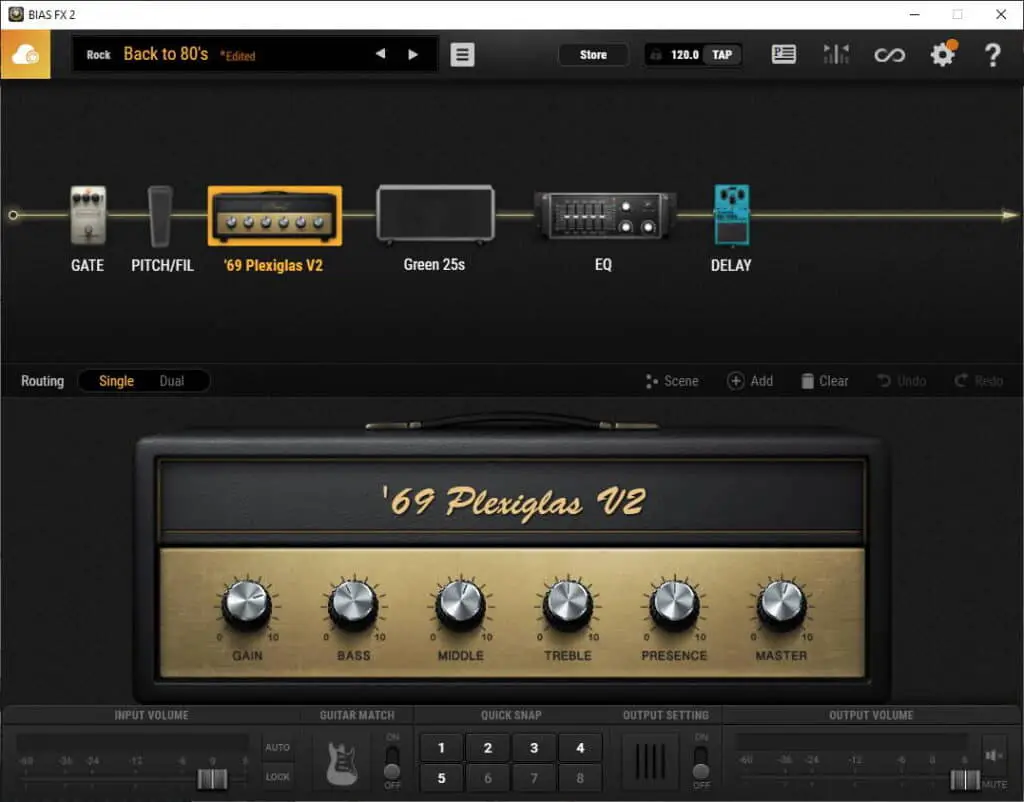
Guitar amp simulators basically have two parts to them, much like a real guitar amp. They have an amplifier part, and an impulse response (IR) or cabinet emulation part. These are just like in a real-world hardware physical amplifier, where you have the actual amplifier that amplifies your guitar signal, and a speaker cabinet housing the speaker that outputs the sound to your ears.
An impulse response (or IR) is a sonic measurement of the sound of a speaker, room or microphone in relation to a sound source. In guitar terms, this is usually your amp.
Andertons.co.uk
If you use an amp sim without cabinet emulation from an IR, you will get a thin, fizzy unpleasant sound.
Some amp sims such as BIAS FX, Amplitube, Guitar Rig, have IRs and cabinet emulation built into them. These are not usually the problem. Basically, if there is somewhere in your amp sim that you can add or configure a speaker cabinet, then you don’t need a separate IR.
Others such as the Lepou amps and Ignite Emissary require a separate IR loader plugin to be used alongside them, with an impulse response loaded into them. In your DAW or other plugin host, you should put the IR loader after the amp sim in your signal chain. This should give you the sound you expect from a guitar amp and speaker cabinet.
Compare the sound of the Lepou HyBrit amp sim with and without an IR yourself in these audio samples….
There are plenty of free IR loaders available. Here are a couple of examples…
2 Use specialist digital audio drivers
A driver is a small piece of software in your computer that handles the communication between an application and some hardware. Your audio interface or sound card will require such a driver to let your amp sim or other audio software access its capabilities.
Drivers come in lots of different types, from generic to highly specialized. For example, on Windows there are drivers called ASIO drivers, which are specifically designed for digital audio. When you bought your audio interface, you probably had the option to download such a driver from the manufacturer’s website, or install one from a disc, or one installed automatically when you connected your interface to your computer.
If when using your amp sim you are suffering from pops or clicks, drop-outs, stuttering or unpleasant digital distortion, this may be because you are not using a dedicated digital audio driver such as an ASIO one.
In your amp sim go to the audio settings, and there should be an option called something like “Audio Driver Type”. Check that this is set to “ASIO” or similar, and not a more general driver type such as “Windows Audio” or “Direct Sound”.
This should also help reduce latency i.e. the delay between when you play a note on the guitar and when you hear it coming out of the amp sim.
As a quick aside; amp sims are great, but they are not for everybody. For that reason, I have a whole article comparing real guitar amps to amp sims. It goes into detail about the differences between real amps and software amps, including the advantages and drawbacks of each. I highly recommend reading it if you are taking your first steps into the world of amp sims after using real amps.
3 Use a noise gate with high gain sounds
If you are playing through some heavy distorted sounds, maybe you’re a heavy metal guitar player, you are likely to get a lot of hiss coming from the amp especially in the rests between playing. This is no different from a real hardware amp, and the solution is the same – to use a noise gate.
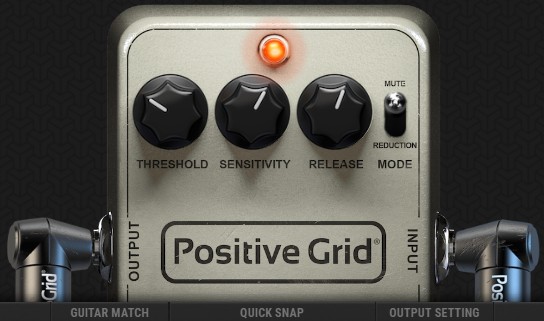
With a real amp you would use a noise gate pedal. Many amp sims feature built in noise gate simulations of the hardware pedals. They work the same way; you set a noise threshold volume, and any sound that is quieter than that volume level will be silenced. What this means in practice is that any rests between notes in your playing will be genuinely silent, rather than full of annoying hiss.
While we’re talking about removing unwanted parts of the sound, EQ (Equalization) is a fantastic fine-grained tool for doing this. It works when using your amp sim standalone and as part of a mix. I have a complete guide on EQ’ing an amp sim, which walks you through the process of getting the best sound possible.
4 Set the audio interface input level higher
With a real amp you don’t generally have to worry about the input level into it. You get a cable, stick one end into your guitar, and the other end into your amp’s guitar input. Sorted!
When you’re using an amp sim, you have another piece of hardware in the way – your audio interface. If the volume level from your guitar through your interface is not at a loud enough level when fed into your amp sim, you are likely to suffer from excessive noise and/or a weedy thin sound.
We’re going to talk about gain now….but what exactly is it, and how does it differ from volume? I have a whole article on that topic! Check out my article on the difference between gain and volume. You’ll learn exactly what the difference is, and how to use this knowledge to improve your own recordings and mixes.
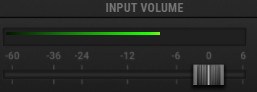
On the audio interface input you have plugged your guitar into there will be a gain or level control. There will also be a way of displaying whether the input is clipping or not; clipping means the input level has exceeded what it can handle without distorting and is something to be avoided. This display may be an indicator turning red, or a traditional meter with a red part of the scale indicating clipping is occurring.
To get the optimum input level you should….
- Plug your guitar into your audio interface
- Turn your guitar volume up full
- While playing your guitar, slowly turn up the interface input gain/level
- When it gets to the point where the signal is clipping, back off the gain/level
- Play as hard as you can on the guitar and make sure the input does not start clipping
- If it does, back the gain/level off again until it no longer clips
If you are interested in recording levels I have a full article on how to set the correct guitar recording levels, which I encourage you to read!
5 Set the audio interface input level lower
As you’ve probably gathered from the above point, it is possible to go too far the other way and set your input volume level too high. This can result in unpleasant digital distortion as the amp sim is effectively overloaded.
Note the distortion I refer to here is not the desirable warm musical distortion such as the type you get from an amplifiers built in overdrive or an overdrive/distortion effects pedal. This is very digital-sounding distortion, likely to cause unpleasant artifacts in the sound such as clicks and pops.
Follow the steps in the above tip to make sure that your signal is not clipping the interface input.
As a side note, my personal choice for audio interfaces are the Focusrite Scarlett series. I have been using these for years, and I think they give great sounding recordings for not very much money. You can buy the Focusrite Solo from Amazon (affiliate link) for a very reasonable price.
6 Set the optimum input level in the amp sim itself
In the last of the tips relating to input level, once you have got the level into your audio interface right, you need to consider the signal level into the actual amp sim itself.
Amp sims typically have an “input level” control actually on the user interface. If this is set too low, you are likely to get a thin, noisy sound. If it is set too high, it may give you unpleasant digital distortion.
There will be some sort of meter next to the input level control. Play your guitar and watch this meter. Raise the input level control until the meter is just short of the red area that indicates the signal is too loud. If, when you play at your loudest, the signal on the meter goes up to just short of that red area, you have set your optimal signal level.
As a quick aside, when using amp sims for playing or recording latency can be an issue. This is the time between when you play a note on your guitar and when you hear it coming out of the amp sim. Check out my guide on reducing amp sim latency for the lowdown on getting your latency as low as possible without compromising sound quality.
7 Use the correct input type on your interface
There is another way you can provide your amp sim with a sub-optimal signal level; using the wrong type of input on your interface.
Typically, an input on an interface is designed for one of three input levels….
- Instrument Level – this is what should be used for a guitar or a bass
- Line Level – typically used when connecting keyboards/synths, which give out a higher signal level than a guitar
- Mic Level – designed for use by microphones, which give out the lowest signal level
If you use any input other than type 1. above, you will get either too high or too low a signal into your amp sim. This will cause either unpleasant distortion, or a thin sound with too much unwanted noise.
On modern audio interfaces, you can typically set the type of an input. This will be done either with a switch or knob on the unit itself, or in a software utility provided with it. Ensure that the input type is set to instrument level for a guitar, and this will send the correct signal level to your amp sim.
Amp sims and other VST plugins are often used inside a DAW. But they don’t have to be – they can be run “standalone” i.e. without having to use a DAW. This is how you would use an amp sim if you wanted to use it just as a guitar amp without recording. To learn exactly how to do this, I recommend taking a look at my article on “how to run VST plugins standalone“.
8 Move away from computer/other electronic sources of interference
When you are playing your guitar through an amp sim, most likely you will be close to the computer that is running the amp sim software. Computers, monitors and other electronic devices are sources of electrical noise which can often be heard when playing an amplified instrument such as an electric guitar.
I cannae change the laws of physics!
Montgomery Scott, Chief Engineer USS Enterprise
Unfortunately, you can’t rid of this. It is a fundamental property of electricity; even the simplest circuit generates electrical noise.
What you can do is minimize the noise being generated. You can do one of two things…
- Move further away from your computer (use a longer cable if necessary)
- Experiment with your positioning e.g. move your chair to face away from the computer/source of interference
It may take some playing around to find the optimal position and orientation in your room for the lowest noise. Using humbuckers rather than single-coil pickups can also reduce this issue. It is worth noting that this is a problem with regular hardware guitar amplifiers as well.
As a quick aside…if you are new to amp sims, Guitar Rig 6 is great for beginners and has an excellent free version. I have a whole beginner’s guide to Guitar Rig 6, which I highly recommend you work through. You’ll learn how to set it all up, how to choose presets, and how to create your own sounds from scratch.
9 Stop relying on presets
It is both a blessing and a curse that amp sims these days come with hundreds of presets or patches. On the one hand, these can give you a great starting point for sounds to play through. On the other hand, they can cause us to be lazy and over-rely on these presets without taking the time to set up the software how we like it and to suit our own style of playing.
The problem with presets is that they are so general, whereas amp, pedals and general rig settings are so personal. Even with a real hardware guitar amp, two guitar players are unlikely to have it set up exactly the same way. I have done this myself; I play through a fellow guitarist’s setup and I sound terrible. Then they play through it without changing a single setting, and they sound absolutely amazing!
To get around this problem, when you first get any amp sim I suggest following this process….
- Create a new empty patch with just an amp model in it, no effects
- Experiment playing through different amp models until you find one you like and works well with your playing
- Save that setup as a patch/preset!
- Use this setup as a template for building your other patches, e.g. you might add a little bit of reverb and/or delay, then save that as another patch
- Build up a collection of patches like this; go slowly only adding one or more effect at a time
- I usually build up a starting collection of patches along these lines….
- Clean
- Clean + chorus
- Light crunch
- Light crunch with tremolo
- Heavier crunch
- Lead overdrive
- Heavier lead overdrive
- Lead overdrive + delay
The key is experimenting with different amp models, cab/speaker models and effects, until you find a sound that suits your taste and style of playing.
While we’re discussing effects, there are guitar players whose main interest in amp sims is to turn their computer into a guitar effects processor. If you are one of these guitarists then I have an article just for you – a beginner’s guide to running guitar effects on your computer. It will show you how to set your PC up as an effects unit, exactly what software and hardware you need, and help you avoid some common pitfalls.
10 Replace a poor/crackly cable
There is a tendency to think that as you are playing through a computer, the signal is all digital so less susceptible to interference than an analog signal. While that is true to an extent, the signal from your guitar through your cable into your audio interface is still analog! This is subject to the same interference as it would be plugged into a regular guitar amp.
So it is always worth using a good quality guitar cable, and taking good care of that cable. Crackles you may think are coming from your amp sim, may simply be the result of a poor or cheap cable. This is an easy item to replace to give you a quick win the sound quality coming out of your amp sim..
Getting the sound right is particularly important if you are recording with amp sims. I have written a complete guide to recording using amp sims, which I highly recommend you read if you are going to be doing any sort of amp sim recording.
11 Reduce the bass
Amp sims can have a tendency to be overly bass-heavy, especially when in a full band mix. This can result in a muddy sound, lacking definition and clarity.
Many amp sims offer an overall output control, with an EQ section where you can for example cut or boost the bass frequencies for all your patches/presets. It is worth experimenting with cutting the bass here, if you are getting a muddy or flubby sound.
Individual patches/presets will also have several methods of controlling the bass content of the sound. There will be EQ controls on the amp model (typically bass, middle and treble). You will also be able to add pedal and/or rack-mount models e.g. an EQ pedal to give you even more fine-grained control per patch/preset.
Finally, often you want to get your guitar to sound as big and fat as possible in your mix without overpowering the bass frequencies. That’s why I wrote a guide to making guitars sound bigger in a mix, which will help you achieve that huge guitar sound without overpowering anything else.
Here is some of my favorite home studio gear…
Thanks for reading this article. I hope you found it helpful in your home music-making activities. Here are a few of the tools that I personally use in my home studio. These are affiliate links, so if you decide to use any of them I’ll earn a small commission.
Audio interface: My personal choice for audio interfaces are the Focusrite Scarlett series. I have been using these for years, and they have always given me great-sounding recordings. For a very reasonable price from Amazon you can buy the excellent Focusrite Scarlett 4i4, or if you don’t need MIDI capability the Focusrite Solo is a great choice.
Amp sim: Guitar amplifier simulator software has come on leaps and bounds in recent years, such that I record all my electric guitar parts using amp sims these days. One of the very best is the incredible Amplitube from IK Multimedia, which I have used on many of my songs.
Headphones for recording: My favorite headphones for recording are the Sony MDR-7506s, which I use for monitoring during all my recording sessions. They can also be found in many pro recording studios. Get the Sony MDR-7506 headphones from Amazon here.
General-purpose microphone: You can’t go wrong with a good ol’ Shure SM-57, one of the most versatile and ubiquitous microphones around. I’ve been using one in my home studio for as long as I can remember. Amazon offers the Shure SM-57 for a very competitive price.
To see all of my most up-to-date recommendations, check out this resource I made for you!