How to add reverb on Reaper; the complete beginner’s guide
DISCLOSURE: This post contains affiliate links. If you buy through these links, I may earn a small commission.
Reverb can enhance the sound of your song perhaps like no other effect. If you are using Reaper as your DAW (Digital Audio Workstation), it has two excellent reverb plugins built in. But it is not immediately obvious how to add reverb in Reaper, or how to configure its reverb plugins.
To add reverb in Reaper, select the track you want to add reverb to and click its FX button. Select the “ReaVerbate” plugin from the list, then click the Add button. Click the FX button again to open the ReaVerbate plugin if it is not already open, then select a preset from the drop-down list.
As with almost all DAWs, you can apply reverb to a single track, a group of tracks or the mix as a whole. This article will cover them all, starting from the simplest setup possible. Even if you’ve never added an effect before, by the end of this article you should be comfortable adding reverb in Reaper.
If you are interested in checking out the best recording gear such as audio interfaces, studio monitor speakers, microphones, etc., you can find them at Amazon by clicking here.
Reverb plugins available in Reaper
The standard way to add reverb in Reaper and almost all other DAWs is to add a plugin to a track. This is called adding an insert effect. Reaper ships with two reverb plugins – ReaVerbate and ReaVerb. They are both excellent plugins and work great, but ReaVerb is a bit more difficult to use and has more of a learning curve associated with it, so I will concentrate on ReaVerbate in this article.
You are of course not limited to using the reverb plugins built into Reaper. There are lots of free and paid reverb plugins available (just google for “reverb VST plugin”). Any VST plugin should work in Reaper. A free one that I have used to great effect many times is OldSkoolVerb. But we’ll stick to the supplied ReaVerbate plugin here.
Are third-party plugins better than those supplied with Reaper, so-called “stock” plugins? That’s actually a complicated question, which is why I wrote a whole article comparing 3rd party to stock plugins. Check it out if you are thinking of using or buying a 3rd party plugin to use instead of a stock one.
Adding ReaVerbate reverb to a track in Reaper
Let’s start as simply as we can; we’ll get the ReaVerbate plugin added as an insert plugin onto a single track in Reaper. Follow these steps…
- Click the FX button on the track you want to add the plugin to…

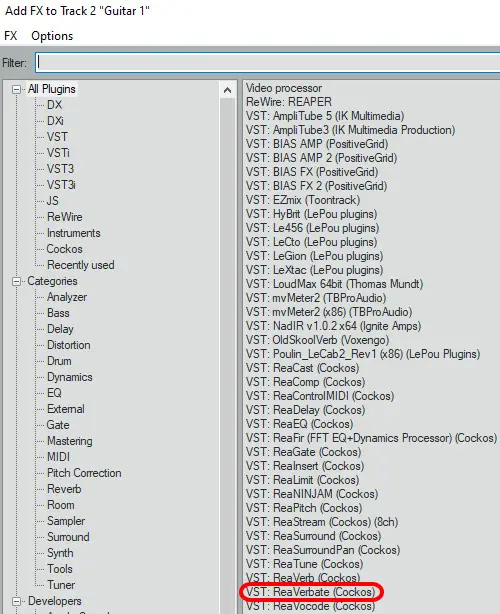
- You should see the plugins window containing a big list of plugins. If not, click the Add button in the FX window. Select All Plugins on the left-hand side to see the big list of all plugins.
- Find the “VST: ReaVerbate (Cockos)” plugin in the list and either double-click it or select it and click the Add button.
- You should now see the FX window for your track containing the ReaVerbate plugin. If not, click the FX button again to launch the FX window.
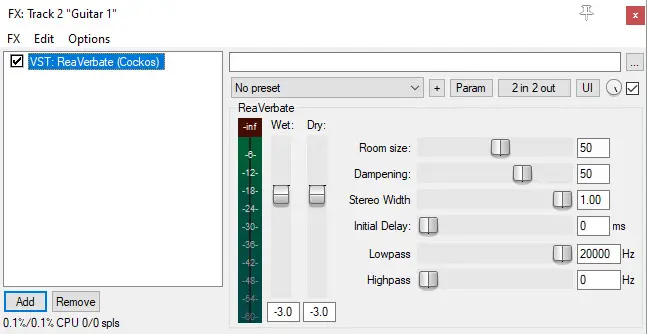
You now have the ReaVerbate reverb plugin added to your track in Reaper!
If you’re adding lots and lots of plugins in Reaper, it can start to affect its speed and responsiveness. To learn ways you can minimize this, check out my article on improving performance in Reaper. It’s highly recommended reading if you are working on a project with more than just a few tracks or plugins in it.
Quickstart using ReaVerbate plugin in Reaper
The ReaVerbate plugin is fairly self-explanatory. You can probably work out how to use it just by experimenting with the controls and trying different presets, which I encourage you to do. I’ll explain the basics of how to use it here.
Using presets in ReaVerbate
The quickest way to get started is to use one of the built-in presets. If you click where it says “No preset”, you will see this is a drop-down list, which gives you several presets to choose from. These are settings that have already been saved for you to use on your tracks.
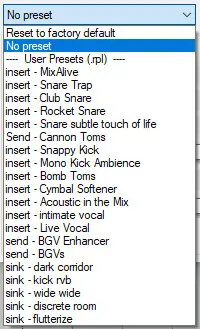
Try a few different ones and see which you like the sound of. Presets are a great starting point when putting reverb on a track; you can select a preset and then tweak it to your taste.
Once you have changed some settings, you can save the new settings as a new preset. Just click the “+” button next to the preset list, and select “Save preset…”. Give your new preset a name and click OK. Your preset will now be in the list ready for you to load in again.
To record some tracks into Reaper to apply reverb on, you will definitely need an audio interface. My favorite audio interfaces are the Focusrite Scarlett series. I have been using these for years in my home studio, and they have always given me great sound quality and reliability for not much money. You can pick up the Focusrite Scarlett Solo (affiliate link) from Amazon for a very competitive price.
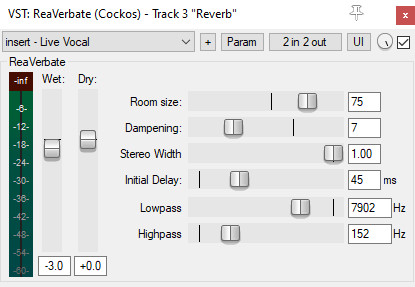
Reaverbate controls
The best way to find out what each control does in ReaVerbate is just to try altering them while your track is playing. You will hear the effect each one has, and this is honestly the best way to learn what they do. Nevertheless, here is a brief description of each control’s purpose…
- Room size: How “big” the reverb sounds, like the size of a room.
- Dampening: Simulates the effect of soft furnishings “dampening” the reverb.
- Stereo Width: How “wide” the reverb sounds between the speakers.
- Initial Delay: Delay before the reverb sounds. Can create a feeling of “space”.
- Lowpass: Reverb will not be applied to frequencies above this setting.
- Highpass: Reverb will not be applied to frequencies below this setting.
- Wet: Amount of signal with reverb mixed onto your track.
- Dry: Amount of signal without reverb mixed onto your track.
Reaper doesn’t just come with reverb plugins; it has lots of them that perform all sorts of effects such as EQ, compression, chorus, and flanger to name just a few. But does it have instrument plugins? Check out my article on instrument plugins in Reaper to see what instrument plugins it has and how to use other instrument plugins within Reaper.
Applying reverb to a group of tracks in Reaper
You are not limited to applying reverb to one track in Reaper. You can also apply reverb to a group of tracks all at once. This saves you from having to add an insert plugin to every track you want the same reverb applied to.
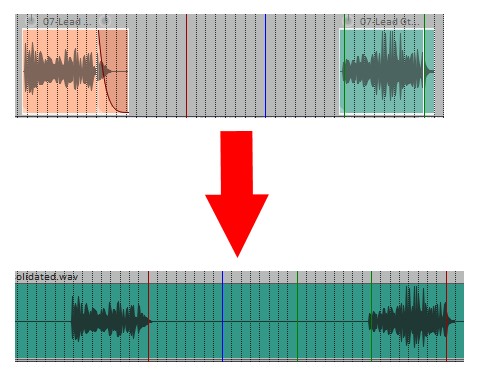
To group tracks in Reaper, create a new track. Then drag the tracks you want in the group into the new track. You will end up with something that looks like this…

You can now apply the insert effect to all the tracks in the group by adding the effect to the group top-level track. In the example shown you would click the FX button on the “Guitars” track to add ReaVerbate to all the tracks in its group i.e. Guitar 1 and Guitar 2.
This will work fine, but I would argue there is a better way to add reverb to multiple tracks. See the later section on adding reverb as a send effect.
To be able to accurately judge and tweak the reverb on your tracks, you will need a decent set of headphones. A great all-rounder set of headphones I have used for years are the Sony MDR-7506s (affiliate link), available from Amazon for a great price. These are industry standard and are found in many pro studios around the world. They are reliable, durable, sound great, and are excellent value for money.
Applying reverb to the whole mix in Reaper
You can apply reverb effectively to every track in your mix at once by adding the ReaVerbate plugin to the master track.
To show the master track, either launch the Mixer (Ctrl+M or View->Mixer). You can also show the master track in the Track Control Panel by right-clicking in some blank space and selecting “Show master track”.
Click the FX button on the master track, then add the ReaVerbate plugin in the same way as in the “Adding ReaVerbate reverb to a track in Reaper” section earlier.
All the tracks in your song will now have exactly the same reverb on them.
This isn’t my favorite method of putting reverb on all tracks in a song. See the next section for what I think is the best method to add reverb to your song in Reaper.
Once you have all your tracks sounding great with reverb applied and mixed together, you will probably want to save a mixdown file. Or maybe you want to selectively export some of your tracks. Fortunately, I have an article showing you exactly how – check out “How to save a mixdown and export tracks in Reaper“.
Adding reverb as a send effect in Reaper
So far we have inserted ReaVerbate onto every track we want to add reverb to. But you can also have something called a send effect.
You add a send effect by having one track that you create specifically to add reverb to. This is the only track you will have the reverb inserted on. You then “send” the output of the tracks you want reverb on to that track. Any tracks you send to the reverb track will have the reverb on them.
Let’s walk through an example…
- Create a new track
- Add Reaverbate to the new track
- For each track you want to add the reverb to…
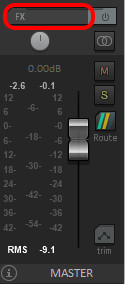
- Click the Route button
- In the Add New Send list select the reverb track you added
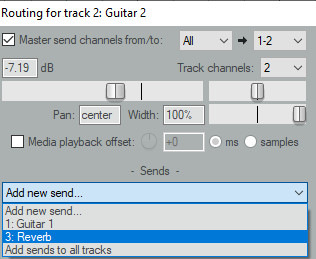
You will now have reverb sounding on the track that you “sent” to the reverb track. You can vary the amount of reverb on that track by using the send fader.
Adding your reverb in this way i.e. on just one track and then sending other tracks to it has several advantages…
- Consistency – You are using exactly the same reverb on every track, just varying the amount. This adds coherence to your track and gives the feeling of musicians playing in the same room together.
- Just one reverb – You only add the reverb to one track, rather than to every track you need it on
- Prevents conflicts – lots of different types of reverb can interfere with each other and create a bit of a mushy-sounding mess
If you do want to add reverb to your song with many tracks, I would recommend using this send effect method.
Here is some of my favorite home studio gear…
Thanks for reading this article. I hope you found it helpful in your home music-making activities. Here are a few of the tools that I personally use in my home studio. These are affiliate links, so if you decide to use any of them I’ll earn a small commission.
Audio interface: My personal choice for audio interfaces are the Focusrite Scarlett series. I have been using these for years, and they have always given me great-sounding recordings. For a very reasonable price from Amazon you can buy the excellent Focusrite Scarlett 4i4, or if you don’t need MIDI capability the Focusrite Solo is a great choice.
Amp sim: Guitar amplifier simulator software has come on leaps and bounds in recent years, such that I record all my electric guitar parts using amp sims these days. One of the very best is the incredible Amplitube from IK Multimedia, which I have used on many of my songs.
Headphones for recording: My favorite headphones for recording are the Sony MDR-7506s, which I use for monitoring during all my recording sessions. They can also be found in many pro recording studios. Get the Sony MDR-7506 headphones from Amazon here.
General-purpose microphone: You can’t go wrong with a good ol’ Shure SM-57, one of the most versatile and ubiquitous microphones around. I’ve been using one in my home studio for as long as I can remember. Amazon offers the Shure SM-57 for a very competitive price.
To see all of my most up-to-date recommendations, check out this resource I made for you!