
DISCLOSURE: This post contains affiliate links. If you buy through these links, I may earn a small commission.
An audio interface is a key part of almost all home music studios. It will usually be connected to a computer, some sort of audio output device like speakers or headphones, and maybe an input device such as a microphone or a guitar. With all this potentially expensive equipment connected, it’s vital that when disconnecting or turning off your interface you do it safely without risking any damage.
To safely remove or turn off an audio interface, first turn off any connected output devices such as headphones or speakers, or turn their volume all the way down. Then turn the audio interface power switch to “off”, unplug its mains cable, or remove its USB connection to the computer.
This article examines the different aspects of powering down and disconnecting an audio interface, and gives you methods to do each one safely. If you want to learn how to best protect your expensive gear connected to your audio interface, read on!
If you are interested in checking out the best recording gear such as audio interfaces, studio monitor speakers, microphones, etc., you can find them at Amazon by clicking here.
Safely turning off/removing an audio interface aspects
There are actually three different points to consider when disconnecting or powering down an audio interface…
- Connected audio output devices – disconnecting or turning off the audio interface can cause a loud “pop” that risks damaging connected speakers or similar devices.
- USB – audio interfaces are USB devices, so the same rules for safely disconnecting any other USB device apply.
- An audio interface is an electrical device – like any electrical device, it can hold charge even after it has been turned off. This really applies to turning the interface back on again after it has been powered down.
Let’s take a look at each one of these in turn…
Safely turning off audio interfaces avoiding loud “pops”
I have an entire article dedicated to stopping your audio interface from making unwanted clicks and pops during normal operation. Definitely check it out if you are having similar trouble with your interface. What we are talking about here is the standard “pop” sound you get when turning your interface off.
I’m sure you have heard the “pop” sound while turning on or off a device that is designed to output sound. A guitar amplifier, home hi-fi system, powered speakers connected to an audio interface, etc… they all potentially do this. This is due to a surge in current when the device is turned on or off going through the speaker.
This is not a problem in itself and is safe, as it is just a fundamental property of an electrical device connected to something designed to output sound. What we want to avoid is the pop becoming so loud that you risk actually damaging the equipment.
The way to do this is to switch off any audio output devices (speakers, headphones, etc) first, before you switch off or disconnect the audio interface. This means that the current surge cannot cause a pop because there is effectively no longer an audio device to output the pop. Turning the volume all the way down will also do the same thing.
This is generally good advice for any set of devices that output audio – switch off the last device in the signal chain (usually the speakers) first, then the last but one etc. until you reach the first device in the chain. Turn that off last. An example is shown below…
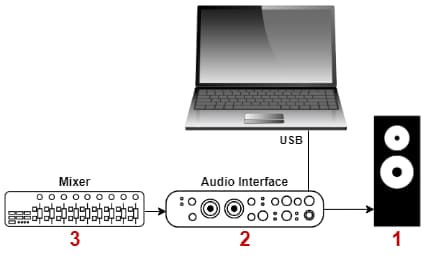
For turning the equipment on, reverse the order so you switch on the speakers last.
If your audio device has a power button it is best to switch it off using the power button before unplugging the mains cable.
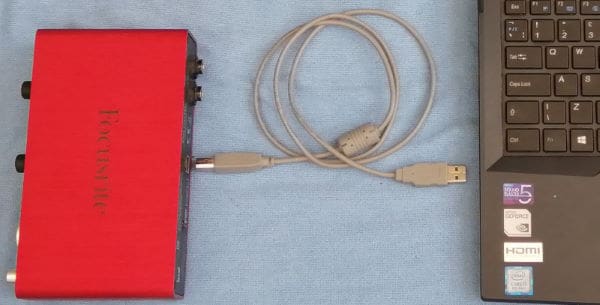
Talking of audio interfaces, if you are looking to buy one I can highly recommend the Focusrite Scarlett series. I have been using these for years, and they have always given me great sound quality and reliability for not much money. You can buy the Focusrite Scarlett Solo (affiliate link) from Amazon for a very competitive price.
Safely disconnecting USB audio interfaces
When disconnecting a USB device from your computer, you are supposed to properly “eject” it. This means going to the device in Windows, and selecting “eject”. Only when Windows prompts you it is ok to remove the device should you do so.
This really applies to devices that can store data e.g. USB flash drives, external hard drives, etc. This process is designed to prevent you from losing data. For example, if you were copying a large file over to a flash drive and you disconnected it, you would potentially lose the data not transferred and end up with a corrupted file.
The “eject” mechanism makes sure any data writing is complete before you remove the device.
Having said all that, with an audio interface this doesn’t really matter. Audio interfaces are not data storage devices, so the worst that can happen is you will stop hearing sound or your input devices will stop working in your DAW.
From a USB point of view, you are safe to disconnect the device whenever you want. But bear in mind the audio “pop” considerations from the previous section. It is best to close down any applications that are using the audio interface e.g. DAWs, amp sims, media playback software, etc. before disconnecting.
As a quick aside…I’ve already mentioned my preferred audio interfaces are the Focusrite Scarletts. But there are many different models in the range. To help you decide which one to buy, I have written a guide to choosing the right Focusrite Scarlett for you. It will help you make an informed choice based on your personal musical and recording needs.
Safely turning an audio interface back on
Audio interfaces are electrical devices. Like any electrical device, it has a property called capacitance. In a nutshell, this means it can hold charge even after it has been powered off.
Typically when you turn off an electrical device, that charge will be held in the device for a few seconds. It starts to dissipate as soon as the power is removed, but it can take up to 10 seconds to go completely depending on the particular device and its circuitry. This applies just as much to audio interfaces.
Because of this charge, you want to avoid turning a device on again immediately after turning it off. With the residual charge still present, you risk a surge when turning it on again which can potentially harm the device or anything connected to it.
So if you turn off your audio interface, count to ten before turning it on again. You will probably be ok with a count of five, but I would choose ten just to be on the safe side.
As a quick aside…if you are using an audio interface with a laptop computer in particular, there are some specific issues you should consider. That’s why I have a whole guide on using audio interfaces with laptops. It takes you through exactly how to use an interface with a laptop, the best interfaces to use, the issues you may encounter and how to solve them.
Remove input device before removing audio interface?
You may have an input device such as a microphone, guitar or keyboard connected to one or more of your audio interface inputs. Incidentally, a question I’m often asked is does a MIDI keyboard need an audio interface? Check out my article on the subject to discover exactly what you need and don’t need to connect your MIDI keyboard.
With input devices such as these, do you have to remove them before turning off or disconnecting your audio interface?
This is not really necessary. If you follow the advice already given i.e. turn off or turn the volume right down on the output device, then turn off the devices from the last device to the first, you should be fine. If you do want to disconnect your input devices, go through that process first, then disconnect them. This will help you avoid any audio pops similar to turning off the audio interface.
Maybe you’re just looking to get into home recording, and are interested in a first microphone and want to make sure you don’t damage it. If so, I can highly recommend the Shure SM58 (affiliate link), available for a great price at Amazon. I’ve used one of these for years. They offer great sound quality and value for money. They are also virtually indestructible!
How an audio interface is normally used & powered
If you’re reading this article, you probably know how to set up, connect and use an audio interface. I’ll briefly describe a couple of points here as there are some important things to note regarding disconnection and turning off, depending on what type of audio interface you have and how it is powered.
Some audio interfaces are not plugged into the mains. They are powered via the USB cable connected to your computer. This is fairly typical of small audio interfaces with not many inputs.
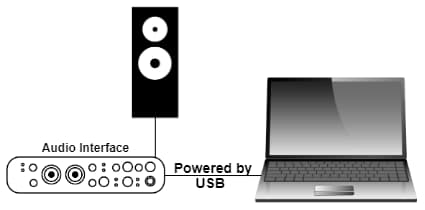
By the way, I have a whole article dedicated to deciding how many inputs you need on an audio interface. I highly recommend you check it out if you are looking to buy your first interface or upgrade your existing one.
Others have a separate mains cable that is plugged into a power outlet…
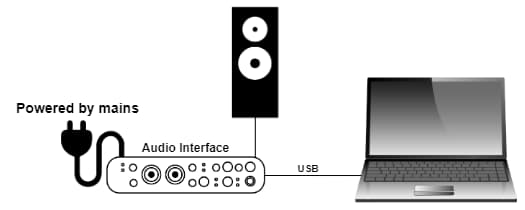
This has implications for powering off the unit. With a USB-powered device, disconnecting it from the computer also powers it down. Whereas with a mains-powered unit, disconnecting it and powering it down are two separate operations.
One more thing to note; some audio interfaces have an on/off switch, and others don’t. Obviously, this gives you another way to power it down, in addition to unplugging the power cable.
Here is some of my favorite home studio gear…
Thanks for reading this article. I hope you found it helpful in your home music-making activities. Here are a few of the tools that I personally use in my home studio. These are affiliate links, so if you decide to use any of them I’ll earn a small commission.
Audio interface: My personal choice for audio interfaces are the Focusrite Scarlett series. I have been using these for years, and they have always given me great-sounding recordings. For a very reasonable price from Amazon you can buy the excellent Focusrite Scarlett 4i4, or if you don’t need MIDI capability the Focusrite Solo is a great choice.
Amp sim: Guitar amplifier simulator software has come on leaps and bounds in recent years, such that I record all my electric guitar parts using amp sims these days. One of the very best is the incredible Amplitube from IK Multimedia, which I have used on many of my songs.
Headphones for recording: My favorite headphones for recording are the Sony MDR-7506s, which I use for monitoring during all my recording sessions. They can also be found in many pro recording studios. Get the Sony MDR-7506 headphones from Amazon here.
General-purpose microphone: You can’t go wrong with a good ol’ Shure SM-57, one of the most versatile and ubiquitous microphones around. I’ve been using one in my home studio for as long as I can remember. Amazon offers the Shure SM-57 for a very competitive price.
To see all of my most up-to-date recommendations, check out this resource I made for you!
