Reaper DAW: 11 ways to improve performance
DISCLOSURE: This post contains affiliate links. If you buy through these links, I may earn a small commission.
Reaper is renowned as one of the best-performing DAWs available today. But that does not mean that you will never have any issues with it. It is highly complex audio software, and therefore subject to the same performance issues as any other similar application.
There are always steps you can take to improve Reaper’s performance, whatever your particular setup. The suggestions below should help you either reduce CPU usage, reduce RAM usage or improve data transfer speed to/from disk. All of these things should help improve Reaper’s performance, making it run smoother and reducing the risk of audio glitches.
Obviously, the more powerful computer you have the better any software will run on it, not just Reaper. Check out this article on the PC specs you need for a music production computer to discover exactly how powerful a computer you will need for various different musical requirements.
If you are interested in checking out the best recording gear such as audio interfaces, studio monitor speakers, microphones, etc., you can find them at Amazon by clicking here.
Use optimal audio buffer settings for Reaper
In Reaper, go to Options->Preferences, or hit Ctrl+P. In the category list on the left, select “Device” under “Audio”.
Here you will find the settings for your audio driver. First of all; make sure you are using a high-quality dedicated audio driver. This is usually an ASIO driver on Windows, which will usually have been supplied with your audio interface. Standard audio drivers such as DirectSound will not give you the best performance, especially with regard to latency.
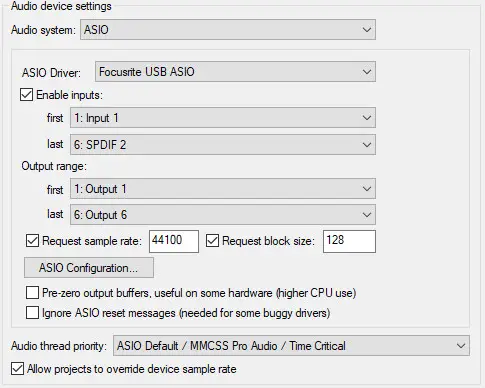
You will likely see settings similar to the above if you are using an ASIO driver.
If you now click the “ASIO Configuration…” button, you will see a dialog similar to the following…
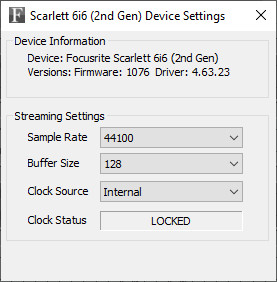
These are the settings for your audio driver. Yours might not look exactly like mine; it depends on which audio driver you are using and which audio interface. But it should have similar settings you can alter.
The “Buffer Size” is the thing we are interested in here. The lower you set this, the more work your CPU will have to do, but the lower your latency (delay) will be between playing a note and hearing it. The higher you set it, the less work your CPU will have to do, but at the cost of greater latency.
Buffer size is very important when recording guitars. I have written a whole guide on recording guitars in Reaper. Definitely check it out if you are planning on doing any sort of guitar recording using Reaper. You’ll learn a simple, repeatable process to help you get your guitars recorded right every time.
Why do we care about buffer size? Well, when you are multi-track recording you want the latency to be as low as possible, so you hear what you play on your instrument in time with everything you are playing back. But you can’t necessarily just set it as low as possible, because the busier your CPU is, the greater the risk of audio drop-outs and glitches.
So it is a compromise; a balance between the risk of audio glitches, and latency. As a general rule; when recording, set it as low as you can without getting any audio glitches. When you are purely playing back audio e.g. when mixing, latency is irrelevant so you can set it a lot higher to effectively eliminate any risk of audio drop-outs.
This is how you get rid of the delay or latency in Reaper; set the buffer size low enough to reduce the delay so it isn’t noticeable, but not so low as to cause audio glitches due to the CPU working too hard.
I can’t tell you exactly what number to choose, because that will depend on your individual hardware and software. Experiment using the general rule above, and try to determine the optimal settings for your own equipment. Just remember…
- Recording: set buffer size LOW to minimize latency
- Playback: set buffer size HIGH to maximize audio quality
N.B: The “Request block size” setting in the Audio Device Settings actually refers to the same thing as the buffer size on the audio driver settings dialog. It requests the setting in the driver, but the request does not have to be honored. Feel free to set this, but make sure you change the setting in the driver’s dialog as well.
If you are suffering from audio glitches, clicks or pops, the buffer settings are not the only potential cause. You audio interface or other hardware could be the culprits. I recommend you check out my article on how to stop clicks and pops for more information.
Use sends and buses instead of inserts
Imagine you have twenty tracks recorded in a project. On every one of those tracks, you have a reverb plugin inserted to add some ambience. This means you are running twenty instances of the reverb plugin, potentially taking up 20x the CPU resources and using 20x more RAM than you need to. This could slow your computer down, ultimately causing audio glitches in extreme cases.
Instead of using insert plugins, you could create an Effects Track or Effects Bus. This is one track, with one instance of the reverb plugin inserted on it. On your twenty tracks, instead of inserting the reverb plugin you could send the outputs to the effects track. This way you get reverb on all your tracks, but with only running one instance of the reverb plugin.
Adding reverb in Reaper is such a common thing to do, I have written a whole beginner’s guide to reverb in Reaper. I highly recommend checking it out if are a relative Reaper novice and want to improve the sound of your tracks with some reverb.
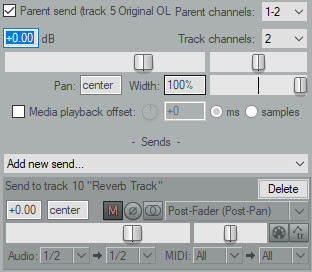
This is an example of how you would set up your effects track and sends in Reaper…
- Create a new track; let’s call it Reverb Track
- Add a reverb plugin to the new track – click the FX button, the choose a Reverb plugin from the list e.g. Reaper’s stock ReaVerbate plugin
- On the plugin window, move the Dry: slider down to zero, and the Wet: slider to 0.0
- On a track you want reverb on, either…
- Click & drag the “Route” button on the track, and drag it to the new track, OR
- Click the “Route” button, click “Add new send…” and select the new reverb track
- Click the “Route” button and on the slider for the send to the reverb track, select how much reverb you want on your track
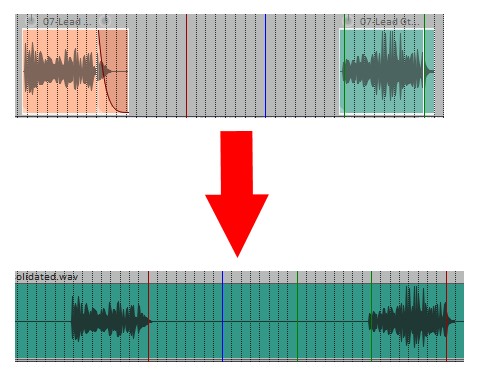
There is a lot of terminology associated with tracks in DAWs and it can be very confusing, especially for the novice. Consolidation is one of those confusing terms. Check out my article on consolidating tracks for an explanation of exactly what this means.
Freeze tracks to free computing resources
The idea behind “freezing” tracks in Reaper, is to free up CPU usage from plugins once you are happy with the settings in those plugins. It is most commonly used on tracks using Virtual Instrument plugins, which can consume a lot of CPU resources.
When you freeze a track, its plugin settings are “frozen”. This means that the track is no longer actively being processed by the plugins, hence saving CPU usage. This CPU time can then be used for other things, potentially allowing you to add a lot more tracks without noticeably slowing down your computer.
When you freeze a track, it sounds exactly the same as it did before. You just can’t change any settings in any of the plugins. If you later decide you do want to change some plugin settings, it is very easy to unfreeze the track to allow access to the plugins again.
Here’s how you freeze a track in Reaper…
- Right-click on a track
- From the context menu select “Render/freeze tracks >”
- Select one of the “Freeze tracks to…” options
…and that’s it!
To unfreeze a track, simply right-click again and select “Render/freeze tracks > Unfreeze tracks (restore previous items and FX”.
A good workflow involving the use of freezing tracks is during mixing. Once you have got a track sounding how you want it, freeze it to free up CPU resources. Then move onto the next, then the next etc. If during the mixing you need to change a plugin setting, you can always unfreeze the relevant track. This process lets you optimize the CPU usage to get the best sound quality possible during mixing.
Freezing tracks can be very useful if you have any VSTi plugin virtual instruments on your tracks. Check out this article on VST and VSTi plugins for more information. You might also be interested in what, if any, virtual instruments Reaper comes with. You’ll find out if you read my “Does Reaper have built-in instruments” article.
Avoid putting effects on the master track
For some reason, effects on the master track seem to use more computing resources than effects on other tracks. I don’t understand why, but I have experienced this along with similar reports from other Reaper users on the web.
It can therefore help improve Reaper’s performance by not using effects on the master track. But what if you want an effect on the whole mix? For example, using a dynamics plugin such as a compressor or limiter on the master track is a very common thing to do.
Instead, you can use a submix or pre-master track. You can set one up like this…
- Create a new track (the submix track)
- Route its output send to the master track (will probably already be done)
- Route the output sends of all your other tracks to your submix track
- Apply your whole-mix master effects to the submix track instead of the master track
This way you are still applying the effects to the whole mix, but avoiding putting effects directly onto the master track. It will sound exactly the same but avoids the performance issues of master track effects.
Why this works, I don’t know. You’d have to ask the Reaper developers!
While we are talking about the mix, you are going to want to create a mixdown of your song in Reaper so other people can hear it. To learn exactly how to do that, have a read of my article entitled “How to save a mixdown and export tracks in Reaper“.
Identify problems with Reaper’s performance meter
Reaper has a very useful performance meter built into it. To access it either go to View->Performance Meter, or press Ctrl+Alt+P on Windows, Opt+Cmnd+P on Mac. You can use it to identify tracks that have performance issues.
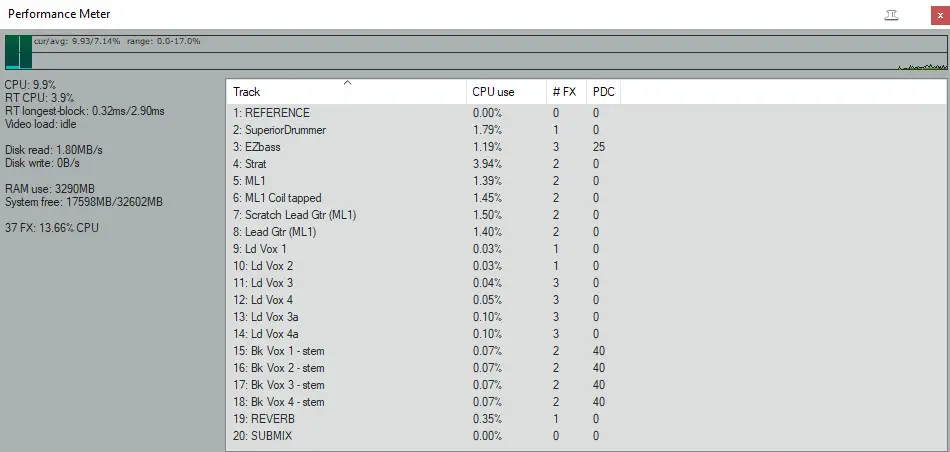
Above is the performance meter opened in one of my songs, during playback of the whole project. You can see that track 4 “Strat” is using more of the CPU’s processing power than any other track – 3.94%.
If I were having any performance issues such as audio glitches, I would start with this track and try and reduce its CPU usage. For example, in this case that track is using several quite CPU-intensive plugins. I could freeze this track, and that should reduce its CPU use.
Generally, the more plugins you have on a track the more CPU power it will consume. One of the plugins on the “Strat” track above is an amp sim (guitar amplifier simulator) plugin. These plugins can often be quite greedy in the resources they consume. Check out my article on what amp sims Reaper comes with to find out more about using amp sims with Reaper.
Try experimental reduce CPU use feature
Reaper contains a feature that tries to reduce the CPU usage of tracks when they are silent. To enable it, go to Options->Preferences, select the Audio heading in the list on the left, and the option is about half way down the right-hand side of the dialog.

You can try checking this option to see if it has performance benefits for you. A word of warning though; some people have reported that turning this on actually makes things worse for them. I do not have this option turned on personally.
If you hover over the option you will see a message at the bottom of the dialog, warning that while it can save CPU use on silent tracks, it could increase CPU use on other tracks.
I suggest you try it to see if it makes a positive difference for you. If it does not, it’s very easy to turn the option off again.
Close other applications while running Reaper
If you are working in Reaper for an extended period of time, there is no point in having other applications open on your computer. I am terrible for this; I often have web browsers, music players, file managers, password managers, and all sorts of stuff open when I’m not using them. All they are doing is using up CPU and memory resources that could be used by Reaper.
Close these applications down when working in Reaper! And don’t forget that some applications run “hidden”; look in the system tray on Windows – found at the right-hand side of the taskbar. Right-click on and close anything you don’t need.
Common culprits here are game applications such as Steam, backup programs, file sync/transfer utilities, etc. And some of the very worst for hogging resources are third-party anti-virus programs. Close these down when using Reaper, and re-open them when you have finished your session.
Keep your PC well maintained for performance
There are a few things you can do in Windows to optimize for performance.
- If you’re using a laptop in the power options, set the Power Mode to Best performance rather than to Balanced or Best Power Efficiency.
- Regularly apply Windows updates; Microsoft are fixing issues all the time so it is best to keep up with these
- Keep drivers up to date; especially your audio driver(s) when using Reaper – periodically check your audio interface manufacturer’s website for the latest driver version
- Keep your hard drive tidy – only install the applications you need and tidy up data. Delete/uninstall things you no longer need. Periodically run the disk cleanup utility to remove operating system files that are no longer needed.
- Defragment your HDDs – important: this is only for HDDs. SSDs do not require defragmenting; in the worst cases defragmenting an SSD can actually reduce its lifespan.
- Some people have reported that disabling WiFi & Bluetooth when working in Reaper has resulted in a noticeable performance improvement.
Those are the main ones to pay attention to. This article has a more comprehensive list – 20 ways to optimize your Windows 10 PC for music production.
Install more RAM
If you are constantly using up all your RAM when running Reaper, you should consider installing some more. You can monitor your RAM usage in Windows’s Task Manager…
- Right click on the taskbar and select “Task Manager”
- Click “More Details”
- Go to the Performance tab
- Select Memory on the left hand side
You should get an indication of how much memory is being used, both as an absolute value and as the percentage of available memory. If you are at 80-90% or more when just using Reaper, it might be time to consider installing some more RAM.
Exactly which type of RAM to buy can be really confusing. A program called Speccy (just use the free version) can help show you which type of RAM is installed in your computer.
In general, more RAM will allow you to…
- Run more instances of effects plugins
- Run more instances of virtual instruments
- Play more tracks at the same time
It’s important to note that installing more RAM will only help performance if you are using this RAM. It won’t make anything faster. It just allows you to run more things at the same time without any performance issues.
Replace HDD with SSD
Hard Disk Drives (HDDs) are traditional hard drives, that contain a magnetic spinning disk inside them. Solid State Drives (SSDs) are the more modern version, that contain no moving parts and are purely electronic. For more information, this article on pcmag.com has a pretty thorough explanation of the differences.
For us, we are interested in the fact that SSDs are much faster than HDDs. So every time Reaper loads/saves to/from disk e.g. when recording or playing back a track, an SSD causes much less of a bottleneck than an HDD.
So if your computer is still using an HDD, it could be worth considering upgrading it to an SSD. As always with technology there is a trade-off; SSDs are much faster, but HDDs are much cheaper per GB. If you can afford it, this upgrade would also improve the general performance of your computer; all applications would run faster, boot times would be much smaller and file loads/saves would be a lot quicker.
Experiment with Reaper’s audio settings
There are a lot of settings in Reaper’s preferences dialog in the Audio section. Device, Playback, Buffering, Recording and Rendering all contain settings that could have an impact on performance.
You can experiment with these settings, as long as you do it in an organized and controlled manner. Only change one thing at a time, and write down which setting you changed. See if it makes any difference, and be prepared to put it back if necessary.
This will be a slow process, with many steps taken over time. If you are happy with Reaper’s performance on your system, I would advise not changing anything. I would recommend this type of experimentation only if you are trying to eek out every last bit of performance from Reaper, and you are running your computer close to its limits.
Related articles
I have quite a few articles about Reaper on this website. Take a look at these, particularly if you are a novice Reaper user or considering it as your DAW…
- How much does Reaper cost? What happens if you don’t pay?
- How to import mp3 into Reaper
- Is Reaper good for beginners?
- Is Reaper a good DAW? Suitable for professional use?
Here is some of my favorite home studio gear…
Thanks for reading this article. I hope you found it helpful in your home music-making activities. Here are a few of the tools that I personally use in my home studio. These are affiliate links, so if you decide to use any of them I’ll earn a small commission.
Audio interface: My personal choice for audio interfaces are the Focusrite Scarlett series. I have been using these for years, and they have always given me great-sounding recordings. For a very reasonable price from Amazon you can buy the excellent Focusrite Scarlett 4i4, or if you don’t need MIDI capability the Focusrite Solo is a great choice.
Amp sim: Guitar amplifier simulator software has come on leaps and bounds in recent years, such that I record all my electric guitar parts using amp sims these days. One of the very best is the incredible Amplitube from IK Multimedia, which I have used on many of my songs.
Headphones for recording: My favorite headphones for recording are the Sony MDR-7506s, which I use for monitoring during all my recording sessions. They can also be found in many pro recording studios. Get the Sony MDR-7506 headphones from Amazon here.
General-purpose microphone: You can’t go wrong with a good ol’ Shure SM-57, one of the most versatile and ubiquitous microphones around. I’ve been using one in my home studio for as long as I can remember. Amazon offers the Shure SM-57 for a very competitive price.
To see all of my most up-to-date recommendations, check out this resource I made for you!