How to record guitar in Reaper – an illustrated guide
DISCLOSURE: This post contains affiliate links. If you buy through these links, I may earn a small commission.
I have been using Reaper as my recording software for many years. As a guitar player, in that time I’ve used it to record guitar parts many times. Reaper is a great choice for recording guitars, but if you are new to recording it can be a little intimidating.
To record guitar in Reaper, make sure your guitar is in good working order. Connect the guitar or mic recording the guitar/amp to an input on the audio interface. In Reaper create a track, ensure the correct audio interface input is selected, enable recording, check the levels, then press record.
Reaper is an ideal DAW (Digital Audio Workstation) for a home studio, being cheap, not too demanding on computing resources, and quite easy to learn with the huge amount of tutorials available. This guide will take you through the process of using it to record a guitar in detail, right from preparing your guitar for recording up to capturing multiple takes and selecting the best one.
If you are interested in checking out the best recording gear such as audio interfaces, studio monitor speakers, microphones, etc., you can find them at Amazon by clicking here.

Use these links to move around…
- Equipment required
- Preparation
- Picking a method of recording guitar
- Setting levels on the audio interface
- Recording your guitar into Reaper
- Post-recording actions
- Should you record guitar dry or wet?
Equipment required for recording guitar in Reaper
Let’s start right at the beginning with a list of equipment you will need to record guitar into Reaper…
- Guitar (duh!) – this can be an acoustic, electric or acoustic-electric guitar
- Jack cable if recording electric or acoustic-electric guitar
- XLR cable if mic’ing up an amp or acoustic guitar
- Microphone if mic’ing up an amp or acoustic guitar
- Audio interface
- USB/Thunderbolt cable (connects audio interface to computer – usually supplied with the audio interface)
- Computer with Reaper installed
- If using Amp Sims, an amp sim installed as a plugin in Reaper
- Guitar amp if mic’ing up an amp
If you are unsure what any of those things are, don’t worry! We’ll cover each in turn throughout this guide, and link to other guides on this website where appropriate if you need more information.
If you have never connected your guitar to a computer before, my article on how to connect a guitar to a PC will really help. You’ll learn exactly what equipment you need, how connect it all together, how to configure the hardware and software you use, and a simple repeatable process to get this right every time.
Preparation for guitar recording in Reaper
You can’t just go blindly stumbling into recording your guitar in Reaper. Well you could, but you wouldn’t get the best results. A little bit of preparation is necessary beforehand.
You can if you want skip this section and jump straight down to the recording section. I don’t recommend you do that though! It’s best to not skimp on this preparation step – you will thank me later!
Preparing your guitar for recording
Once you have chosen a guitar to record with, it needs to be checked over to make sure it is in good working order. There is nothing more frustrating and demotivating than ruining a take by a guitar cutting out, being out-of-tune or unpleasant noise/hum getting on to the recording.
This process is not specific to Reaper, but I include these tips here as they are vital to get the best results when recording a guitar into anything. Work through the following steps to check your guitar will be ok for recording…
Check the intonation
Check your guitar is properly intonated i.e. that it is properly in tune with itself. A harmonic played at the 12th fret should sound exactly in tune with the fretted note played at the 12th fret.
Change strings if necessary
If your strings are dull sounding, look worn or leave a dirty residue on your hands when you play them, it’s probably time to change your strings. Remember to stretch the new strings out to minimize tuning issues.
This YouTube video shows you how to intonate a Les Paul style electric guitar…
Check for scratchy pots
Your volume and tone knobs (pots or potentiometers) can sometimes be a source of noise when you turn them. This can often be fixed by spraying the pots with a contact cleaner spray.
Check out this video to learn how you can fix scratchy pots…
Check the jack socket
Make sure when you plug a cable into the jack socket and play the guitar that the cable is not loose or wobbly, and that the sound is not cutting out or making any annoying noises. You may have to get a screwdriver and make sure everything is tightly screwed in. Worst case, the connections to the socket may need resoldering.
Use a good quality, good condition cable
Check the cable you intend to use. Check for unwanted noises or cut-outs. Replace it if you are experiencing problems.
Test guitar beforehand
It’s much better to discover any issues before you start recording than in the middle of a take.
Tune-up!
If there is only one of these tips you take notice of, make it this one. There is nothing worse than recording a great take of a solo, only to find when listening back to it that it was out-of-tune. Tune your guitar before every take! Yes, you read that right – before every single take. No excuses!
Preparing your computer and Reaper for recording
There are a few things to check with your computer and audio interface before you start recording…
Check audio interface is in good working order
Physically check your audio interface is in good working order. Playback some music and listen to it through headphones or speakers – check there are no clicks, pops or annoying background noises. If any of these are happening for you, my article on how to stop audio interface clicks and pops can help fix some of these issues.
Check all the knobs by turning them one by one to make sure they are not crackly or noisy. You can get away with noisy knobs on a user interface, as long as the noises only occurs when you turn them as usually you will leave these set in one place when recording.
I have been using Focusrite Scarlett audio interfaces for recording guitars and other instruments for years and years. I have found them to be very reliable, easy to use, sound great and are good value for money. You can pick up the Focusrite Scarlett Solo (affiliate link) for a great price at Amazon.
Check the audio driver being used by Reaper
Standard audio drivers are not suitable for recording using a DAW. You need to use a high-fidelity, low-latency audio driver specifically designed for high-quality audio applications such as ASIO (Audio Stream Input/Output) on Windows and Core Audio drivers on a Mac.
On a Mac, an appropriate driver should be selected automatically. On Windows, a suitable driver is usually shipped with your audio interface. It may have automatically been installed when you first connected your interface.
To select an ASIO driver in Reaper go to Options->Preferences… (Ctrl+P), and select Audio->Device in the left-hand pane. Ensure the Audio System is set to ASIO, and that ASIO Driver is set to an appropriate driver for your user interface.
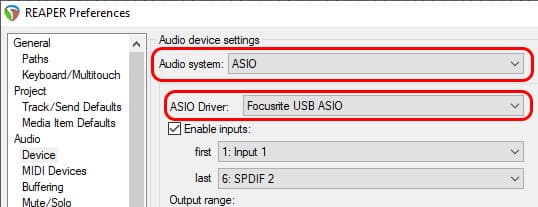
You can see from the screenshot on my system as I use a Focusrite Scarlett audio interface, my ASIO driver is set to “Focusrite USB ASIO”.
Setup amp sim if using one
Using an amp sim (guitar amplifier simulator software) is a great way to record electric guitar without having to use a real guitar amp. I have a whole detailed article on recording guitar with amp sims, which is essential reading if you go down this route. If you are using an amp sim, you should get the latency (time between playing a note and hearing it) as low as possible while retaining a high-quality sound.
I have a whole guide on reducing amp sim latency, that I highly recommend you check out if you are using an amp sim. It will help you achieve the best balance between low latency and a good guitar tone.
Picking a method of recording guitar into Reaper
There are two main modern methods of recording guitar…
- Placing a microphone in front of the sound source i.e. a guitar amp or an acoustic guitar (so-called mic’ing up)
- Using a DI (Direct In) connection from your guitar’s jack socket into your audio interface
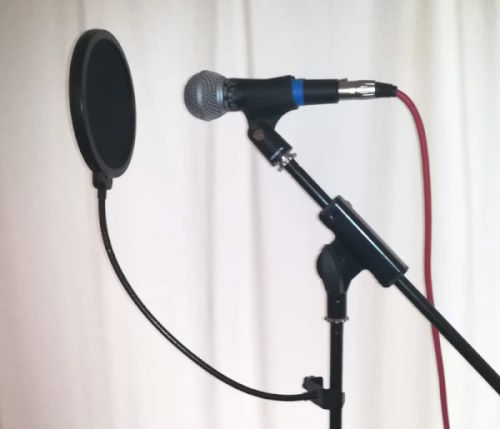
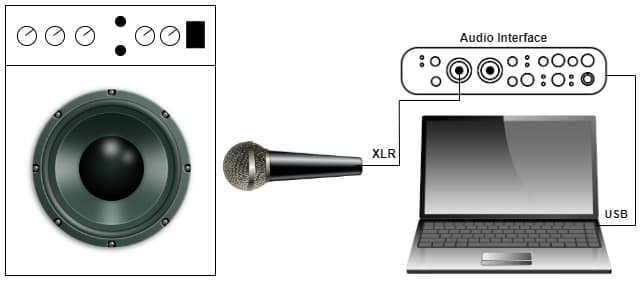
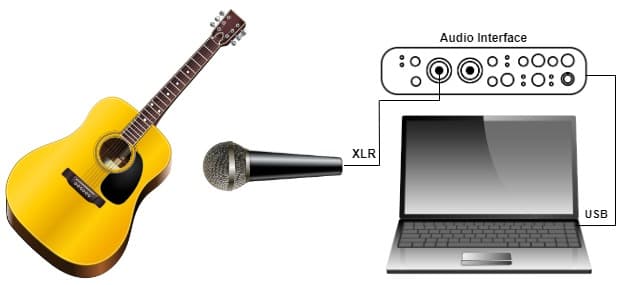
Mic’ing up a guitar/amp for recording
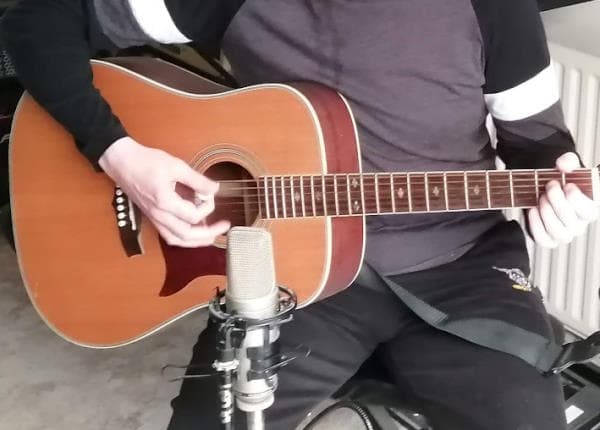
The basic principle of mic’ing up anything is that you place a microphone in front of the sound source. For guitar, this means placing a microphone in front of the guitar amp for electric guitar, or in front of the guitar itself for an acoustic guitar. You then connect the microphone to the audio interface that is attached to your computer running Reaper.
DI’ing a guitar for recording
With an electric or acoustic-electric guitar, you have the option to directly connect a jack cable from the guitar’s jack socket to an input on your audio interface. The sound will be captured directly into Reaper.

Of course, an electric guitar won’t sound how it is supposed to with just the DI as there is no amplification stage. This is why we would typically use an amp sim in this scenario, which you would add to the recorded track in Reaper as a plugin. It would then let you choose amp models and effects, meaning you have full control of the sound post-recording.
Mic’ing up vs DI
Which of the above methods you choose will depend on what you are trying to achieve, your equipment, space available, the acoustics of your room, etc.
The big difference is if you mic up a guitar amp, then you are stuck with that sound. You cannot decide you want to use a different amp sound post-recording – if you wanted to do that you would have to re-record your track.
Using the DI method with an amp sim, you are free to change your recorded sound as much as you like after you have recorded your track. You can select different amp models, vary the amount of distortion/overdrive, tweak the EQ and add effects.
That doesn’t mean that mic’ing up an amp is bad. There is something to be said for picking a sound and committing to it at the recording stage. Too many options can be a bad thing – it can lead to so-called “option paralysis” where you have so many options to choose from, making a decision on one can be difficult.
My recommendation would be to use the DI method with amp sims. Mic’ing guitar amps is an art in itself, and can take years to master. With a DI you also eliminate the room acoustics, so if you have a bad-sounding room it doesn’t matter. I have done all my electric guitar recording using amp sims with a DI for years.
Whichever method you use, you will need a good set of headphones to be able to hear (monitor) your guitar through Reaper when recording and listening back afterward. I highly recommend the Sony MDR-7506 headphones (affiliate link), which I have been using in my home studio for years. They are industry standard and used in many pro studios around the world, they sound great, are durable, comfortable and reliable, and can be bought at Amazon for a very competitive price.
Setting levels on the audio interface
Getting the recording level right (how loud the guitar’s signal is) is vital. It needs to be loud enough to be heard over any background noise, be at a similar level to other instruments you may record, but not so loud as to cause unpleasant distortion or “clipping”.
I have a whole guide on how to set guitar recording levels, which I highly recommend you read. You’ll learn the steps to get your guitar recording level right every single time. I’ll summarize the steps for setting the guitar’s level on your audio interface here…
- Plug your guitar or microphone recording your guitar into an input on your audio interface
- Turn the gain knob for the audio interface input you are connected to down to zero
- Play the loudest section of the guitar part you intend to record
- Gradually turn up the gain on the audio interface input, until the clipping light comes on
- At this point, back off the gain a little until clipping is no longer occurring
- Play the loud guitar part section again, and check the clipping light no longer comes on
- If the clipping light does come on, back off the gain a little more and go back to the previous step
Once you can play the loudest section of your guitar part without the clipping indicator light coming on, you have set the correct level on your audio interface.
Recording your guitar into Reaper
Finally, we are at the point where we can start using Reaper to record our guitar parts. Here’s my recommended steps to work through to capture your guitar part…
Add a click or timing reference
If this is the first part you are recording, you probably want a click or at least some sort of track to act as a timing reference. If you already have a track that can keep you in time as you record, you can skip this step.
Adding a click in Reaper is very easy – you simply turn on the metronome. You can do this by going to Options->Metronome Enabled. Click it again to turn the metronome off. Alternatively, you can toggle this icon on the toolbar to turn the click on and off…
You can change the tempo by clicking on the BPM value in the transport bar (View->Transport or Ctrl+Alt+T) and typing in a new value.
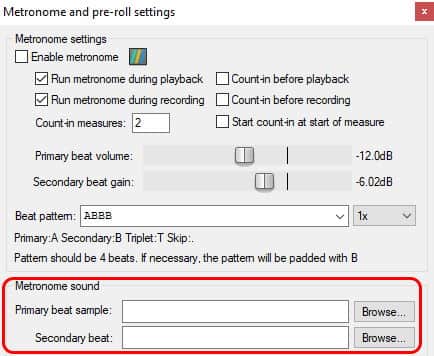
If you are like me, you may well hate the default beep-beep sound of the metronome. I find it really annoying and distracting – it sounds like a video game from the 1980s! You can change the sound by right-clicking on the toolbar’s metronome icon, and selecting your own samples for the primary and secondary beat sounds. You can easily find suitable sounds freely available on the web.
Some people hate metronomes altogether, preferring to have an actual drumbeat. You can do this by creating a track, and loading a pattern onto it from a drum plugin such as EZDrummer or MT Power DrumKit 2.
If you would prefer to have a drum track to play along to, my article on how to create drum tracks will really help. It will show you how to create drum tracks in several ways, using both free and paid-for software.
Create a track in Reaper
You will need a track to record your guitar part onto. There are several ways to create a track in Reaper…
- Right-click somewhere in the Track Control Panel (on the left-hand side of the screen by default) and select Insert New Track
- On the main menu, navigate to and click Track->Insert New Track
- Press the Ctrl+T keyboard shortcut
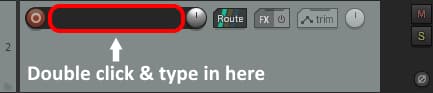
Give your track a sensible name (e.g. “Guitar 1”, “Electric Guitar 2”, “Rhythm Gtr 1”, “Ac. Gtr 1”, etc) that will help you identify it among lots of other tracks. To do this, double-click on the blank track name, and type in your desired name…
Enable the track for recording
By default, all new tracks in Reaper are not enabled for recording. To enable recording on your new track, click the little red button just to the left of the track name. It will turn bright red and will reveal the track’s input options, which we will deal with next.
Configure the track’s input
This step is a common cause of confusion for beginner Reaper users. Your track needs to be told which input on your audio interface it should record from. For example, if your guitar is connected to input 1 on your audio interface, you need to select input 1 for the track you are recording to.
You can change the track’s input by using the IN FX dropdown as shown below…
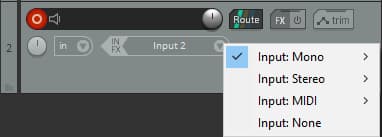
You can see I have selected input 2 on my track, as my guitar is connected to input 2 on my audio interface.
Ensure you can hear yourself – enable monitoring
Make sure your headphones are plugged into a headphone socket on your audio interface. You need to be able to hear your guitar through the headphones when you are recording. This is known as monitoring.
You can enable monitoring in Reaper by clicking the little speaker icon for the track you are recording to. This is circled in red in the screenshot below…

There are three settings that each mouse click will select in turn…
- Monitoring OFF
- Monitoring ON
- AUTO monitoring (monitoring will automatically turn OFF when you are just playing back what you recorded)
There is another way of monitoring your guitar, which is to use direct monitoring on your audio interface. Consult your manual for how to do this for your specific interface. It bypasses Reaper altogether, and effectively sends the input straight to your headphones.
I would advise using monitoring in Reaper. This has the advantage that if you are playing into an amp sim (see next section), you can hear your guitar through the amp sim’s amp and effects models. Only use direct monitoring if you are having performance or latency issues in Reaper.
(Optional) Add amp sim
If you are recording an electric guitar using a DI, you will probably want to use an amp sim to get your guitar tones. While not strictly necessary, it is very nice to be able to play through the amp sim as you record. This lets you hear the electric guitar sounding like an electric guitar should, through an amplifier and maybe some effects pedals.
There are many free and paid amp sims available today. Popular free ones include Amplitube 5 CS and Guitar Rig 6 Player. You usually install one by running an installer. This should put the amp sim in the correct folder, so Reaper can find and use it as a plugin.
In fact, I have a whole beginner’s guide to Guitar Rig 6, which I highly recommend you work through. You’ll learn how to set up Guitar Rig, how to choose presets, and how to create your own sounds from scratch.
To add an amp sim plugin to your track, click the FX button for the track, then click the “Add” button.
If you are interested in learning more about recording using amp sims, I have a whole guide dedicated to amp sim recording. You’ll learn in detail how to record with amp sims, how to avoid some common pitfalls and how to get great results every time.
Set the recording start point
You might not want to start your guitar part recording at the beginning of your song. It might start a few bars or measures in, or it may be a guitar solo that starts after the second chorus. Setting where you want to start recording from is simple in Reaper; just click on the place where you want to start from in the main parts window.

You can set a count-in by right-clicking on the metronome icon in the main toolbar and typing in the number of count-in measures you want.
Make a test recording and check the levels
Making a quick test recording before you go for a take is a great way to check everything is ok. Just press the record button on the transport bar or press Ctrl+R, and play a few bars on the guitar. Listen back to it and make sure it can be heard, there are no unwanted noises and you are getting a good tone.
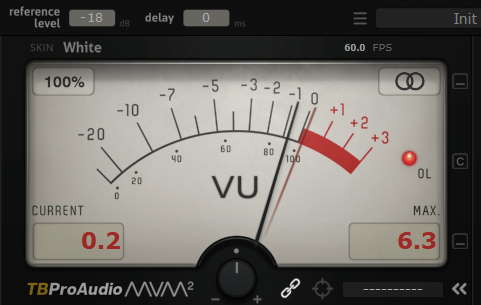
This is also a good time to check the levels. I know we checked them earlier on the audio interface, but here we are checking within Reaper. Check that the level on the guitar’s channel is within the -18dB to -12dB range. This will ensure your guitar part plays nicely with any other parts, and is not too quiet or too loud.
Use the gain knob on your audio interface to adjust the level as necessary. You may also have a software application supplied with your audio interface that will let you adjust the input level.
Tune your guitar (again!)
I make no apologies for repeating this – tune your guitar before every take!
Trust me. If you get into the habit of doing this you will hopefully never have to deal with the situation of recording a great take, then having to scrap it as it’s out-of-tune.
Record!
Hit that big red button on Reaper’s transport bar! You can also use Ctrl+R (Cmd+R on a Mac).
As you record your guitar part, you should be able to hear what you are playing, the click and any existing tracks you haven’t muted. If you can’t, go back to the setup steps and check you have set everything up correctly.
Playback and re-record
If you’re like me, you rarely get a recording you are completely satisfied with on the first try!
Playback your recorded part (click the Play button on the transport bar), and if you are happy with it – great! You are done.
If you’d like to re-record it as you are not happy with it, you have two options…
- You can delete the part and record it again
- You can leave the first take and record another take
If you are sure you don’t want to keep any of your first take, do option 1.
If you are happy with some parts of it, or you are completely happy but want to record some more takes and pick the best, do option 2. You can do this by recording over the top of the take you have just recorded i.e. don’t delete your first recording.
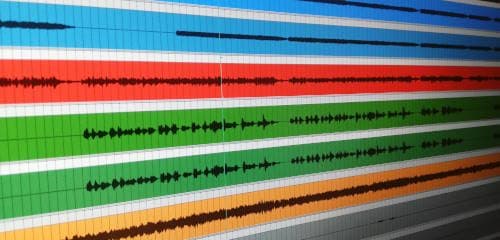
You can do this as many times as you like. So if your record your guitar part 6 times, Reaper will record 6 takes. You can then choose between them and pick the take you were most happy with. You can choose between them by simply clicking each take. You can also use ‘T’ and ‘Shift+T’ to select between the takes.
If you liked a section of one take, but a different section of another, you can split the takes but typing ‘S’ at the point where you want to split them. You can then select each section from separate takes.
This process of selecting different takes is called comping. For a more detailed explanation of comping, I highly recommend watching this video…
Actions to take post-recording guitar in Reaper
Congratulations, you’ve finished your recording! What now?
Applying effects in Reaper
Well, a common task is to apply effects to your recorded track(s). Reverb is probably the most common effect applied, but there are many, many effects supplied with Reaper. And many more you can download, both free and paid.
To apply an effect to a track, click the FX button on the track, then click the Add button in the FX window. You’ll see a big list of all the effects you can apply. For a simple reverb plugin, select “ReaVerbate” and click the Add button at the bottom right. Adjust the controls to your taste.
If you recorded using amp sims, you also have the full functionality of the amp sims you can tweak and play with, including all its supplied effects.
Backing up your Reaper work
The one other thing I would suggest you do is to back-up your work so far! Although computers these days are pretty reliable, if you’ve used them for any length of time, you’ll know they have a tendency to crash/corrupt your work at the most inconvenient time!
So back-up the folder you have stored your project and recorded files in. This should be to a different drive than the one they are stored on – an external hard drive or some form of cloud storage is ideal.
Mixing
This is not an article on mixing, but I’ll mention it briefly since it is so important. Once you have recorded all your tracks you need to balance the volumes of each track, make sure they sound good alongside each other and make each come to the foreground when it needs to.
This process is called mixing. As well as for recording, Reaper is a great tool for mixing. I have a whole article on getting started with mixing, which is highly recommended reading for novice mixers. You’ll learn about the whole mixing process, from defining what mixing is right up to walking you through making your first mix.
Should you record guitar dry or wet into Reaper?
There is a debate that’s been going on for years, regarding whether you should record your guitars “dry” or “wet“.
What does this mean? “Wet” means with effects applied such as reverb, overdrive, delay, chorus, etc. “Dry” means with no effects applied, just the pure clean signal, and any effects you want will be applied after recording.
For example, say you are mic’ing up an amp, and you use some of the amp’s built-in reverb and overdrive, and maybe a delay and a chorus effects pedal. If you record this into Reaper, this is an example of “wet” recording.
If you DI your guitar straight into your audio interface and record that into Reaper, that is an example of “dry” recording.
So which one should you choose? Both have their benefits and drawbacks.
It essentially comes down to at what point do you want to commit to a sound. If you want to commit at the recording stage, then record wet. You lose flexibility, as you can’t change your base sound after you have recorded it. But you have made the decision to commit to a sound early, which can help prevent having difficultly committing to a sound later, when you have a load of other mixing decisions to make.
If you want to be able to change your sound after recording, record dry. This gives you full flexibility to use amp sims to alter your sound – you might change the sound you were initially going for once you hear the guitar part alongside the rest of your instruments. It does mean that you are postponing the decision though, which might make your job harder post-recording when you have lots of other decisions to make.
Here is some of my favorite home studio gear…
Thanks for reading this article. I hope you found it helpful in your home music-making activities. Here are a few of the tools that I personally use in my home studio. These are affiliate links, so if you decide to use any of them I’ll earn a small commission.
Audio interface: My personal choice for audio interfaces are the Focusrite Scarlett series. I have been using these for years, and they have always given me great-sounding recordings. For a very reasonable price from Amazon you can buy the excellent Focusrite Scarlett 4i4, or if you don’t need MIDI capability the Focusrite Solo is a great choice.
Amp sim: Guitar amplifier simulator software has come on leaps and bounds in recent years, such that I record all my electric guitar parts using amp sims these days. One of the very best is the incredible Amplitube from IK Multimedia, which I have used on many of my songs.
Headphones for recording: My favorite headphones for recording are the Sony MDR-7506s, which I use for monitoring during all my recording sessions. They can also be found in many pro recording studios. Get the Sony MDR-7506 headphones from Amazon here.
General-purpose microphone: You can’t go wrong with a good ol’ Shure SM-57, one of the most versatile and ubiquitous microphones around. I’ve been using one in my home studio for as long as I can remember. Amazon offers the Shure SM-57 for a very competitive price.
To see all of my most up-to-date recommendations, check out this resource I made for you!