DISCLOSURE: This post contains affiliate links. If you buy through these links, I may earn a small commission.
When recording songs in our home studios, it can be easy to get overwhelmed and paralyzed by even the simplest of decisions. For example, when faced with recording several tracks for a song, what should you record first?
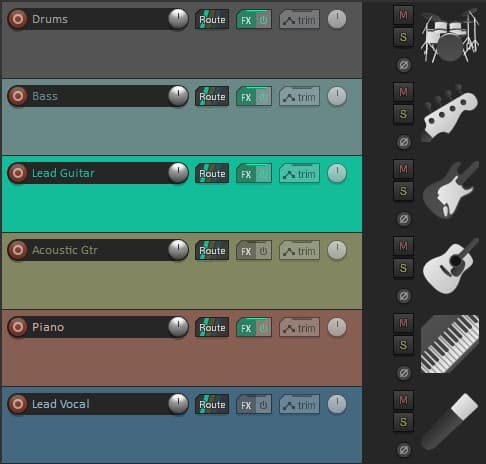
As a general rule, you should record rhythm tracks first in a song. This gives a solid foundation for other instruments to follow and build on top of. Start with drums, whether they are real instruments, programmed or loops. Then record the bass, which completes the rhythm section with the drums.
I find it helps greatly to have a system i.e. an order of recording instruments in mind before I start the recording process. This way, I always have a starting point to fall back on even if I am otherwise unsure of the order to record my tracks in. Read on to discover what you should record first, and the factors that may influence that decision.
This site is all about creating music in your own home. If you’re new to home music-making, you may be wondering exactly what a “home music studio” is. That’s why I wrote my “What is a home recording studio” beginners’ guide, for people just like you!
If you are interested in checking out the best recording gear such as audio interfaces, studio monitor speakers, microphones, etc., you can find them at Amazon by clicking here.

Why you should record rhythm tracks first
Generally, you should start with rhythmic tracks first. Typically the drum track is the most obvious one to record first. This could be real acoustic drums, programmed drums, drum loops, a drum machine, etc.
It could also be more unusual rhythmic instruments such as percussion, hand claps, snapping fingers, foot-stamping, percussive noises on an acoustic guitar e.g. slapping the body, muted string strums with pick, etc.
Having said that, there is no absolute right or wrong answer to which track you should record first. This article is a guide. It may be that in one particular song, it makes sense to do it a different way – that’s fine. Go with your gut – whatever you think will work best, is “right” for you.
We will be talking about “tracks” a lot in this article. If you are unsure of exactly what a track is, then definitely check out this article detailing exactly what tracks are, what you can do with them, and how to use them.
There are several reasons to lay down the main rhythm track first…
Rhythm track gives timing and feel for other tracks
Having a rhythmic source helps you keep time when recording the other tracks in your song. Now you may be saying “but a click track could do that just as well”. And that’s a fair point – a click track is great for keeping everyone in time. Click tracks can also be useful if there are sections in the song where there are no drums e.g. in a breakdown.
But a click track or metronome is rather sterile to play against. Something just going “click-click-click” is never going to be as interesting as playing along to a drum track. A drum track can also help give you the feel/groove for the track. This can improve the performances when recording the other instruments, as the musicians have more of an idea of where the song is heading and can adjust accordingly.
Get the timing right when recording
Timing is extremely important when recording a song. Nothing suggests “amateur” more than obvious timing errors in a song; it makes your song sound sloppy and gives an impression of being unfinished. Giving all the other tracks a solid, common, rhythmic base to work to can help enormously in eliminating these errors. It also helps get the other tracks recorded in time with a similar feel.
You could argue these days that you can fix timing errors manually post-recording, when editing your tracks. I hate doing this! I think it leads to an unnatural-sounding song, as if all the parts were played by a robot.
My advice would be to use editing to fix timing sparingly; get it as close to right when recording as you possibly can. Having a drum track recorded first should help with this.
Minor “errors” in timing are part of what makes music played by a human being sound “human”, so you should only eliminate the most obvious jarring ones. Now of course this does depend on the style of music. For example, certain genres of electronic dance music may be going for an artificial robotic sound deliberately. This is an artistic choice, and having a drum track recorded first will still help with the timing when recording other tracks.
Record a rhythm track even if your song has no drums
Supposing your song has no drum track e.g. it has a simple arrangement with 2 acoustic guitars, a piano and a lead vocal?
Recording a rhythm track can still be useful here, even if the intention is to throw it away once everything else has been recorded. Of course, you could use a click track. This is fine for a source of timing, but suffers from the issue already mentioned of being uninteresting to play against and giving no feel or groove to the song.
Instead, you could create a percussive rhythm track to fit with your song. In the acoustic arrangement example above, you could record some muted acoustic guitar string hits with a pick. This would allow you to give some feel/groove to the song, put accents where you think they should go, and define the main rhythm of the song.
This can help inform the other instrument tracks on how to play when it comes to recording time. You can then discard the rhythm track once the other tracks are done.
If you are completely new to home recording, I highly recommend you check out my beginner’s guide to recording music at home. A huge amount of work has gone into this guide! It is a complete resource to take you from never having recorded before all the way through to making your first home recording.
Bass is often considered a rhythm track

Drums and bass combined are often referred to as the “rhythm section” in a band or song. There is good reason for this; bass lines often have just as much influence over the overall feel and groove of a song as the drums.
So the bass should probably be the next track to record after the drum track. This will complete the feel/groove for the song, and give a solid low end to build everything else on top of.
Having said that, it can sometimes make sense to record the rhythm guitars next instead. This can be especially useful if the bass line is not fully formed yet, and you want the bassist to work to the guitars as well as the drums.
A good audio interface is essential for doing any sort of home recording. My personal choice is the Focusrite Scarlett series. I have been using these for years, and they give great sounding recordings for not very much money. You can buy the Focusrite Solo from Amazon (affiliate link) for a very reasonable price.
What should I record next after the rhythm tracks?
In general, you can think of the order in which to record your tracks in three stages…
- Rhythm
- Harmony
- Melody
When recording your tracks, especially when using a microphone, it’s important to choose a location that will give you the best audio quality and not hinder your workflow. That’s why I wrote my article on where is the best place to record in your home, which is essential reading before you start recording. It will help you select the best room and location in that room that will give you the best possible results.
Recording harmony tracks after the rhythm tracks
We have already covered recording the rhythm tracks. The “harmony” tracks in the second stage includes things like rhythm guitars, synths, pianos, organs, etc. Anything that you can play chords on that forms part of providing the chord structure of the song can be recorded at this stage.
The actual order of recording the harmony instruments is not that important, and will depend on your particular song. For example, if your song is mainly piano-based, then you should probably record the piano part first so the other instruments can play to it.
These harmony tracks will be extremely helpful for the melody instruments to sit on top of later. They help vocalists and lead instrumentalists understand the harmonic structure and chord progressions. They also help keep them in tune! In addition, they help give the singer the feeling of playing with a band, which in turn can help add character to their performance.
Recording melody tracks after the harmony tracks
The third and final stage is to record the melody parts. Most obviously, this will be your lead vocal track, but could also include things like a guitar solo, or perhaps some saxophone counter melodies in a verse, etc.
It is important to have most of the song already there when recording the lead vocal. This gives the singer the best chance of giving their very best performance suited to the song. It will be like singing with a band, which can be very helpful in setting an atmosphere to help produce a singer’s best work.
The one exception to this order is backing vocals. Although they are part of the “harmony” of the song, typically I leave backing vocals till last, after the lead vocal has been recorded. This gives a “target” to harmonize against. I find doing it this way leads to finding the best harmonies, and lets you match the feel and timing to the lead vocal recording.
To get great vocal takes, the singer needs to be able to hear themselves clearly. A good pair of closed-back studio headphones are essential for this. I highly recommend the Sony MDR-7506 headphones (affiliate link), available from Amazon for a great price. These are the headphones I use in my home studio for all my recording activities.
Recording scratch or guide tracks first
You don’t have to go straight into recording the actual takes you will use in your finished song. You can instead record scratch or guide tracks first.
These are tracks that are sort of “draft” versions of the tracks you will record, that you will ultimately throw away as they will be replaced with the real recordings later. The idea is that they act as a guide for the musicians to inform what they play when they come to record the “proper” track.
Scratch tracks should be recorded quickly. You shouldn’t worry about making a mistake-free performance, or getting the right sound, etc. They could also be a much simpler arrangement than the track in the final song, e.g…
- Guide tracks could be vocal, acoustic guitar and click track
- Final song could be a full band arrangement with drums, bass, guitars, piano, lead & backing vocals
Use scratch tracks as a guide for yourself or another musician to record the actual take later on. They can be great to use if the song is in mid-development and not fully fleshed out yet. This is quite a common way of working – there is no clear dividing line between the writing and recording of a song, and writing quite often continues during the recording process.
Scratch tracks are also great for teaching someone else the part you want them to play. For example, imagine you have written a song with a guitar part in it, but you can only play keyboards. You could record an approximation of the guitar part on the keyboard as a scratch track. You could then give this to your guitar player for them to learn the part, and play along to when they record the proper guitar track.
Similarly, a fairly common thing to do is record a vocal melody scratch track on an instrument e.g. piano, guitar. This gives a guide to the singer as to what the tune and timing of the vocal melody is. They can sing along to it when recording the lead vocal track helping them to keep in tune and to remember the melody line.
I’ll give one more example; using a programmed drums scratch track as a guide for a drummer to use when recording a real acoustic drums track. I have worked this way myself, and found it to be a very effective way of working.
When I worked in this way, I made it clear to the drummer that my programmed scratch track was only a guide, and that they were free to put their own spin on it. I’m not a drummer, so for all I know I may have programmed something that is actually impossible to play on the drums without 3 arms!
In general, scratch tracks also give you an idea of what the song is developing into; the feel, emotion, dynamics, etc. This allows the musicians recording the “real” tracks later to tailor their performances a certain way, in keeping with the character of the song.
What to record first with a band vs solo musician
The decision of what to record first may change depending on whether you are playing all the parts yourself, or you are recording a band with several musicians each playing a different part.
With a band, you have the option of taking a live “on-the-floor” approach. This means recording the band all playing the song together and recording several tracks at once, not each track separately one after the other. This is how all recordings used to be done many decades ago. This gives you the feel of a band playing together, with the musicians reacting to and bouncing off each other.
There is also the option of a hybrid approach, where you record some tracks live then overdub other tracks later. For example record bass, drums and rhythm guitars live together, then record the lead vocal separately later.
If you are going to take this approach, I would advise quickly recording scratch tracks first. The band can then use these as a guide to play live over the top of them.
In a home studio, you are going to be limited in what you can do with the “live” approach to recording. Limitations you may encounter are…
- physical space limitations
- not enough cables
- not enough microphones (DI everything you can to prevent bleed)
- not enough headphones for monitoring
Plan your session carefully, and make sure you know how you are going to record each instrument and have the necessary equipment available beforehand.
As you can probably imagine, recording many tracks can be a very time-consuming process. You may be wondering just how long it could take you. That’s why I wrote my “how long does it take to record a song” article. Obviously, the answer to this massively varies from song to song. However, the article will give you a good idea of the length of time needed for different situations, allowing you to better plan your recording sessions.
What to do after recording
After all your recording is finished, you will typically move on to the following activities…
- Editing – this is polishing your tracks. This could involve chopping out unused sections from a track, re-arranging parts, duplicating (copy-pasting) parts, adding fade outs/ins, fixing timing errors, etc.
- Mixing – this is essentially balancing the volumes of all your tracks so that they sound good together. Mixing can be a very complicated and confusing activity. To help you understand the process, I have written a beginners guide to mixing in general. I highly recommended you check it out if you are new to mixing.
Maybe you are even working with someone else on your music, and you need to send your tracks to them. If so, I highly recommend reading my article on consolidating your tracks. This is a vital process to perform on your tracks when working with someone else, especially if they are using a different DAW to you.
Here is some of my favorite home studio gear…
Thanks for reading this article. I hope you found it helpful in your home music-making activities. Here are a few of the tools that I personally use in my home studio. These are affiliate links, so if you decide to use any of them I’ll earn a small commission.
Audio interface: My personal choice for audio interfaces are the Focusrite Scarlett series. I have been using these for years, and they have always given me great-sounding recordings. For a very reasonable price from Amazon you can buy the excellent Focusrite Scarlett 4i4, or if you don’t need MIDI capability the Focusrite Solo is a great choice.
Amp sim: Guitar amplifier simulator software has come on leaps and bounds in recent years, such that I record all my electric guitar parts using amp sims these days. One of the very best is the incredible Amplitube from IK Multimedia, which I have used on many of my songs.
Headphones for recording: My favorite headphones for recording are the Sony MDR-7506s, which I use for monitoring during all my recording sessions. They can also be found in many pro recording studios. Get the Sony MDR-7506 headphones from Amazon here.
General-purpose microphone: You can’t go wrong with a good ol’ Shure SM-57, one of the most versatile and ubiquitous microphones around. I’ve been using one in my home studio for as long as I can remember. Amazon offers the Shure SM-57 for a very competitive price.
To see all of my most up-to-date recommendations, check out this resource I made for you!


