
DISCLOSURE: This post contains affiliate links. If you buy through these links, I may earn a small commission.
I have been working in some form of home recording studio for over 20 years. When I started in the 1990s, my “studio” was just a cassette-based Tascam Portastudio (remember those!?) with a cheap microphone I bought from a local consumer electronics store.
Today, my studio is based around a dedicated PC and an audio interface, set up permanently in a spare room in my house. So what exactly is a “home recording studio”?
A home recording studio is a set of equipment in a private home, for creating audio productions. It could simply be a laptop, audio interface & headphones. Or it could be a dedicated, acoustically treated room with a computer, studio monitor speakers, and other gear permanently installed.
The technology available to us has now advanced to the point where it is entirely feasible to make commercial quality recordings in our own homes, without resorting to using a professional recording studio. Read on for details on the different types of home studio, the equipment required and its associated cost.
If you are completely new to home recording, I highly recommend you check out my beginner’s guide to recording music at home. A huge amount of work has gone into this guide! It is a complete resource to take you from never having recorded before all the way through to making your first home recording.
If you are interested in checking out the best recording gear such as audio interfaces, studio monitor speakers, microphones, etc., you can find them at Amazon by clicking here.
The different types of home recording studio
There are three basic types of home recording studio…
1 Portable home studio based around a laptop
Approximate cost: $900
The first type of home studio requires only three pieces of equipment; a laptop, an audio interface and a pair of headphones. This is intended to be a fully portable setup that you could easily fit in a bag or suitcase.
The idea with this type of setup is that your “studio” could be anywhere. This could be any available room in your own house or apartment, or it could be in a hotel room halfway across the world.
This type of studio is ideal for editing, arranging and mixing tasks. These tasks can be done without making any external noise, unlike say recording loud vocals. All the sound will be in your headphones.
It’s perfectly possible to record using this setup, you just have to be mindful of where you are. e.g. I would not record vocals in a hotel room for fear of disturbing guests in the neighboring rooms. (I would also probably be too embarrassed!) Better to record purely electrical instruments in a way that makes little or no external noise e.g. keyboards or electric guitars plugged straight into the audio interface.
If you want to find out more about recording electric guitars silently, definitely check out my complete guide to recording guitar using amp sims. It takes you through exactly what equipment and software you need, and walks you step-by-step through the process.
Here’s an example equipment list for a portable home studio…
| Equipment | Purpose | Approximate cost |
|---|---|---|
| Laptop | Running your DAW software, storing your recordings & projects | $600 |
| DAW Software | Performing all your recording, mixing and production tasks | $60 |
| Audio interface | Lets you plug instruments & microphones into your computer | $120 |
| Headphones | Monitoring while recording and listening back to your songs | $100 |
| Jack cable | Lets you plugin electric instruments into your audio interface | $20 |
In the above equipment list and in the rest of this article, I have put $60 as the cost of the DAW as this is how much Reaper costs. This is my DAW of choice, and I believe it offers the best bang-for-buck out of any DAW on the market today.
2 Permanent home studio in a multi-purpose room
Approximate cost: $1200
When you have a fixed location for all your music production activities, your home studio is more of a permanent setup than the first type.
In this type of studio, you will most likely have a fixed desk or workstation with your computer (desktop or laptop) on it. Various other equipment will be permanently installed such as an audio interface, maybe studio monitor speakers, maybe some mic stands with associated microphones. Studio monitor speakers are not essential if you have a decent pair of headphones.
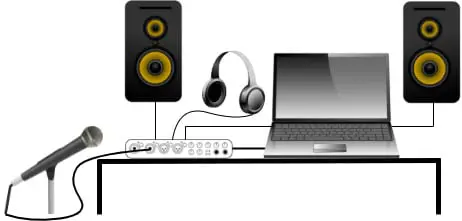
The room may still be used for other purposes i.e. it is not dedicated just to music-making. This is the type of studio that I have in my house. The computer is also used for other things, and the room is also used for watching TV/movies, playing video games, working out in and working from home.
This type of setup is much more suited to recording acoustically e.g. vocals, acoustic guitar, etc. However, I would still recommend recording electric instruments using a DI (Direct Input) wherever possible.
Here’s an example equipment list for a permanent multi-purpose room based home studio…
| Equipment | Purpose | Approx cost |
|---|---|---|
| Workstation / desk | Holds your computer, audio interface & other equipment | $150 |
| Computer | Running your DAW software, storing your recordings & projects | $600 |
| DAW Software | Performing all your recording, mixing and production tasks | $60 |
| Audio interface | Lets you plug instruments & microphones into your computer | $120 |
| Headphones | Monitoring while recording and listening back to your songs | $100 |
| Microphone | Record acoustic audio sources | $100 |
| Mic stand | Holds your microphone still and eliminates handling noise | $40 |
| Pop filter | Reduces “plosives” (unpleasant loud noise from “p” and “b” sounds) | $10 |
| Jack cable | Lets you plugin electric instruments into your audio interface | $20 |
| XLR cable | Lets you plugin microphones into your audio interface | $20 |
You may be wondering if even with all the relatively affordable technology available today, can you really make a music production comparable to a pro recording studio in your own home? If so, definitely check out my article on if you need to go to a studio to make music. It will give you an idea of what exactly is possible in a home studio today, and discusses the pros and cons of pro studio vs home studio recording.
3 Dedicated sole-purpose home studio room
Approximate cost: $2500
Now we’re getting into the big bucks!
It’s similar to the previous type of studio in that this is a permanent setup. But now we have a dedicated room that is used solely for music production activities. This could be a spare room, an attic conversion, a converted garage or a purpose-built extension.
I’ll assume the room you use has already been built. If not, that would obviously add tens of thousands of dollars to the cost e.g. if you had an extension to your house purpose-built.
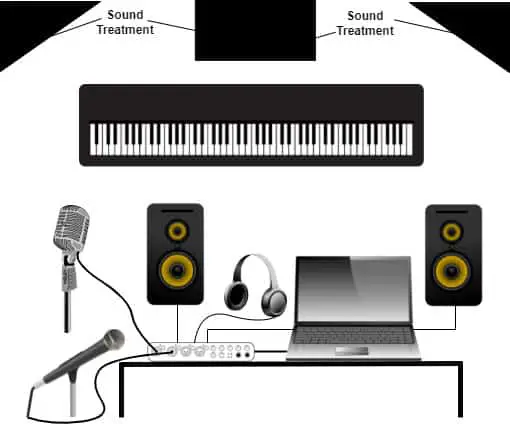
The room could (and should!) have been acoustically treated. For example, bass traps installed and reflections dampened to help the room give as flat a sound as possible. This will help prevent unwanted echo and frequency build-up, and give you the truest possible representation of your music when listening to it through speakers.
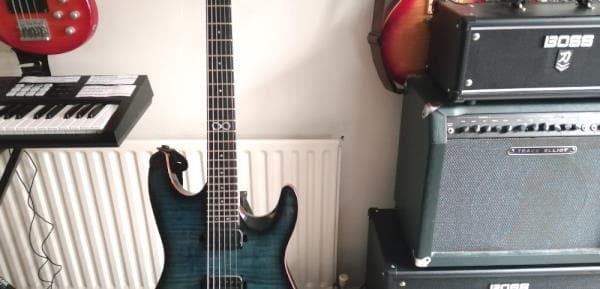
As the room is used solely for music-making, there may be many other pieces of equipment permanently installed. You could have guitar or bass amps, outboard gear such as compressors or limiters, maybe even a full drum set permanently mic’d up. You could even have a small part of the room sectioned off to act as a vocal recording booth.
It is also worth having a MIDI keyboard. Entering MIDI is such a common task, and is often easier to do on a musical keyboard, even if you are not a keyboard player.
Here’s an example equipment list for a permanent dedicated room based home studio. I have allowed for a more expensive audio interface with more inputs (including MIDI) in this type of studio…
| Equipment | Purpose | Approx cost |
|---|---|---|
| Workstation / desk | Holds your computer, audio interface & other equipment | $150 |
| Computer | Running your DAW software, storing your recordings & projects | $600 |
| DAW Software | Performing all your recording, mixing and production tasks | $60 |
| Audio interface | Lets you plug instruments & microphones into your computer | $400 |
| Headphones | Monitoring while recording and listening back to your songs | $100 |
| Studio monitor speakers | Mixing, mastering and listening back to your recordings | $400 |
| Microphones | Record acoustic audio sources | $250 |
| Mic stands | Holds your microphone still and eliminates handling noise | $80 |
| MIDI controller keyboard | Record keyboard instrument parts and other MIDI data | $200 |
| Jack cables | Lets you plugin electric instruments into your audio interface | $40 |
| XLR cables | Lets you plugin microphones into your audio interface | $40 |
| MIDI Cables | Lets you MIDI instruments into your audio interface | $40 |
| Sound treatment panels | Reduce unpleasant room reflections, echo & bass frequency build-up | $200 |
When planning a home studio, it is easy to forget to factor in the cost of cables. Do not buy cheap cables! They are a false economy. They carry the signal from one piece of equipment to another, and as such are absolutely vital to your home studio working well. Decent cables can easily add a couple of hundred dollars to the cost of your home studio.
You can build your studio gradually
You may be looking at the above studio examples, and thinking there is no way I can afford that!
But you really don’t have to. It is perfectly possible to get started with just an audio interface, a computer and a pair of headphones. The beauty of a home studio is that you can build it up gradually over a number of years.
Don’t think that you have to have lots of high-end equipment to make great-sounding music; you really don’t. Far more important to get started with a basic setup, and put the time into learning how to use your equipment and software. This time will be far the best investment you can make in improving your music productions.
It is possible to get professional results in a home studio, and the line between pro and home studio are getting more and more blurred every day. If you are having doubts about getting professional results in a home studio, check out my recording professionally at home article. It will give you tips on getting the very best results possible from your home studio setup.
The key components of a home recording studio
There are a few key components common to all types of home studio. These are needed whether it’s a simple portable setup based around a laptop, right up to a dedicated specialist whole room.
You are going to need to decide where to put this equipment. This article – Where is the best place to record at home? – can help you with that. It will walk you through all the issues you should consider, and help you find the location in your home that should give you the best recordings.
A computer is at the center of your home studio
A computer running music recording software is the key component of a home studio, and will form the centerpiece of all your music-making activities.
A few years ago, you would have needed a high-end or specialist music computer to run music recording software effectively. That is no longer the case today. Any off-the-shelf PC costing more than about $500 should be sufficient to get you started with home music production.
Either a PC or a Mac will be fine. Don’t listen to the fanboys or the haters. I have had a PC-based home studio for decades and continue to today; it works great and I am very happy with it. I also have friends using Macs as the heart of their home studios, and they swear by them.
I suggest if anyone tries to get you into the PC vs Mac argument, smile politely and slowly back away towards the nearest exit…
There are alternatives to using a computer in a home studio such as multitrack digital recorders. Do yourself a favor though – just use a computer and DAW (Digital Audio Workstation) software. The versatility and ease of use will both help you learn quickly and let you progress and expand far more easily.
So what’s this DAW software I keep mentioning all about then…?
What software do you need for a home studio?
The main piece of software you will need to run on your computer is called Digital Audio Workstation (DAW) software.
I like to think of a DAW as a recording studio in software. Think of something you might do in a pro recording studio, and you can probably do it in a DAW on your computer. DAWs allow you to…
- Record one instrument (e.g. guitar, piano, drums, human voice, etc)
- Record multiple instruments at the same time
- Record another instrument while listening to one you have already recorded (overdubs)
- Edit your recordings
- Mix the different tracks you have recorded together, changing each of their volumes
- Apply effects such as reverb, compression, EQ, etc.
- Accept “plugins” (other audio software) to add software instruments and more effects
- Export your song to various different file formats (e.g. wav, flac, mp3, aiff, ogg vorbis, etc).
That is just a tiny summary of what DAWs can do. For more information, I highly recommend taking a look at my “what is music recording software” article. It goes into a lot more depth on the capabilities and uses of DAW software. It also gives details of the many free and paid DAWs available today.
Sometimes you don’t need a full DAW; simple audio editing and recording software is enough. Audacity is one of these applications and is completely free. Check out this article for a beginner’s introduction to Audacity. If you need help getting audio to play in Audacity, my article on reasons why Audacity might not be playing should help you to track down and fix the issue.
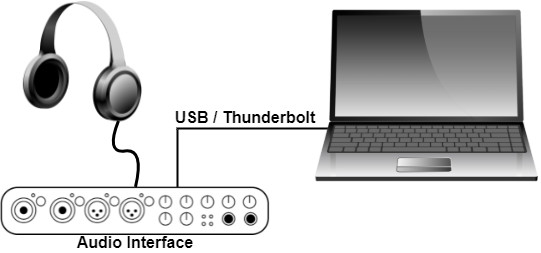
An audio interface
An audio interface is required to connect whatever you are recording to your computer.
This might be a microphone if you are recording something acoustically, e.g. a vocal or an acoustic guitar.
Or it might be a so-called D.I. (Direct input). This is where you connect a musical instrument such as an electric guitar or a keyboard directly to the interface with a cable, recording the direct electrical signal rather than the acoustic sound.
Audio interfaces have 1 or more inputs. These are usually either XLR inputs for microphones, or jack inputs for instruments. They have outputs for headphones and speakers to monitor and listen back to your recordings. They connect to your computer via USB or Thunderbolt.
You may be thinking….my computer has a mic input, why can’t I just connect a microphone to that? Well, you can, but you won’t get very good results. Those mic inputs are not designed for the kind of high fidelity audio processing that dedicated audio interfaces are.
Just get an audio interface. You can pick up an excellent one for about $100 these days, and it will be well worth the money.
My personal choice for audio interfaces are the Focusrite Scarlett series. I have been using these for years, including recording 3 commercially released EPs using them. You can buy the Focusrite Solo from zZounds.com (affiliate link) for a very reasonable price.
Headphones/studio monitor speakers
Obviously, you will need to get the audio you have recorded or created from your computer into your ears. You can do this with either headphones or studio monitor speakers.
Headphones
I would advise prioritizing getting headphones over studio monitor speakers. This is because when you record audio acoustically, you need to listen to what you have already recorded or a click track to keep you in time. This is called monitoring. If you used speakers, then sound from the speakers would go into the microphone when recording.
Much better to use headphones, where the recorded sound goes directly into your ears and doesn’t leak into the microphone and onto another track. This way you keep all your tracks clean and isolated.
A good pair of closed-back studio headphones are essential for this. I highly recommend the Sony MDR-7506 headphones (affiliate link), available from zZounds.com for a great price. These are the headphones I use in my home studio for all my recording activities.
Studio monitor speakers
You may be wondering if you can just use standard consumer stereo or hi-fi speakers. I wouldn’t advise this, as those are designed to “enhance” sound. Another way of saying this, is that those speakers “lie” to you! A common example is that bass is often artificially increased in consumer speakers.
When you are making your own music, you want your speakers to present the music to you without any artificial enhancement i.e. give it to you exactly as it sounds. Studio monitor speakers are designed to do this; they give you a so-called flat frequency response. This lets you make better mixing and creative decisions, as you are hearing your music untampered with.
I highly recommend the Kali LP-6 Monitor Speakers (affiliate link) available from Amazon a very competitive price. These are great value speakers, which excellent clarity and detail for their price range. N.B: link is for one speaker.
Microphone
It may surprise you to know that a microphone is not essential for a home studio! If you are only recording electric instruments such as electric guitars and basses, MIDI keyboards, digital pianos, etc. I would recommend you plug these directly into your audio interface to record them.
Microphones are only required if you are going to record something acoustically. Obviously, the only way to record vocals is by using a microphone. The same can be said for…
- acoustic guitars
- wind instruments such as trumpet, flute, saxophone, clarinet, etc,
- string instruments like violins, violas, cellos, etc.
Fortunately, there are many excellent microphones available for not much money. I recommend two different microphones for beginners (zZounds.com affiliate links)…
- Shure SM57 – this is a studio standard dynamic microphone, suitable for recording just about anything
- Rode NT1-A – this is a condenser microphone, particularly suitable for vocals and acoustic guitars
The different types of home studio projects
There are several different ways to make music in a home studio…
1 No recording projects
You do not have to record anything to make a piece of music!
That might sound odd, but you really don’t have to. There are so many loops and samples available for you to download today, both free and paid-for, that you really can create whole music productions without recording anything at all.
Just be very careful to check the licensing on any loops you download, to make sure you have the rights to use them in your own music.
2 Recording without microphones
Electric instruments such as electric guitars & basses, keyboards, even electric violins can be recorded without using any microphones.
To do this, you plug the instrument directly into the audio interface. This is called a DI (Direct Input) This could be with a jack cable for an electric guitar, an XLR cable for a microphone or via MIDI for a keyboard.
The great advantage of this way of recording, is that there is no background noise recorded up as there would be with a microphone. So if there is heavy traffic outside, or someone is watching TV loudly in the next room, it doesn’t matter. Your recording session can proceed without any problem.
When you have a lot of tracks, as you can imagine the whole process can be very time-consuming. Check out my article on how long it takes to record a song to get an idea of roughly how long you can expect different types of song projects to take. This should help you better plan your recording sessions.
3 Traditional microphone based recording
This is what people probably think of when you mention recording music. Put a microphone in front of anything, and you can record it.
There are things that can only be recorded this way, such as vocals or acoustic guitars. You have to be careful with how you set up your room and microphone positions to get the best sound possible. It can take a lot of time and experimentation to get this right.
Now of course you can combine the above types of project. Most home studio projects usually are a combination of all three of the above. For example in my music productions I often…
- use loops for drums
- record electric guitars/basses via a DI
- record keyboards via MIDI
- record vocals and acoustic guitars acoustically with a microphone
When you have many tracks, it’s always a challenge to decide in what order to record them. That’s why I wrote my “what to record first” article. I recommend you read it to help you understand common track recording orders, and to help find a method that will work for you.
Activities performed in a home recording studio
There are many activities performed in your home recording studio to create your music productions. Despite the name, it is not just recording that is involved in creating your songs.
All of the following activities form an important part of the music production process…
- Multi-track recording, including…
- Audio
- MIDI
- Arranging
- Editing
- Mixing, including…
- Gain staging
- Balancing levels
- EQing
- Compression
- Effects
- Mastering
You might also be collaborating with someone else, who is working in their home studio. If so, you are probably going to be sending tracks to each other. In that case, you should definitely read my consolidating tracks article. Consolidation is a vital process to perform before you send tracks to someone else, especially if they are using a different DAW to you.
Here is some of my favorite home studio gear…
Thanks for reading this article. I hope you found it helpful in your home music-making activities. Here are a few of the tools that I personally use in my home studio. These are affiliate links, so if you decide to use any of them I’ll earn a small commission.
Audio interface: My personal choice for audio interfaces are the Focusrite Scarlett series. I have been using these for years, and they have always given me great-sounding recordings. For a very reasonable price from Amazon you can buy the excellent Focusrite Scarlett 4i4, or if you don’t need MIDI capability the Focusrite Solo is a great choice.
Amp sim: Guitar amplifier simulator software has come on leaps and bounds in recent years, such that I record all my electric guitar parts using amp sims these days. One of the very best is the incredible Amplitube from IK Multimedia, which I have used on many of my songs.
Headphones for recording: My favorite headphones for recording are the Sony MDR-7506s, which I use for monitoring during all my recording sessions. They can also be found in many pro recording studios. Get the Sony MDR-7506 headphones from Amazon here.
General-purpose microphone: You can’t go wrong with a good ol’ Shure SM-57, one of the most versatile and ubiquitous microphones around. I’ve been using one in my home studio for as long as I can remember. Amazon offers the Shure SM-57 for a very competitive price.
To see all of my most up-to-date recommendations, check out this resource I made for you!
