
DISCLOSURE: This post contains affiliate links. If you buy through these links, I may earn a small commission.
With the technology, software and equipment available to us today relatively inexpensively, it is entirely possible to make professional recordings in your own home.
It isn’t just a case of throwing up a microphone and pressing record though! Your home has not been specially designed for audio recording like a home studio has. This means you have to take a few more steps than you would in a pro studio to set-up your room for recording.
Combined with selecting the right equipment and approaching the recording with a professional attitude, there is no reason why you cannot produce a professional-sounding recording, wherever your room may be.
Read on to discover 9 tips that will help you get that pro sound in your home.
This site is all about creating music in your own home. If you are novice at home recording, I wrote my how to record music at home beginners’ guide just for you! Check it out; you’ll learn how to set up a home studio, what you can do in it and you’ll be walked through making your very first recording.
If you are interested in checking out the best recording gear such as audio interfaces, studio monitor speakers, microphones, etc., you can find them at Amazon by clicking here.
1 Setup your environment to reduce reflections
A large factor in the quality of the recording you can obtain through a microphone, is the environment you record in. This is because the mic does not just capture the sound going straight from your recording source into the microphone. Sound is omnidirectional (i.e. travels out in all directions), so you will also get reflections from walls, windows, doors and other hard surfaces, where the sound hits the surface then travels back into the mic.
Why is this a problem? These reflections can build on each other, causing unpleasant frequencies to add up potentially ruining the sound of the main recording source, whether that is a human voice, acoustic guitar or whatever. Ideally, we want to eliminate these reflections as much as possible.
Pro studios have rooms specially designed to reduce reflections, with acoustic treatment, vocal booths, bass traps, etc. Our home studios don’t have the same luxury in the multi-purpose rooms we use for recording. But there are things we can do that will go a long way to massively reduce the audio reflections in our rooms…
Place soft furnishings around your room
Hard surfaces reflect sound, whereas soft surfaces absorb sound. Therefore one of the best ways to reduce reflections in your recording room is to strategically place soft furnishings and other items around your room. For example…
- Carpets/rugs – a carpeted room will absorb more reflections than a room with a hard floor. If you don’t have a carpet, a large, thick rug will help absorb some of the sound.
- Curtains/drapes – close the curtains when recording. This will stop the sound hitting the hard window surface and reflecting back. The thicker the curtains, the better.
- Small soft items – things like duvets, blankets, big winter coats, cushions, etc. placed in front of hard surfaces or in corners can go a long way to reducing unwanted reflections. Experiment with the placement that makes the biggest difference in your room to find the best locations.
- Soft items behind the singer’s head – if you are only going to put soft items in one place in your room, I would suggest that should be behind where the singer’s head will be when recording vocals. A big sound absorbing item such as a duvet will help a lot with keeping the vocal recording clean and clear.
Position recording sources away from hard surfaces
Whether you are recording a singer or an instrumentalist, positioning them away from hard surfaces can help a lot with avoiding unwanted reflections. Try these suggestions…
- Move away from walls, windows, doors, etc – don’t position your recording source (singer, guitarist, etc) with their back right up against a wall or hard surface. I appreciate there could be an issue with space especially in a small room, but do your best with the space available.
- Avoid the center of the room – The center of the room is where the reflections combine the most, particularly in a square room. This is because the distance from the wall to the left is the same as the wall to the right, so the reflections arrive back from each wall at exactly the same time.
- Angle away from walls – If you stand at an angle to a wall rather than face on to it, the reflections will be deflected away from you rather than coming straight back. This can help reduce the amplitude of those reflections when they eventually arrive back at the microphone.
- Experiment with mic position – no two rooms are the same; spend some time finding the optimum position in your room. Time taken to make test recordings to try to find the best recording position is rarely wasted.
Following these steps to set-up your room to reduce reflections can go a long way in helping to obtain a professional-sounding recording.
For more detail on the best location to record in your home and how to set-up your room for optimal audio performance, I highly recommend you read the following two articles of mine…
2 Reduce background noise
Background noise can be a big problem in a home studio. Your fantastic vocal take can easily be ruined by traffic noise, someone using a vacuum cleaner, people talking loudly in a nearby room, a loud fan in a computer, etc. I’m sure you can think of a few more that have messed up your own recordings!
Try the following tips to reduce background noise in your room…
- Use a cardioid mic – a cardioid mic (such as most dynamic microphones) rejects most sound from behind it and only picks up sound from in front of it. You can use this to your advantage. For example, if you have a loud computer in your recording room, point the back of the microphone at the computer. This should minimize the amount of computer noise that makes it onto your recording
- Eliminate sources of buzzing – removing background noise sources from your room is better than trying to reduce their effects. Turn off all electrical devices in your room that you don’t need for recording. All electrical equipment produces some noise, so minimizing the amount of these sources can really help.
- Pick a quiet time – this may seem blindingly obvious, but picking a quiet time to record when background noise is at a minimum will hugely help. Listen out day-to-day in your room and build up a picture of when the best recording times are likely to be. And also…
- Negotiate a recording time with the household – ask other members of your household if you can arrange a time with them when you agree the house/apartment will be quiet. A bit of give-and-take here is important. Much better to negotiate this calmy, rather than get angry when you try to record at a time when the house is noisy.
It’s obviously much easier to control background noise in a professional recording studio than it is in a home studio. You might be wondering if you really need to buy time in a pro studio to get great recordings. If so, check out this article on if you need to go to a pro studio to make music. It examines what you can realistically do in a home studio, and should put your mind at ease.
3 Use good quality equipment
Pro recording studios often have access to very high-end equipment, often costing many thousands of dollars.
Fortunately, you do not have to use such expensive gear to get professional-sounding recordings. There is a lot of excellent equipment available for much less money, often using some of the same components that can be found in the more expensive gear.
Exactly what gear you need will depend on exactly what you are recording, but there are three items that will be common to pretty much all recording situations: an audio interface, a microphone and a pair of headphones…
Audio interface
The audio interface is the piece of equipment responsible for getting the audio from your recording source into your computer, which is obviously a vital task. There are many great audio interfaces available today for not a lot of money.
My favorites are the Focusrite Scarlett series, which I have been using for many years. I have recorded 3 commercially released EPs using them. I personally recommend these two interfaces, both available from Amazom.com (affiliate links) for very competitive prices…
- Focusrite Scarlett 4i4 (has MIDI inputs & outputs)
- Focusrite Scarlett Solo (if you don’t need MIDI functionality)
These interfaces actually use some of the same components (e.g. the Analog to Digital converter chips) found in much higher-end gear, so they can give you similar results to interfaces costing a lot more.
Microphone
As I’m sure you know, the microphone is the thing responsible for converting the sound you are recording into an electrical signal. This is the first step in the recording equipment chain, and obviously a crucial one. Much like audio interfaces, there are several excellent options for home studios available relatively inexpensively.
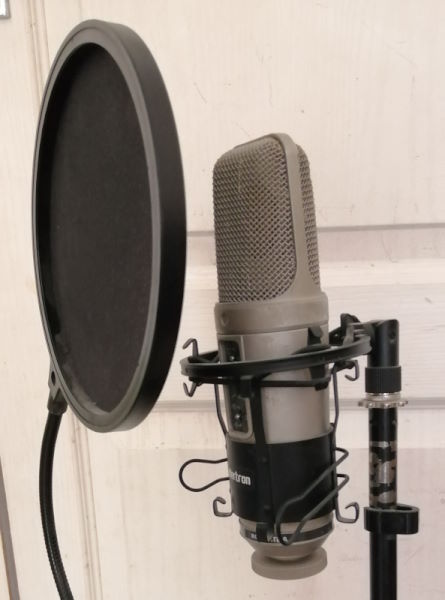
There are 2 types of microphone I recommend for a home studio; a dynamic microphone and a large-diaphragm condenser (LDC) microphone. Each has slightly different strengths…
- A dynamic microphone is a great all-rounder, suited to mic’ing up guitar amps, acoustic guitars and vocals. They cope very well with loud sound sources. The one I recommend is the industry-standard Shure SM57 (affiliate link), available from Amazon.com for a great price. I have been using one in my home studio for as long as I can remember.
- A large-diaphragm condenser mic is famed for producing a clear, crisp sound with a distinctive high-end sparkle. They are particularly good on vocals and acoustic guitars, and are great for capturing quieter sounds. For a starter LDC mic I recommend the Rode NT1-A package from Amazon.com, which includes a shock-mount and a pop-filter, both vital for recording vocals well.
If you can afford it, I would recommend getting both a dynamic and an LDC microphone. Then you can try for yourself which one works better in any particular recording situation in your home studio. If you can only afford one, then I would recommend starting with a dynamic microphone.
If you’re interested in the pros and cons of dynamic vs condenser microphones, I highly recommend you read my article on which type of microphone to choose for a home studio.
Headphones
One often overlooked aspect of recording is the ability to hear yourself clearly. If you are struggling to hear yourself, it will be very difficult to judge the quality of the performance you are capturing. You may end up with a take that is out of tune, contains timing errors, or is just generally sloppy.
Listening to a performance whilst it is being recorded is called monitoring. The best type of headphones for monitoring are closed-back headphones. This means that the cups that fit completely cover your ears, and very little sound leaks out of them. For monitoring this is perfect, as it means no sound will leak out of the headphones back into the microphone, potentially spoiling our recording.
My favorite headphones for monitoring are the Sony MDR-7506s, which I have been using in my home studio for many years. You will usually find a pair or two of these in most pro recording studios. You can buy Sony MDR-7506 headphones from Amazon.com (affiliate link) for a great price.
4 Use best practice mic and recording techniques
There are certain tried-and-tested best-practice recording techniques that you can use whatever environment you are in. These work equally well in a home studio as in a pro studio, and each one contributes a small part in obtaining a professional sounding recording.
- Optimum distance from the microphone – a common mistake from novices when recording is to put the microphone too close to the sound source. This can over-emphasize the bass frequencies, and result in a too-loud recording that distorts and clips. A good rule of thumb is to start with the mic about 12″/30cm away from the audio source.
- Use a pop filter on vocals – a pop filter placed in front of a microphone reduces plosives; these are “p” and “b” sounds that produce a rapid rush of air into the microphone that can ruin an otherwise excellent vocal take. This Gator pop filter from zzounds.com is ideal for a home studio; inexpensive and with a C-clamp to attach it to pretty much any mic stand.
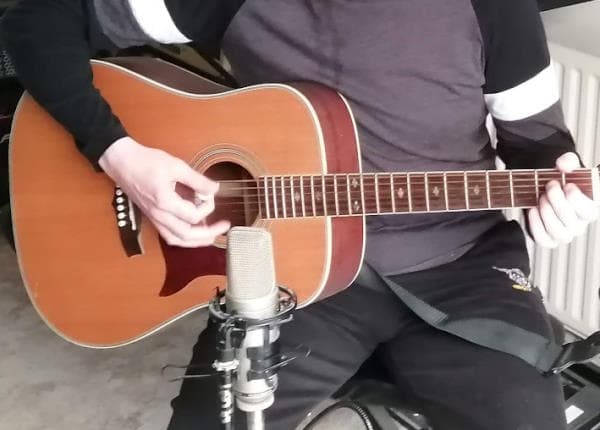
- Angle the microphone on acoustic guitar – microphones pointed directly at an acoustic guitar’s soundhole can result in an overly boomy sound. Keep the mic in front of the soundhole, but angle it to point towards round about the 12th fret. This can help add a bit of high-end sparkle and reduce overpowering bass frequencies from the guitar.
- Recording levels: don’t record too loud – with the digital recording equipment we all have these days, there is no need to record as loud as possible. In fact doing that will likely destroy your recording. As a general rule, aim to peak at no more than about -12dB, or about ⅔ up the meter. This article of mine on setting guitar recording levels is highly recommended reading, and is also applicable to other recording sources, not just guitars.
- Don’t record real drums! – recording real acoustic drums well is really difficult. My advice is that unless you really know what you are doing and have almost a semi-pro recording setup in your home studio, don’t use real drums. The quality of software such as Superior Drummer is so good these days, that I would highly recommend such software instead.
It’s always a challenge to try and decide the order in which to record your tracks. Check out this article on which track to record first for help deciding on an order that works for you, factors affecting track recording order, and common recording orders often used by others.
5 Record using DI’s wherever possible
One sure-fire way to stop the acoustics of your room negatively affecting your recorded sound, is to remove the room from your recordings completely! You can do this by recording using D.I.‘s (Direct Input). This immediately 100% removes any chance of reflections and background noise making it onto your recordings.
For example, the traditional method of recording an electric guitar is to put a microphone in front of a guitar amp. Instead, you can plug the jack cable from your guitar directly into your audio interface. And instead of a real amp you can use an amp sim (software guitar amplifier simulator) to get the guitar tones you need.
For more details on this method of recording electric guitars, I highly recommend you read my Complete Guide To Recording Guitar With Amp Sims article.
The 2 amp sims I personally recommend are BIAS FX 2 and Amplitube 5 (both affiliate links). I have recorded with both, and they are excellent modern alternatives to using real guitar amps.
This method of recording can also be used very effectively with keyboards, where you have the option of recording either using audio or using MIDI.
There is no way to DI vocals, so to record singers you’re stuck with the traditional microphone method. At least until someone invents a way of plugging a human being directly into an audio interface 😉
Recording using DI’s is also a great way of decreasing the amount of time spent setting up for your recordings. See this article on how long it takes to record a song for general ideas on the length of time you can expect your recordings to take. This should help you better plan your recording sessions.
6 Adopt a professional attitude
The one thing you can do in your home studio exactly the same as in a pro recording studio, is to approach your recording with a professional attitude. This can take many forms, but the following suggestions will all contribute to having the mindset of producing the best possible recordings you can…
- Record multiple takes – If a take has an error or mistake; re-record it! Don’t settle for a sub-par or sloppy performance. You don’t have to aim for perfection, but you do have to aim for good-enough.
- Comp between multiple takes – When you have multiple takes, you have the option of comping between them i.e. selecting the best sections from several different takes and combining them to make one super-take.
- Double tracking – multiple takes also allows double tracking (or even treble or quadruple tracking). This can also add a layer of professionalism to your song, making your vocal or guitar tracks sound bigger and more consistent.
- Tune-up before every take! – Yes, I said before every single take! There is nothing worse than recording a great performance, then realizing that your instrument was out of tune and having to do it all again.
- Ensure instruments are well-maintained – change guitar strings before a session for example, ensure the guitar is well intonated, make sure electrics are working and there are no loose connections, etc. This also includes the human voice, which is a musical instrument. Singers; don’t go out and get drunk the night before a vocal recording session; prepare and take care of your voice just like you would any other instrument
- Take regular breaks – musicians are human beings, and as such get tired. They will not perform at their best when tired. There is an old saying in recording – “the best takes are just after breaks”.
Part of that professional approach may well be to collaborate with other people. This could very well involve sending tracks to other people in their home studios. If you plan on working this way, definitely check out my article on consolidating tracks. This is a vital process to perform on your tracks when working with someone else, especially if they are using a different DAW to you.
7 Don’t be afraid of editing to improve a recording
Ideally, you want to record the best performance possible. With any luck, that recording will require no editing or changes in any way.
Here in the real world, don’t be afraid of editing post-recording to make things that little bit better. If you have a great take, but there is a slight timing error on a couple of the notes, then don’t be afraid of moving those notes in your DAW to correct the timing.
Similarly, it is ok to use pitch correction tools such as AutoTune to fix the occasional out-of-tune note in a vocal track. I am not one of those people who demands that you must never use such tools. Sure, get the original take as good as possible. But if a vocal track sounds great with fantastic energy and vibe, but there are just a few pitchy notes, I think it is absolutely fine to fix those notes using a software tool.
8 Mixing environment is also important
Once you have recorded all your tracks, you will move onto the mixing stage. Do not move onto this stage if you are not happy with your recordings. The “fix it in the mix” myth is just that – a myth. Mixing can make your song sound great, but only if you are working with good recordings. So don’t be afraid to go back and re-record tracks you are not happy with.
Your mixing environment is just as important as your recording environment. You have 2 choices when it comes to mixing – use studio reference monitor speakers, or open-back studio reference headphones.
The best mixing environment is to use monitor speakers in a room specially treated for sound. This is what you would typically find in a pro recording studio. As we do not have that sort of setup in our homes, I actually recommend using a good-quality pair of open-back reference headphones to mix on at home. Headphones eliminate the effect of your room, and allow a level of consistency even if you wanted to mix somewhere else e.g. on your laptop in a hotel room,
I highly recommend the AKG K-702 Reference Headphones (affiliate link), which you can get at Amazon for a very reasonable price. These are the headphones that I have been mixing on for years, with great results. I have used these to mix 3 commercially released EPs.
As a side note, I also wrote a beginners guide to mixing in general. I highly recommended you check it out if you are new to mixing. It clears up some of the confusion novice mixers often have, and helps you avoid some common mixing pitfalls.
9 Consider a hybrid home/pro studio approach
There is always the option of taking a hybrid approach i.e. where some of your recording is done in your home, and you pay to do some in a professional recording studio. This could be a way to obtain a really professional sound, without paying for the studio time for all your recording sessions.
Typically you may want to do all your D.I. recording at home, where the recording environment has no influence on the recorded environment. Keyboards, electric guitars, basses are all prime candidates for this.
Then you could record anything that requires an actual microphone in a pro studio. Typical candidates are…
- Lead vocals
- Backing vocals
- Real acoustic drums
- Acoustic piano
The line between home and pro recording studio is getting more and more blurred all the time. I recommend reading my article on what exactly is a home studio, to learn about the different types of home studio, what you can do in one and what you can still really only do in a pro studio.
Good luck in all your recording endeavors, and on getting a pro sound in your home recording studio.
Here is some of my favorite home studio gear…
Thanks for reading this article. I hope you found it helpful in your home music-making activities. Here are a few of the tools that I personally use in my home studio. These are affiliate links, so if you decide to use any of them I’ll earn a small commission.
Audio interface: My personal choice for audio interfaces are the Focusrite Scarlett series. I have been using these for years, and they have always given me great-sounding recordings. For a very reasonable price from Amazon you can buy the excellent Focusrite Scarlett 4i4, or if you don’t need MIDI capability the Focusrite Solo is a great choice.
Amp sim: Guitar amplifier simulator software has come on leaps and bounds in recent years, such that I record all my electric guitar parts using amp sims these days. One of the very best is the incredible Amplitube from IK Multimedia, which I have used on many of my songs.
Headphones for recording: My favorite headphones for recording are the Sony MDR-7506s, which I use for monitoring during all my recording sessions. They can also be found in many pro recording studios. Get the Sony MDR-7506 headphones from Amazon here.
General-purpose microphone: You can’t go wrong with a good ol’ Shure SM-57, one of the most versatile and ubiquitous microphones around. I’ve been using one in my home studio for as long as I can remember. Amazon offers the Shure SM-57 for a very competitive price.
To see all of my most up-to-date recommendations, check out this resource I made for you!
