
DISCLOSURE: This post contains affiliate links. If you buy through these links, I may earn a small commission.
I have been recording vocals in my home studio for over twenty years. In that time I have made pretty much every mistake it is possible to make. One of those very common mistakes I made was to try and record everything as loud as possible. This is the number one reason for distortion in your vocal tracks.
The most common reason that vocals are distorted is that they have been recorded too loud. On average, the recording level should be about -18dB, peaking at no more than -12dB. Being too close to the microphone and poor microphone technique can also contribute to the signal being too loud.
Fortunately, vocal distortion is an easy problem to avoid by following some simple processes. Read on to discover several easy things you can do to help you prevent your vocals from distorting, and a complete process to ensure you record at the correct levels for modern digital recording equipment.
If you are reading this article, then clearly you are interested in recording vocals and getting a great sound. Check out these articles that are all related to helping you get the best vocal sound possible in your songs…
- Nervous recording vocals? How to reduce red-light fever
- Should you record vocals in one take?
- Why is AutoTune considered bad – is it really ok to use?
If you are interested in checking out the best recording gear such as audio interfaces, studio monitor speakers, microphones, etc., you can find them at Amazon by clicking here.
Prevention is better than cure for vocal distortion
Preventing distortion from getting on to your vocal recording is far better than trying to fix it afterward.
There are a few things you can try to get rid of distortion from a recorded vocal, but to be honest they are not all that effective. You are far better off trying to eliminate distortion at the recording stage, rather than deal with it later on during your music production.
I would even go so far as to say if you have a distorted vocal recording, your best option is probably to re-record it using the techniques detailed in this article.
Most common cause of distortion is recording too loud
Old analog equipment recording levels
A quick history lesson…
Back in the old analog recording days, it was best practice to record as loud as possible without going into the red i.e. with the meter hitting as close to 0dB without going over it. In fact, it was actually considered ok for the level to go over 0dB occasionally.
The reason for this is that with old noisy analog equipment, it was desirable to get the signal-to-noise ratio (SNR) as high as possible. This means the signal (the ‘S‘ in SNT – the thing you are recording e.g. a vocal) should be as loud as possible compared to the background noise (the ‘N‘ in SNR). This is effectively to “drown out” the noise with the volume of the thing you are recording.
Also, due to the way analog electronics work, analog distortion is not always unpleasant. In fact, it can actually be desirable to an extent – some analog equipment is famed for having a certain “warmth” when it starts to distort. Just ask a rock guitarist about their tube guitar amp!
Talking of guitar amps…have you ever considered running a vocal microphone through one?! It may sound crazy, but it’s actually an unorthodox way of getting a cool, unusual vocal sound. Check out my article on running vocals through a guitar amp to learn how to safely do this, and some common mistakes to avoid.
Today’s modern digital equipment recording levels
These days we all record digitally, usually into DAW (Digital Audio Workstation) software running on a computer.
If you are new to DAWs, definitely check out my introduction to music software article. It explains what a DAW is and what you can do with one.
Digital distortion does not sound pleasant. Ever! A vocal can be completely ruined by even a small amount of digital distortion.
So we want to avoid digital distortion at all costs. This means making sure that our signal levels are nowhere near 0dB when we are recording.
Also, due to the high quality of the equipment and the signals we are all using nowadays, trying to record as loud as possible to drown out noise is no longer an issue. Therefore we can actually record at a lot lower levels than 0dB and obtain excellent results.
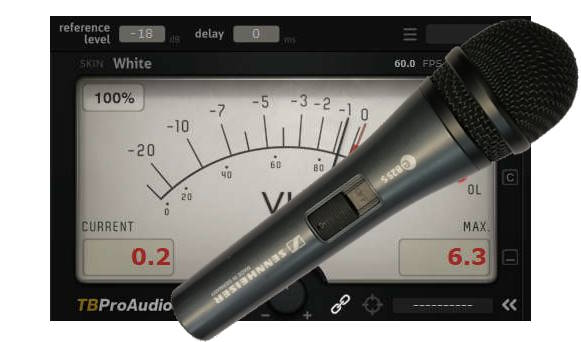
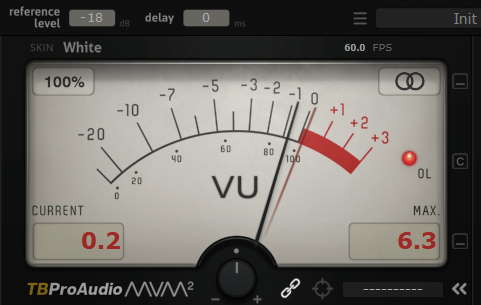
So what sort of recording levels should we be aiming to record at when recording vocals to avoid distortion? The following rule of thumb is a good one to follow…
- Your average recording level should be round about -18dB
- Peaks in the level should reach no more than -15dB (occasional peaks up to -12dB are ok)
This may seem very quiet to you, but these levels are absolutely fine and will give you great results. The pre-amps in most modern audio interfaces work best at around -18dB; this is the level that they have been optimized for.
These levels leave plenty of headroom i.e. room for you to increase the volume of the track when mixing your song, should you need to. Think of headroom as a safety net for the volume of your tracks; with enough of it, you won’t have to worry about increasing the volume of your tracks to the point where they are distorting.
You may be thinking that at those levels, your tracks are going to be much quieter than the volume of commercially released songs you hear on streaming services, the radio, etc. …
Yes, they are! You should not be working at commercial song levels during the recording and mixing of your song. This is a sure-fire way to create horrible distortion in your tracks. Work at quieter levels throughout the recording and mixing of your song. The mastering process will take those levels up to commercial volume once your song has been mixed.
Vocal recording process for avoiding distortion
I find it is always helpful to have a repeatable process for many things in music production, and recording vocals is no exception. Try using this process to get your vocal recording levels right and distortion-free every time…
1 Place your microphone on a stand
Handling noise can cause nasty peaks in the audio signal from the microphone, which in turn can cause distortion. I would always advise placing the microphone on a stand for recording, rather than having the singer hold the microphone in their hand.
If you’re looking for a great value microphone that can be used to record vocals and many other things, check out my article on why the Shure SM58 is a great recording mic for a home studio. You’ll learn about its features, its pros and cons and best practices for getting the most out of this great value, versatile microphone.
2 Position the mic & stand to minimize reflections
Audio reflections from hard surfaces in your room can play havoc with your recorded audio. They can emphasize unwanted frequencies and reduce the strength of desired frequencies making your vocal sound thin.
Follow the tips in my article on recording vocals in a small room to find the best position for the microphone in your room. In summary; avoid corners, avoid the dead center of the room, stay away from hard surfaces, and angle the singer away from walls.
3 Place soft furnishings behind the singers head
The reflections that often cause the most problem with vocal recordings are those that reflect back from the wall behind the singer.
One way to massively reduce these is to place soft furnishings behind the singer’s head. Things like cushions, duvets, thick blankets, big winter coats, etc. will help eliminate these reflections and get a cleaner vocal recording.
4 Use a pop-filter in front of the microphone
A pop filter helps reduce the sudden rush of air and increase in volume from “plosives” i.e. ‘p’ and ‘b’ sounds sung into the microphone. These sounds can cause distortion, so anything we can do to reduce them at the recording stage is a good thing.
Attach the pop filter to the microphone stand and place it in front of the microphone. Ideally, it should be at least 4 inches (10cm) away from the mic.
For more details on pop filters, I highly recommend you take a look at my article on when a pop filter is really necessary. It goes through the different recording scenarios where you need and where you don’t need a pop filter, and shows you how to properly use one.
5 Connect microphone, audio interface & computer
Your microphone needs to be connected to an XLR input on your audio interface. Use a good quality XLR cable; cheap cables are a false economy – they don’t last as long and can cause some signal loss so your recording quality will not be as good as it could be.
Your audio interface needs to be connected to your computer, usually via USB or Thunderbolt. If you are new to recording and the equipment required, I highly recommend reading my beginner’s guide to recording at home and making your first recording.
Also, make sure that the input your microphone is connected to is set to “Instrument” rather than “Line” if this is a feature you have to manually set on your interface.
I have been using Focusrite Scarlett interfaces for years. In fact, I have recorded 3 commercially released EPs using them. You can buy the Focusrite Solo from zZounds.com (affiliate link) for a very reasonable price.
6 Position singer about 12″ away from the microphone
Singing too close to the microphone can cause the volume to be too high, and in turn cause distortion in your recording.
A good rule of thumb is to place the singer about 12″ (30cm) away from the microphone. You can vary this distance depending on how loud the part the singer will be singing is, but it is a good distance to start with.
In the studio, there is no need to get the singer very close to the mic like you might do in a live environment. You do not have stage and crowd noise to deal with, so there is no need to maximize the singer’s volume to drown out the background noise.
Distance from the microphone is not the only important positional consideration for recording singers. Check out my article comparing sitting or standing for recording vocals. It goes through the pros and cons of both positions, and will help you decide on the best one for your music.
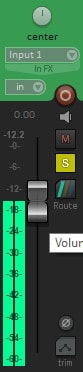
7 Set recording level
In your DAW, enable the vocal track for recording. Get the singer to sing into the microphone, and monitor the recording level on the channel fader in the DAW.
Aim to get the recording level to average at around -18dB, peaking at -15dB. The occasional peak up to -12dB is ok, but no louder. Use the gain control on your audio interface to adjust the volume until it reaches these levels.
Also, make sure that the clipping light is not coming on for the channel your microphone is plugged into. If you achieve the levels stated above, the clipping light should not activate.
A lot of audio interfaces have a “pad” feature. This reduces the input level by a number of dBs. This is not something you should have to use for audio; it is really aimed at recording electric guitars with very high output pickups.
I’ve mentioned the gain control above….but what exactly is gain, and how does it differ from volume? I have a whole article on that topic! Check out my article on the difference between gain and volume. You’ll learn exactly what the difference is, and how to use this knowledge to improve your own recordings and mixes.
8 Make a test recording
Before you commit to recording for real, do a quick test recording with your singer singing part of the track. The loudest part of the track would be good to use for a test recording.
Do one final check of the levels as you are recording. Listen back to it, make sure you are happy with it, and that there are no distorted sections or other unpleasant artifacts on the recording.
9 Record!
You are now ready to push the big red record button! If you followed the above steps, you will have given yourself the very best chance of capturing a distortion-free vocal recording.
Faulty equipment can cause distortion
The equipment we all have in our home studios these days is on the whole very reliable. But there is always that rare occasion when some piece of kit develops a fault, and it can be a frustrating task to try and track down the issue. These faults can be a cause of distortion, crackling, drop-outs and other audio artifacts.
It is important to keep your equipment well maintained and in good condition. Some of the more common faults are…
- Cables : Buy good quality cables to start with, treat them well and they should last you a lifetime. However, cheap cables are susceptible to poor solder joints in the connectors, cracked wires inside the cable and poor or broken insulation.
- Audio interfaces : Most often, the inputs may develop loose connections due to things being plugged into them over and over again.
- Microphones : Dynamic microphones are pretty sturdy, and have never had one develop a fault. Condenser microphones are a little more delicate, and are more sensitive to mechanical shocks and dust. It is worth keeping your condenser mic in its case when not in use.
Don’t worry; these problems are all pretty rare. But if you are experiencing mystery distortion on your vocal recordings even though you are doing everything else right, it is worth checking these out.
Swap the equipment out one at a time with a spare, and see if that makes any difference. If you don’t have spares, see if a friend has some kit they would be willing to lend you for a short time.
Talking of equipment, the choice of microphone to record vocals with is very important. Different types of mic require different ways of working. Check out this article comparing dynamic and condenser microphones for a home studio for information on which one will work best for you, and best practices for getting consistently excellent results.
Dealing with distortion at the mixing stage
As I’ve already stated, the best place to deal with any distortion is when you are recording your vocals. Preventing it from getting onto your tracks in the first place is by far the best route to take.
But, supposing you reach the stage where you are mixing your song. You discover that some of your tracks are much louder than others, so you decide you need to turn up the quieter tracks to equalize the volumes. You may even resort to some sort of volume boost plugin…
…Don’t increase the volume! If you do this, you risk all those tracks starting to reach the point where they will distort. You could well end up in a volume battle between your tracks, and run out of headroom i.e. where your tracks are as loud as they will go with the faders turned up full.
Instead, reduce the volume of the louder tracks. This will keep their levels away from distortion territory. It will also give you room to increase the volume on a track, should you need to as part of the mixing process.
Ideally, all your tracks will have been recorded at similar levels, so this will not be an issue.
Even so, before you even start mixing you should really do something called gain staging. This is where you make the volumes of all of your tracks the same volume, averaging at around -18dB. This will give you the very best chance of avoiding distortion on any of your tracks.
My introduction to mixing article includes a section on gain staging, and I highly recommend you read it if you are new to the mixing process in general.
Potential “fixes” to try to reduce vocal distortion
Finally, after everything I’ve said about preventing distortion from getting on your vocal recordings in the first place, there are a few things you can try if some distortion has found its way onto your tracks.
In all honesty, these are not that effective and I wouldn’t hold out much hope for them reducing distortion to any degree. They may be worth a try as a last resort, but the only real way to fix the distortion is to go back to the source and re-record at the correct levels.
Things you can try…
- Declipping plugins – these claim to be able to analyse the audio waveform and reconstruct it without the clipping/distortion. An example is Accusonus Era De-Clipper. A de-clip component can also be found in Izotopes RX Elements.
- EQ – you can try experimenting with filtering out some high-end from your track in an attempt to remove some distortion. The problem with this is that you will also remove the frequencies from your actual vocal. Consequently, it is likely to make it sound dull and lifeless.
Here is some of my favorite home studio gear…
Thanks for reading this article. I hope you found it helpful in your home music-making activities. Here are a few of the tools that I personally use in my home studio. These are affiliate links, so if you decide to use any of them I’ll earn a small commission.
Audio interface: My personal choice for audio interfaces are the Focusrite Scarlett series. I have been using these for years, and they have always given me great-sounding recordings. For a very reasonable price from Amazon you can buy the excellent Focusrite Scarlett 4i4, or if you don’t need MIDI capability the Focusrite Solo is a great choice.
Amp sim: Guitar amplifier simulator software has come on leaps and bounds in recent years, such that I record all my electric guitar parts using amp sims these days. One of the very best is the incredible Amplitube from IK Multimedia, which I have used on many of my songs.
Headphones for recording: My favorite headphones for recording are the Sony MDR-7506s, which I use for monitoring during all my recording sessions. They can also be found in many pro recording studios. Get the Sony MDR-7506 headphones from Amazon here.
General-purpose microphone: You can’t go wrong with a good ol’ Shure SM-57, one of the most versatile and ubiquitous microphones around. I’ve been using one in my home studio for as long as I can remember. Amazon offers the Shure SM-57 for a very competitive price.
To see all of my most up-to-date recommendations, check out this resource I made for you!
