
DISCLOSURE: This post contains affiliate links. If you buy through these links, I may earn a small commission.
The most common way to connect a musical keyboard (synth, digital piano, workstation, etc.) to a computer is to use MIDI, something that I do in my home studio all the time. But supposing your keyboard does not have MIDI capability, or you want to connect it to your computer in some other way. How do you connect your keyboard to a computer without using MIDI?
To connect a keyboard to a computer without MIDI, plug a jack cable into the keyboard’s line-out or headphone socket. Plug the other end of the jack cable into an audio interface connected to your computer, or into the computer’s mic socket via a ¼” jack to mini-jack adapter.
While MIDI is incredibly useful, it is not the only means by which you can connect a keyboard to a computer. Even if your keyboard and computer do support MIDI, there are other reasons why you might prefer an audio connection. Read on to discover these reasons and exactly how you connect your keyboard and computer without using MIDI.
To learn more about all the connection methods you can use to connect keyboards to computers, I highly recommend my “How do I connect a hardware synth to a computer?” article. You’ll learn the different connection method in detail, with step-by-step instructions to get you connected up quickly.
If you are interested in checking out the best recording gear such as audio interfaces, studio monitor speakers, microphones, etc., you can find them at Amazon by clicking here.
Connecting keyboard to computer using audio connection
The alternative to a MIDI connection is to use an audio connection. Here your keyboard sends actual audio signals down a cable to your computer, unlike MIDI which transmits instructions to play notes down its connections.
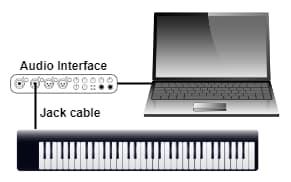
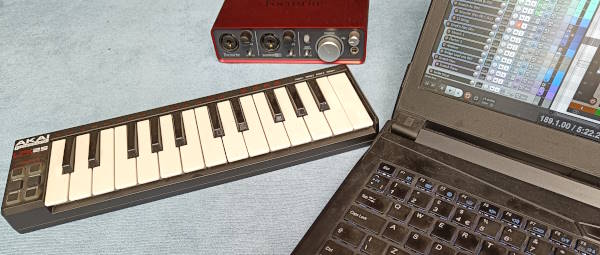
Your keyboard will have either a line-out socket or a headphone socket. If it has both, then favor the line-out socket. Run a jack cable from one of those sockets into an input on your audio interface. The audio interface should be connected to your computer using either USB or Thunderbolt.
Remember that audio interfaces often have extra inputs on the back, which are usually line-level inputs that are ideally suited to keyboards.
You can use the built-in mic-in socket on your computer if it has one instead of an audio interface. But I wouldn’t recommend this; you’ll get much better results from using an audio interface. The sound quality will be better, and you will probably suffer from less latency (the delay between playing a note on your keyboard and hearing it come out of your computer). This applies to any instrument you might connect to your computer, not just keyboards.
If you need to buy an audio interface, I highly recommend the Focusrite Scarlett series. I have been using these for many years in my home studio, and they have always been reliable, durable and given me great sound quality. You can pick up the Focusrite Scarlett Solo (affiliate link) at Amazon for a very competitive price.
If you do choose to try using the mic socket, you will probably need a ¼” to mini-jack adapter to make your jack cable fit the socket.
The Jack cable(s)
You will need at least one jack cable for this. If you want a stereo connection, you might need to use two jack cables. For example, if your keyboard has Line Out (Left) and Line Out (Right) sockets, you could connect one to input one on your audio interface, and the other to input two. This will give you a full stereo connection.
Or you may decide to keep things simple and just have a mono connection. In this case, only one jack cable is required.
One other option is connecting a single stereo socket on the keyboard (e.g. headphone socket) to two mono inputs on your audio interface (one for left, one for right). This will require “splitting” the signal somehow; the single headphone socket on the keyboard needs to connect to two audio interface inputs.
There are several ways to do this…you could use a mixer, but the simplest way is to use a single stereo mini jack to dual ¼” jack adapter cable such as this one (affiliate link) from Amazon.
| Connection Type | Cables Required |
|---|---|
| Mono (KB line out to audio interface input) | 1 x ¼” mono jack cable |
| Stereo (KB line out L & R to 2 audio interface inputs) | 2 x ¼” mono jack cable |
| Stereo (KB headphone out to 2 audio interface inputs) | 1 x mini jack to 2 x mono jack cable |
| Stereo (KB headphone out to mic in on computer) | 1 x mini jack cable |
| Stereo (KB line out L & R to mic in on computer) | 1 x mini jack to 2 x ¼” jack cable |
Hearing your keyboard through your computer
Once you have connected your keyboard to your computer, you are going to want to actually hear it when you play it! There are several ways to do this, depending on your particular setup.
Incidentally, for hearing your keyboard or anything else in your home studio, you are going to need a pair of good-quality headphones. The Sony MDR7506s (affiliate link) are industry standard and can be found in many studios all over the world. I have been using a pair of these for years, and they are a great-sounding, reliable, reasonably priced workhorse that should last you a long time.
Using your audio interface’s Mixing/Routing software
If you have an audio interface, this is the method to use.
Your interface will have probably been supplied with a routing/mixing application. This allows you to select which sources, including the interface’s inputs, are sent to which output. For example, you could select inputs 1 & 2 to be routed to the output your speakers are connected to, letting you hear whatever is plugged into inputs 1 & 2.
Unless you have the same audio interface as me, your application won’t look the same as mine. This is a screenshot of the “Focusrite Control” mixing/routing application supplied with my 2nd gen Focusrite Scarlett 6i6 interface…
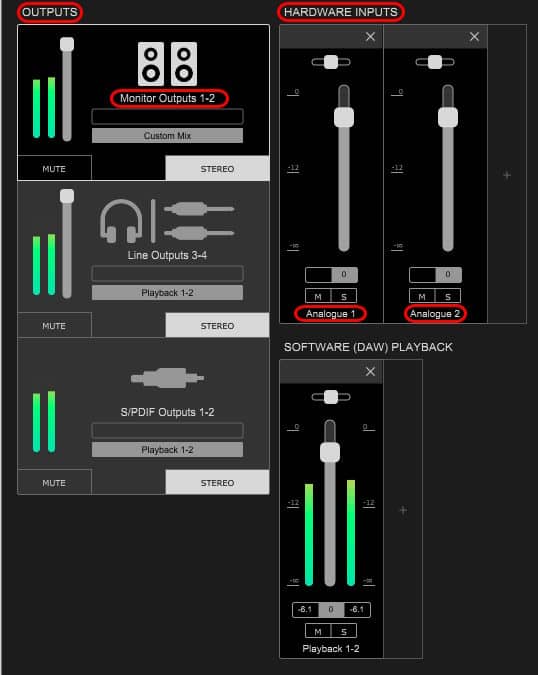
The sources on the right-hand side are what will be heard on the non greyed-out outputs on the left-hand side. You can see that I have inputs Analogue 1 and Analogue 2 selected to output to Monitor Outputs 1-2, which are the outputs that my speakers are connected to. If I pressed the little X in the top right hand corner of the Analogue 2 input, it would be removed from the right-hand side and I would no longer be able to hear that input.
Your application will probably be different to mine. But hopefully this gives you an idea of how you can configure the inputs and outputs using your interface’s software to be able to hear your keyboard through your computer.
In Windows
If your keyboard is connected to your computer’s built-in mic socket, you can use Windows to enable listening to it.
Right-click the speaker icon in the system tray, then click “Sounds”. Go to the “Recording” tab, and select whichever input your keyboard is connected to. Then click the “Set Default” button to set this input as the default source.
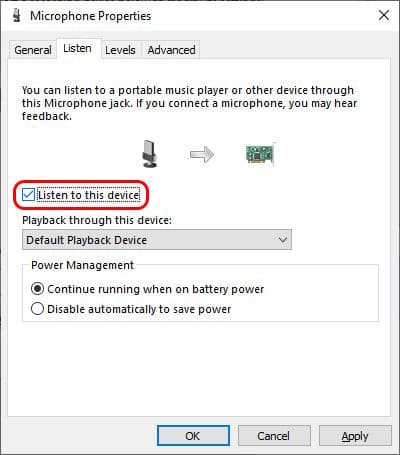
Right-click the input, and select “Properties”. Click the “Listen” tab, then enable the “Listen to this device” checkbox and click “Apply”. You should now be able to hear your keyboard.
Note that you will probably experience some latency i.e. a delay between when you play a note on the keyboard and when you hear it coming out of your computer. The sound quality is also likely to not be great. This is why I highly recommend using an audio interface for connecting a keyboard to a computer.
Using a DAW to record your keyboard
With your audio connection all set up, as well as just hearing your keyboard you can now record the sound from it. I’ll talk you through doing this on Reaper, as it is the DAW (Digital Audio Workstation) that I am most familiar with. The process will be similar in other DAWs.
Create a track in Reaper. Then enable that track for recording, and enable monitoring. Set the track’s input to the input that your keyboard is connected to, or pair of inputs if you are using a stereo connection. You should be able to hear your keyboard. You can now press record to record the audio from the keyboard in Reaper on the new track you created.
Acoustic only keyboard
Perhaps your keyboard is actually acoustic and has no electrical connectivity at all, e.g. a traditional acoustic piano. In this case, you have only one option; use a microphone.
Position the microphone close, but not too close to the piano. 1 – 2 meters or 3 – 6 feet away should be ok. Experiment to find the best position for your room and instrument.
Once you have the microphone positioned, attach an XLR cable to the microphone and the other end to an input on your audio interface. From this point on, you can follow the instructions earlier in this article to get your instrument playing through your computer.
Why to not use MIDI to connect keyboard to computer
MIDI is incredibly useful and offers several advantages when connecting and recording keyboards. But there are legitimate reasons why you might not want to use it…
- Your keyboard might not have MIDI capability, leaving you with audio as your only option
- You might not have a MIDI interface or an audio interface with MIDI built in
- Your keyboard has a really nice sound that you want in your song, so you need to capture the actual audio from your keyboard
- MIDI is for some reason not working on your keyboard or interface. Audio is a good backup option for situations like this
- You think that recording the MIDI is “cheating” and gives a bit of an artificial performance. This is not what I think, but I do know people who think this. I mostly record keyboards using MIDI. Maybe for a classical piano piece I would default to recording the audio.
Why to use MIDI to connect keyboard to computer
MIDI offers several advantages over audio for keyboard-to-computer connections, and recording a performance using them.
- MIDI transmits instructions to play notes, not audio. This means that…
- Performances are easy to edit. Made a mistake? Just correct it in the piano roll editor in your DAW. You can’t do that with audio – you would need to re-record the whole performance.
- It’s easy to change the sound. Because MIDI is instructions to play notes, you can change the software instrument those instructions play to anything you want. With audio, you are stuck with the sound you recorded.
Bear in mind, that with MIDI you don’t necessarily need an audio interface. Check out my article explaining using audio interfaces with MIDI keyboards, and learn if you need an audio interface for your particular requirements.
Should you choose audio or MIDI?
There is no right or wrong answer to this, if you have the opportunity to use either. If you want to record the actual sound that your keyboard provides, choose audio. If you want to be able to edit your performance using your mouse inside your DAW, or change its sound to something else after you have recorded it, choose MIDI.
Here is some of my favorite home studio gear…
Thanks for reading this article. I hope you found it helpful in your home music-making activities. Here are a few of the tools that I personally use in my home studio. These are affiliate links, so if you decide to use any of them I’ll earn a small commission.
Audio interface: My personal choice for audio interfaces are the Focusrite Scarlett series. I have been using these for years, and they have always given me great-sounding recordings. For a very reasonable price from Amazon you can buy the excellent Focusrite Scarlett 4i4, or if you don’t need MIDI capability the Focusrite Solo is a great choice.
Amp sim: Guitar amplifier simulator software has come on leaps and bounds in recent years, such that I record all my electric guitar parts using amp sims these days. One of the very best is the incredible Amplitube from IK Multimedia, which I have used on many of my songs.
Headphones for recording: My favorite headphones for recording are the Sony MDR-7506s, which I use for monitoring during all my recording sessions. They can also be found in many pro recording studios. Get the Sony MDR-7506 headphones from Amazon here.
General-purpose microphone: You can’t go wrong with a good ol’ Shure SM-57, one of the most versatile and ubiquitous microphones around. I’ve been using one in my home studio for as long as I can remember. Amazon offers the Shure SM-57 for a very competitive price.
To see all of my most up-to-date recommendations, check out this resource I made for you!
