
It is possible to get a great recorded acoustic guitar sound using just one microphone. This is something I have done many times over the years in my home studio. But it isn’t quite as simple as just putting a microphone in front of the guitar, pressing record and hoping for the best.
To record an acoustic guitar with one mic, place the mic about 12″ (30 cm) in front of the guitar, on a mic stand. Turn the mic so it points towards the 12th fret, not directly at the sound-hole. Make sure the recording position in the room is away from corners and walls to minimize reflections.
There are a few pitfalls to be aware of when recording an acoustic guitar, and some tips and tricks you can use to ensure you capture the sound you are going for. This article takes a detailed look at the simple steps you can take to get the best possible recorded acoustic guitar sound.
If you are interested in checking out the best recording gear such as audio interfaces, studio monitor speakers, microphones, etc., you can find them at Amazon by clicking here.
Recording location
The first thing to consider is where you are going to record your acoustic guitar. This means both choosing the room to record in, and whereabouts in that room you should put your guitar to record it. These can have a big effect on the recorded sound.
Choosing the recording room
You may not have a choice of room to record in. That’s fine – the next point will discuss how to use whatever room you have available to get the best possible sound. If you do have a choice of room, then try to pick one with lots of soft furnishings e.g. carpet, curtains, sofas, cushions, etc. This will help minimize reflections in the room, cutting down on unwanted harsh echo and the build-up of potentially unwanted frequencies.
If you have ever walked into a room with a hard floor, no curtains and no soft furnishings, you will know how brittle and harsh it sounds when you speak. Some people may like this sound, and want to capture it on the recording. My issue with this is that it is difficult to control, and once captured you can’t change it. In my opinion, it is much better to record in a more acoustically “dead” room, and then add in effects like reverb, echo and EQ afterwards if you want them. This way, you have much more control over the guitar sound in your mix.
Recording location in the room
Ideally, we want to choose somewhere in the room where we can minimize the reflections already mentioned. There are several things we can do to try to achieve this…
- Stay away from corners
- Move away from walls, but not into the dead-center of your room
- Angle yourself away from walls so you are not directly facing any of them
- If you can’t avoid being close to a wall, face away from the wall and put some cushions or other soft furnishings behind you to try and dampen the sound, helping prevent reflections
As you can see, there are a lot of factors involved in choosing the best room to record in, and the best location in that room. My article on finding the best place to record at home will help you find the place in your house or apartment that will give you the best recording results.
Microphone choice
The microphone that you choose to record your acoustic guitar will have an effect on the type of sound you record. My favorite mic to use for this purpose is my Rode NT2-A, which is a large-diaphragm condenser microphone. I have made many acoustic guitar recordings over the years using the NT2-A that I am very happy with. You can purchase this microphone at a competitive price from Amazon via this affiliate link: Rode NT2-A condenser mic.
Condenser microphones are often recommended for use on acoustic guitar. This is due to their excellence at capturing high-end frequencies, their sensitivity and ability to record great nuance and detail. If you have any large-diaphragm condenser mic, it will be ideal to use in this application.
Do not think though that this means that you have to have a condenser microphone to get a good acoustic guitar recording; you most certainly do not. Be aware that there is a lot of gear snobbery around microphones, that you will encounter if you browse forums discussing such matters.
You absolutely can record an acoustic guitar with a bog-standard dynamic microphone, and get a great sound. I have done exactly that with my good old Shure SM57, and been very pleased with the results. To help you get the best sound possible, I have a whole article dedicated to recording acoustic guitars with an SM57, which you can find here.
So please don’t think you have to save up several hundreds of dollars for an expensive condenser mic. If you have any sort of dynamic microphone, just use that! I’ve often said that the best mic for any task is the one you have.
You may have to be a little more careful with a dynamic mic, but you can still get a great recorded sound. For example, make sure you don’t get the mic too close to the guitar as you will get an overly “boom-y” sound.
Preparation
In the excitement of wanting to record an acoustic guitar part for your latest masterpiece, the importance of preparation is often overlooked.
Choose a great guitar
If you have more than one, then pick your best acoustic guitar. I know it sounds obvious, but choose a great acoustic guitar; get a great recorded acoustic guitar sound. You might have several acoustics that are all great but have different types of sound. For example, a typical dreadnought sounds very different from your average parlor guitar. Put some thought into the type of sound you want to capture for your song, and pick an acoustic guitar accordingly.
Don’t be put off if you only own one acoustic guitar – this just makes the decision for you!
Change the strings
Old strings can sound dull, have tuning problems and be uncomfortable to play. Do yourself a favor, and if you haven’t done so in a while – change the strings. I know it’s a pain when you’re excited about recording and just want to get on with it. You will thank yourself later when you listen back to your recording.
Tune-up
OK, I know this is obvious. You know you have to tune your guitar before you record. But make sure you tune it before every take. Yes, every single take.
In the excitement of recording your part, you may well not notice that your guitar has drifted slightly out of tune. There is nothing worse than recording a great take, then when you listen back to it along with other parts in your song realizing that it’s unusable due to it not being in tune. I know – this has happened to me far more times than I care to admit.
So build it into your workflow that you tune up your guitar before pressing record every single time.
Microphone positioning
You’ve chosen your recording room, whereabouts in that room you are going to record and your guitar is prepared and ready for action. Now, where exactly do you put the microphone?
Acoustic guitars are complex mechanical systems. Multiple parts of the guitar vibrate and hence contribute to the sound…
- The strings
- The guitar body
- The neck
- Air inside the guitar
- Air projected out from the guitar
When you are positioning the microphone, you are essentially choosing to have more or less of each component of the sound depending on where the mic is.
For example, if you put the microphone above the guitar it will be closer to the low-sounding strings. This means you will pick up more of the low strings than the high ones, giving you a bass-ier sound with more low-end. You get the opposite effect with the mic below the guitar, giving you a more trebly sound.
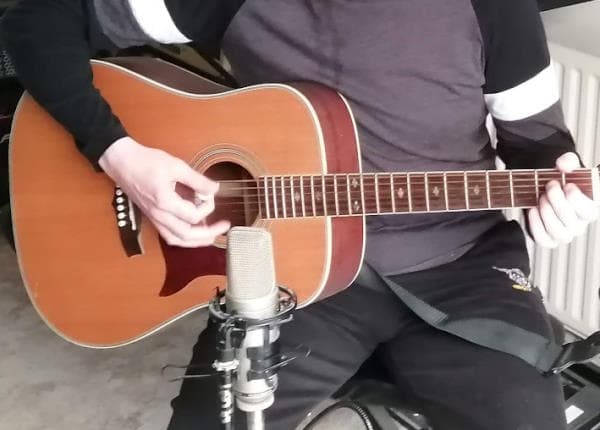
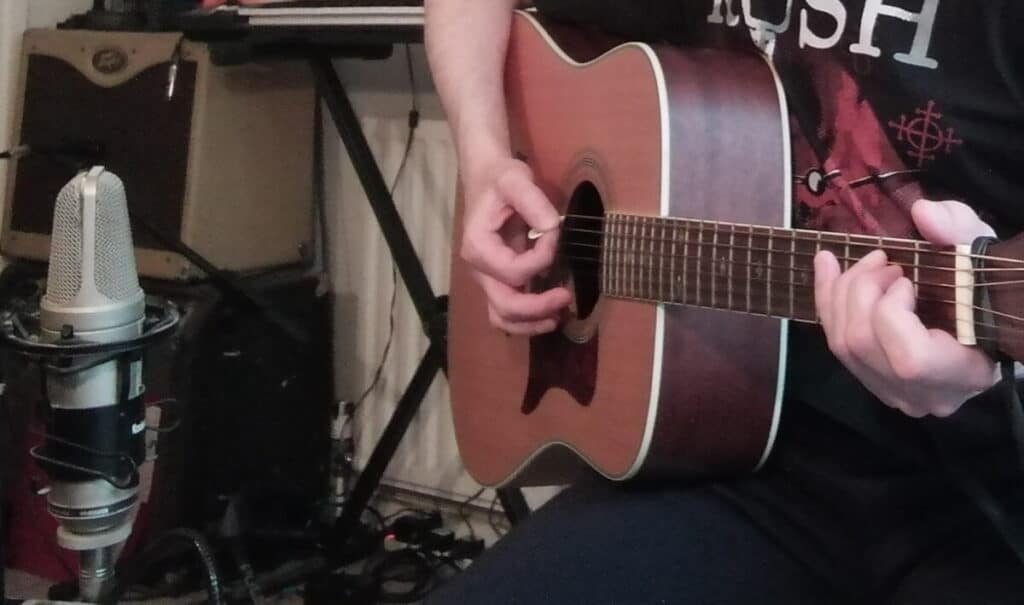
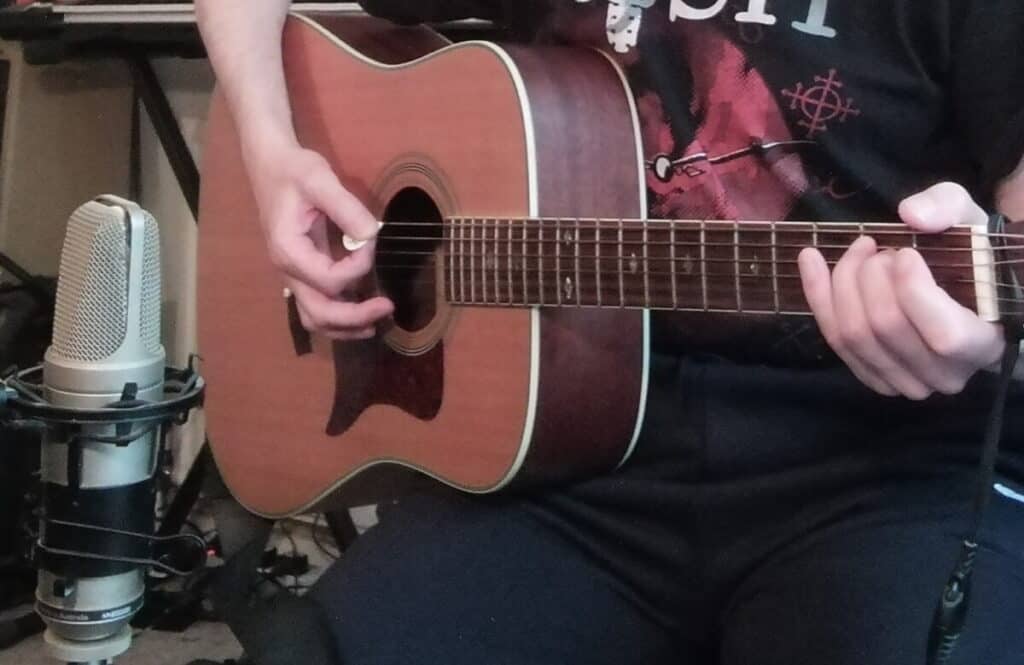
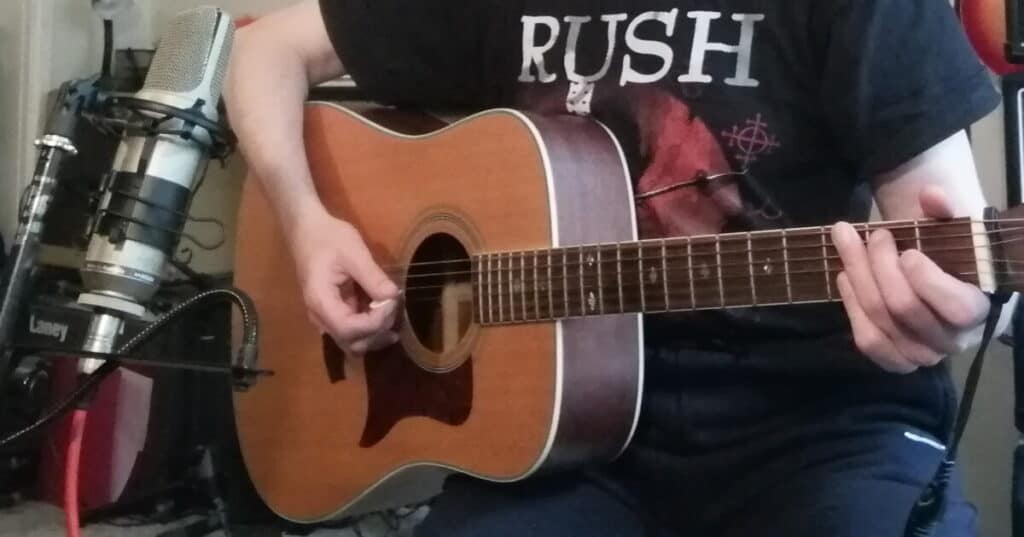
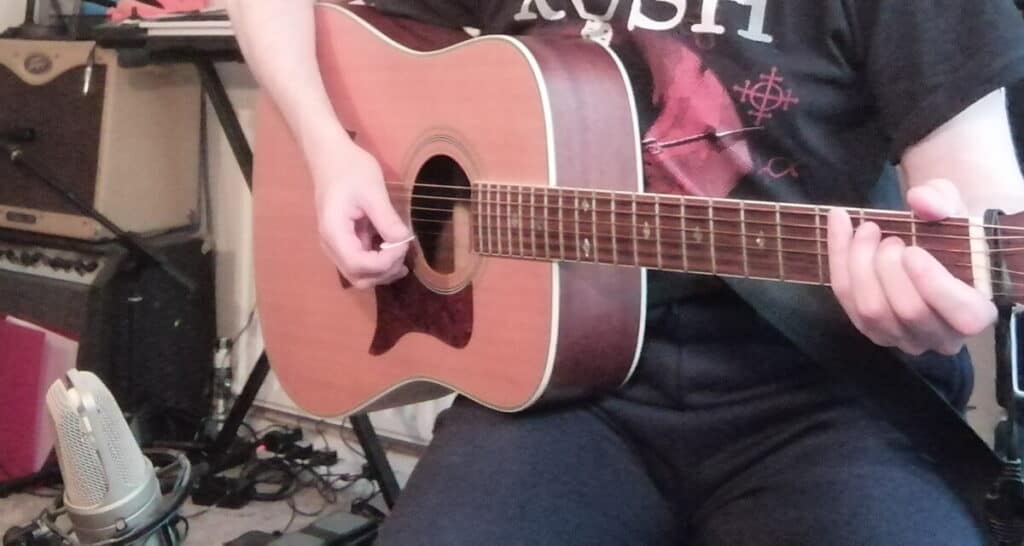
Here are some recommended microphone positions, with the associated characteristics of each one. I have recorded a sound clip for each position so you can compare the different captured results. I used my Rode NT2-A microphone and my Tanglewood dreadnought style acoustic guitar for all the clips. There is also an associated photo for each to illustrate the microphone positioning in relation to the guitar.
Mic position – option 1
Place the mic directly in front of the sound-hole. But don’t have the mic pointing straight at the sound-hole. This position tends to give an overly boomy sound, picking up a lot of the deep resonances from the guitar body and inside it. Instead, with the mic in roughly the same place, angle it to point towards the 12th fret. This position picks up a full all-round sound, with the boominess reduced and string detail increased by the angling towards the 12th fret.
Don’t get too close! No one listens to an acoustic guitar with their head right close up to the guitar body. This closeness would over-emphasize bass frequencies due to the proximity effect, especially with a dynamic microphone. Different recording engineers prefer different distances, but I prefer the mic at least 12″ (30 cm) away from the guitar. This applies to all the microphone positions discussed in this article. Experiment with the distance yourself to find your own preference.
This is a sound-clip of my dreadnought style acoustic guitar, recorded with my Rode NT2-A condenser mic in this position. There is no processing on the sound at all, as I wanted to give you as clear an indication of the sound captured as possible.
Mic position – option 2
This second position moves the microphone from being directly in front of the sound-hole, to being directly in front of the 12th fret and pointing straight at it.
This position will give you less low-frequency content than option 1. It captures more of the string detail, and more of the high-end frequencies. Some think that this mic position emphasizes the sound of the strings too much. Have a listen to the sound clip below, and experiment with this position yourself to make your own mind up.
Mic position – option 3
This position involves placing the microphone still in front of but above the guitar, angling it down to point towards the guitar. With the mic in this position, we will still rotate it to point more towards the 12th fret than the sound-hole.
You will get more low-frequency content with the microphone in this position, emphasizing the bass strings over the treble strings.
Mic position – option 4
The final position we’re going to look at is essentially the opposite of the previous position. This time we place the microphone still in front of but below the guitar, angling it up to point towards the guitar. Again, we rotate the mic to point more towards the 12th fret than the sound-hole.
You can probably guess what this will do to the sound – you will get more high-frequency content, with more of the treble strings being captured over the bass strings.
You can also try moving the microphone to be more in-line with the 12th fret, rather than the sound-hole. This will give you an even brighter sound, possibly too bright.
How playing technique affects the recorded sound
You now know how to set up your mic and guitar for recording, and capture a great sound. There is one more important consideration to take into account; what the guitarist is going to play, and how they are going to play it.
A few years ago I was recording in a professional studio, and I was playing a strummed acoustic guitar part. The engineer recorded me playing one take, and I was quite happy with it. But he asked me to do another take, this time biasing my strumming towards the high strings over the low strings. And that was the take that ultimately got used.
This illustrates how one of the easiest ways to alter the recorded sound is to change how it is played. This is an overlooked point – you can ask the guitar player to adjust their playing to get the type of sound you want.
Here are some examples of different techniques or styles of playing that can affect the recorded sound…
- Strum heavier or lighter
- Emphasize more of the high or more of the low strings
- Use a heavier or lighter pick
- Use a pick made from a different material
- Play finger-style
- Add percussive noises, such as slapping or knocking on the guitar body
It’s also worth noting that the style of playing can influence how far away from the guitar you place the microphone. You are likely to put the mic farther away when recording a heavy strummed part played with a pick, than a softly picked finger-style broken-chord part.
Actually recording the guitar
OK, you’re ready to record. If you are a complete beginner to recording, my article on how to record music at home is a great place to start. But I will go over the basics here…
Connect the microphone to your audio interface
You need an XLR cable to connect your microphone to your audio interface. The female end of the cable goes into the microphone, and the male end goes into a free XLR input on your interface. Don’t forget to turn on phantom power (+48V) if you are using a condenser microphone.
There are actually various options for “connecting” an acoustic guitar to a computer, not just the traditional microphone-in-front-of-the-guitar method. Check out my “how to connect an acoustic guitar to a computer” article for more information, and to learn in detail about the various options available and when best to use them.
Set recording levels
Play the guitar, and observe the clipping indicator on your audio interface. Then adjust the “gain” control for that input, such that you get a good strong signal when the guitar is played, but it never starts clipping. The indicator usually turns red when clipping occurs, and green when a good signal is detected.
You then also need to set the levels in your DAW software. Create a track, and enable it for recording. Play the guitar, and check inside the DAW that the signal is not clipping. Remember that with digital recording you do not want to record as hot as possible; if the meter is going up to 0db then this is way too loud. A rule of thumb is that you only want the signal to come up to about ⅔ up the meter, or no higher than -10dB.
Make a quick test recording
Although this step isn’t strictly necessary, I always find it useful. It is seriously annoying when you record what you think is a great take, only to find that something was wrong and you have to re-do it. So make a quick test recording, just a few seconds long, then listen back to it to make sure everything sounds as it should
Record
OK, time to hit record! Keep an eye on the levels throughout your recording, just to make sure in the excitement of performing a take you don’t creep up into clipping. Listen back once you have finished, and re-record if there is anything you are not happy with or would like to change.
Talking of recording more generally…it can be difficult to decide how big an audio interface you need for your personal recording situations. If you are in the market for an interface, I highly recommend reading my “how many audio interface inputs do I need?” article, which will help you make an informed choice and not spend more money than you absolutely need to.
After the recording
Once you have captured a great take, you are unlikely to be completely finished with your acoustic guitar part. Unless your recording is a demo of some equipment, your part is likely to be part of a larger mix. As such, you are probably going to want to apply some processing to that track. What processing you choose to apply will depend on the song’s style and what the intended role of the acoustic guitar is.
Consider what the purpose of the acoustic guitar is in your song…
- Is the acoustic guitar the main harmony instrument?
- Is it a sparse or dense mix e.g. just an acoustic guitar and vocal, or a full band with drums, bass, electric guitars, piano, etc.
- Is the acoustic guitar a featured instrument in your song, or is it just for adding some texture?
These considerations will affect which processing and the type of processing you will want to apply. For example, in a full band mix you are likely to want to EQ out a lot of the low end of the acoustic guitar to make room for the bass and drums. Whereas if the mix is just acoustic guitar and vocals, keeping most of that low end will probably be desirable as it will be the sole source of those frequencies in the mix.
One of the most annoying things that can happen is that you find your recording has unpleasant clicks or pops on it. This is reasonably common but usually quite easy to solve. Check out my guide to stopping audio interface clicks and pops to help avoid these annoying sounds ruining an otherwise excellent take.
This is by no means an exhaustive list, but here are some very common processing actions applied to recorded acoustic guitar parts…
EQ
EQ is like a volume control for individual frequency ranges. If you have ever used a tone control, or treble and bass controls on a hi-fi or stereo – this is EQ. But the EQ plugins that we have available to us in the DAW are much more sophisticated, allowing extremely fine and detailed control over which frequencies we can increase or reduce in our recordings. There will be a stock EQ plug-in for your DAW – this should be ideal to use on your acoustic guitar part.
EQ is commonly applied on acoustic guitars in a mix. As already mentioned, what EQ moves you make will depend on what the intended role of the guitar is. Here are some examples of common EQ operations….
- Apply a High-Pass Filter (HPF) at around 100Hz, so everything is cut below that frequency
- Apply a cut around 250Hz, to allow room for bass instruments like bass guitar
- If your guitar is in a full mix, cut at around 600 – 800 Hz if the guitar is fighting with other instruments for space in the mix
- Boost a little above 4kHz to add some high-end sparkle. Experiment with frequencies above this, but be careful you don’t make the sound too hissy.
Bear in mind that these are just ideas for starting points; every recording and mix is different. Use your ears – they are the ultimate judge of the best actions to take for your mix.
Reverb
Reverb is great for adding space and depth to an acoustic guitar, giving a sense of filling a room with sound. It can sound great on acoustic guitar, bringing the part to life. But it is easy to overdo it. Especially if you have a dense mix – applying thick reverb to every instrument is one sure way of creating a horrible muddy mess.
All DAWs have some sort of stock reverb plug-in, which is usually excellent. Apply a little reverb to your recorded acoustic guitar, and experiment with the type and how much to use. It is often advisable to get a sound you like, then back it off a little bit, just to make sure you are not over-using it.
Consider double tracking
I have added this here in the processing section, as you might consider whether to double-track your guitar part at the same stage as adding EQ or reverb.
When you listen back to your acoustic guitar recording, you may want it to sound wider or fuller. One way to do this is to double-track the part, i.e. record another part exactly the same again on a different track in your DAW. Then typically you would pan one of the tracks to the left and one of the tracks to the right. This effectively gives you one big wide guitar part that appears to fill the stereo space.
Do not just copy the one recorded guitar part onto another track then pan them. This will not have the same effect! It will just sound like there is a single part coming from the middle of the stereo space.
It is also advisable to use a slightly different sound when recording the 2nd guitar part, even though the part being played should be exactly the same. This gives a sonic distinction between the two parts, making them easier to mix together as they won’t be fighting for exactly the same frequencies. You can use all the previously mentioned techniques to do this e.g. different mic placement, different guitar, different pick gauge, etc.
Double-tracking is a useful technique to consider if your song would benefit from a wider guitar part.
Mono vs stereo
As we are only considering using one microphone in this article, we are recording in mono by definition. To record in stereo, you would need to use two microphones which is beyond the scope of this article.
Some engineers do like to record acoustic guitars in stereo. My own opinion is that I do not. I always prefer to record acoustic guitars in mono. If I want the guitar to fill the stereo space, I prefer to use the double-tracking technique previously mentioned.
If you are interested in stereo acoustic guitar recording, this article from Universal Audio has a section on stereo mic positioning.
Recording an electric-acoustic guitar
As a final point in this article, we’ll briefly consider how recording an electric-acoustic (electro-acoustic) guitar affects what has been discussed.
You may be thinking that you don’t need a microphone at all to record your electric-acoustic, as you can just DI into the audio interface i.e. plug a cable into your guitar and the other end into the interface. Indeed you can do that, but I would advise against it.
You will get a far superior recorded sound if you use a microphone, just like you would with a regular acoustic guitar. Although pick-up technology in acoustic guitars has improved hugely over recent years, you will still get a much more accurate, realistic recording from a microphone than from a direct connection from the guitar.
The only time I could see a DI being useful, is if for some reason you wanted that very particular amplified electro-acoustic live sound on your recording.
Conclusion
There should be more than enough information in this article to enable you to make excellent recordings of your acoustic guitar using just one microphone. Remember that practice makes perfect, and that the more you record the better you will get at it. You will start to develop a sense of what works for you and what doesn’t, and what type of sounds you prefer. Good luck!
Here is some of my favorite home studio gear…
Thanks for reading this article. I hope you found it helpful in your home music-making activities. Here are a few of the tools that I personally use in my home studio. These are affiliate links, so if you decide to use any of them I’ll earn a small commission.
Audio interface: My personal choice for audio interfaces are the Focusrite Scarlett series. I have been using these for years, and they have always given me great-sounding recordings. For a very reasonable price from Amazon you can buy the excellent Focusrite Scarlett 4i4, or if you don’t need MIDI capability the Focusrite Solo is a great choice.
Amp sim: Guitar amplifier simulator software has come on leaps and bounds in recent years, such that I record all my electric guitar parts using amp sims these days. One of the very best is the incredible Amplitube from IK Multimedia, which I have used on many of my songs.
Headphones for recording: My favorite headphones for recording are the Sony MDR-7506s, which I use for monitoring during all my recording sessions. They can also be found in many pro recording studios. Get the Sony MDR-7506 headphones from Amazon here.
General-purpose microphone: You can’t go wrong with a good ol’ Shure SM-57, one of the most versatile and ubiquitous microphones around. I’ve been using one in my home studio for as long as I can remember. Amazon offers the Shure SM-57 for a very competitive price.
To see all of my most up-to-date recommendations, check out this resource I made for you!
