
DISCLOSURE: This post contains affiliate links. If you buy through these links, I may earn a small commission.
Many guitar players want to connect their guitar to their computer, for recording or just to play through using an amp sim (guitar amp simulator software). This is usually done via an audio interface. But it is possible to connect your guitar straight into your PC without using an audio interface?
It is possible to connect a guitar to a PC without an audio interface. Plug a guitar cable into your guitar, then the other end into a ¼″ to mini-jack adapter. Plug the mini-jack adapter into the PC’s mic input. Enable “listen to this device” for the mic input in Window’s sound settings.
While it is possible to do this without an audio interface, I do not recommend it. You will get much better results by using an interface, which is specifically designed for this type of high-quality audio connectivity. Nevertheless, if you are still interested in trying the direct connection method with your guitar, read on to discover exactly how to do it and the drawbacks of this approach.
For a step-by-step guide to connecting a guitar to a PC using an audio interface, check out my “How to connect a guitar to a PC” article. You’ll learn everything you need to know about plugging a guitar into a PC using the recommended method.
If you are interested in checking out the best recording gear such as audio interfaces, studio monitor speakers, microphones, etc., you can find them at Amazon by clicking here.
How to connect guitar to PC with no audio interface
You will need…
- A standard guitar cable
- A ¼” jack to mini-jack adapter
- A PC with a mic input
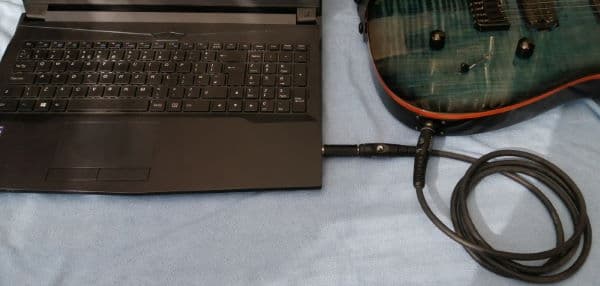
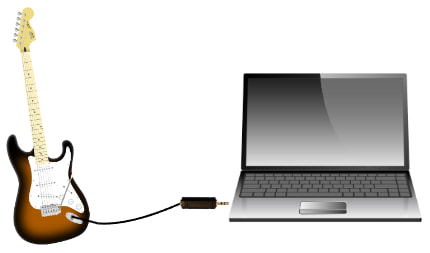
Firstly, plug one end of the guitar cable into your guitar in the usual manner. Because mic inputs on PCs are almost always mini-jack sockets, an adapter is required to effectively convert the bigger guitar cable plug into the smaller mini-jack style plug. Adapters like these (affiliate link) from Amazon should be suitable.
Plug the other end of the guitar cable into the mini-jack adapter socket. The plug end of the adapter should fit in the mic socket of the computer, so plug this in now.
As far as the hardware goes, that’s it. You have connected your guitar to your computer. However, you probably won’t be able to hear anything through your computer’s speakers or headphones. To get that working, you will have to enable a setting in Window’s sound configuration.
A related question often asked is “How can I connect my guitar to a Bluetooth speaker“? That’s why I have a whole article covering the topic of guitar-to-Bluetooth-speaker connections. Check it out to discover the different ways of doing this, the problems you may encounter and alternative methods for a wireless guitar connection.
Configuring Windows so you can hear your guitar
You need to get to the “Sound” settings in Windows. But this is not the modern sound settings found in Windows 10 and 11, but the old dialog that has been in Windows for years and years.
In Windows 10, you can click on the Start menu and type “Control Panel” without the quotes. Click on the icon to launch Control Panel. Click on “Sound” to bring up the sound settings.
In Windows 11, it’s a little trickier. Press Windows Key + R, and enter mmsys.cpl in the “Open:” text box. Click OK and the Sound Settings dialog should launch. This method also works on Windows 10.
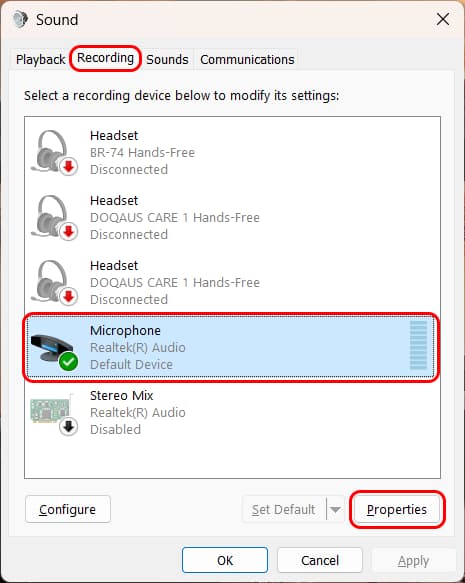
You should see a dialog like the one in the screenshot. Select the Recording tab, and then select the microphone device from the list that your guitar is plugged into. The screenshot is taken from my laptop running Windows 11, and my guitar is plugged into the built-in microphone port, which is the “Microphone (Realtek(R) Audio)” device.
Once you have selected your microphone device, click the Properties button…
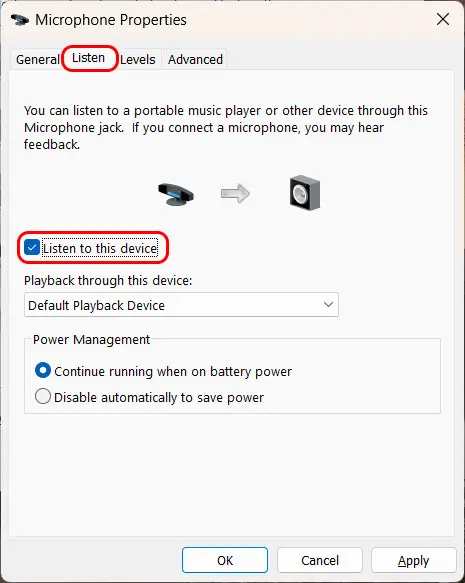
This should bring up the Microphone Properties dialog. Click the “Listen” tab, then check the “Listen to this device” checkbox. You should now be able to hear your guitar through your laptop speakers or headphones as you play.
Listening to guitar through a laptop with no audio interface
I recorded some audio clips of me playing an electric guitar through my laptop without an audio interface, so you can judge for yourself how bad it sounds.
I used my phone in front of my laptop to record these clips, as I wanted you to be able to hear the latency (i.e. the time taken between playing a note and the sound of the note coming out of the speakers). You can hear the acoustic sound of the guitar as well as the sound of the speakers to hear the time difference.
Here’s a clip straight in using no amp sim, just the sound straight into the mic port and out of the speakers…
You can hear there is quite a lot of background noise, and there is a noticeable latency – the time between playing a note on the guitar and hearing it out of the speakers. It also sounds rather lifeless.
Could you use this sound? Maybe just for noodling around or practice, but certainly not for recording or any real live application. The latency is annoying – I couldn’t cope with that for very long.
Let’s try and improve the sound using an amp sim…
Using an amp sim with no audio interface
It is very common these days to use an amp sim (guitar amplifier simulator software) on a computer, and plug your guitar into it via an audio interface. I have obtained excellent results using this method, including recording guitars on songs I have commercially released.
If you do want to use amp sims, check out my article on getting better sounds using amp sims. You’ll learn several tips and tricks to get the very best out of your amp sims, and how to avoid some common mistakes and pitfalls.
So what do amp sims sound like without using an audio interface? Here’s a clip of me playing through the excellent amp sim BIAS FX…
If you want to try this yourself, make sure in your amp sim you go to the Audio settings and select the input your guitar is plugged into and your output device – speakers or headphones. You will also need to select an audio driver, probably a Direct Sound or Windows Audio driver.
As you can hear, the background noise is horrible. You can barely hear the guitar coming out of the speakers, and the latency is pretty bad – this is unplayable for me. I don’t think this sound is usable for anything, even just noodling around in your bedroom.
BIAS FX is a fantastic amp sim that I have used extensively, and it sounds much, much better than this when used properly via an audio interface.
You should use an audio interface to connect guitar to PC
If you haven’t realized by now, I really, really recommend using an audio interface to connect your guitar to your computer. I cannot stress this enough. Just get an audio interface!
Having said that, an audio interface isn’t necessary for every musical activity in a home studio. To help you work out if you require one, I have written a whole article asking do you need an audio interface? It’s highly recommended reading before you part with any cash on an interface.
But for connecting a guitar to a computer, you will get much, much better results from using an audio interface. It offers these advantages over a direct connection…
- Much better sound quality
- Much less background noise
- Audio interfaces come with dedicated specialist ASIO software drivers for high-quality audio and low latency
- Much better latency; should be able to configure it to be virtually unnoticeable
- Dedicated hardware for your audio input and output
- Works very well with amp sims
Connecting your guitar directly to your PC without an audio interface has these disadvantages…
- Very poor sound quality (background noise, hiss)
- Latency (so long as to be unplayable in some cases)
- Guitar signal level too low for standard mic inputs on PCs (leading to low signal-to-noise ratio and background noise)
- Amp sims all but unusable
The only real disadvantage of an audio interface is that they cost money. However, the cost of an audio interface is worth it in my opinion. Small audio interfaces are pretty cheap these days. I know price is relative to what you can afford, but I would highly recommend saving up for one, asking for one for a birthday present, etc.
Certainly, if you are going to do any recording, you need an audio interface. If this applies to you, then you need to check out my complete guide to recording with amp sims article. It takes you right through connecting your guitar, through setting up your amp sims and all the way up to making your first recording.
The audio interfaces I personally recommend are the Focusrite Scarlett series. I have been using these for many years, and they have always given me great sound quality, durability and reliability. They are also built like tanks! You can pick up the Focusrite Scarlett Solo (affiliate link) from Amazon for a very competitive price.
If you are looking for something in a more budget range, try the M-Audio M-Track Solo (affiliate link) from Amazon. It has excellent reviews and is very highly thought of as a beginner audio interface.
Alternatively, you can always try Reverb or eBay for second-hand units. This is riskier than buying brand new, but you also give yourself the chance of bagging an absolute bargain.
If you are choosing your first audio interface, definitely check out my article on how to decide how many inputs your interface should have. It will take you through the factors influencing how many inputs you will need, and help you make an informed choice of audio interface. Ultimately, it should save you money as you’ll learn to buy exactly what you need and nothing more.
Here is some of my favorite home studio gear…
Thanks for reading this article. I hope you found it helpful in your home music-making activities. Here are a few of the tools that I personally use in my home studio. These are affiliate links, so if you decide to use any of them I’ll earn a small commission.
Audio interface: My personal choice for audio interfaces are the Focusrite Scarlett series. I have been using these for years, and they have always given me great-sounding recordings. For a very reasonable price from Amazon you can buy the excellent Focusrite Scarlett 4i4, or if you don’t need MIDI capability the Focusrite Solo is a great choice.
Amp sim: Guitar amplifier simulator software has come on leaps and bounds in recent years, such that I record all my electric guitar parts using amp sims these days. One of the very best is the incredible Amplitube from IK Multimedia, which I have used on many of my songs.
Headphones for recording: My favorite headphones for recording are the Sony MDR-7506s, which I use for monitoring during all my recording sessions. They can also be found in many pro recording studios. Get the Sony MDR-7506 headphones from Amazon here.
General-purpose microphone: You can’t go wrong with a good ol’ Shure SM-57, one of the most versatile and ubiquitous microphones around. I’ve been using one in my home studio for as long as I can remember. Amazon offers the Shure SM-57 for a very competitive price.
To see all of my most up-to-date recommendations, check out this resource I made for you!
