How to connect multiple microphones to a computer
DISCLOSURE: This post contains affiliate links. If you buy through these links, I may earn a small commission.
I have connected more than one microphone to my PC several times in my home studio over the years. These were generally when I needed to record multiple sound sources at the same time. Depending on what exactly you are trying to do, there are several different methods of connecting multiple microphones to a computer.
As a general rule, the best way to connect multiple microphones to a computer is to use multiple XLR inputs on an audio interface. Connect each microphone to a free XLR input on the audio interface using XLR cables. Connect the audio interface to your computer via USB or Thunderbolt.
There are several reasons you might want to connect more than one microphone to your computer. You might be recording a podcast with two people speaking. Or you might be recording multiple sound sources for a song, such as a singer and an acoustic guitar. You can probably think of a few more.
This article takes you through the different ways you can connect several mics to a computer, and looks at which method is best for each of the various different applications.
If you are interested in checking out the best recording gear such as audio interfaces, studio monitor speakers, microphones, etc., you can find them at Amazon by clicking here.
Methods for connecting multiple mics to a computer
We will look at three methods for connecting several microphones to a computer.
Method 1 (Easiest) – Multiple USB microphones
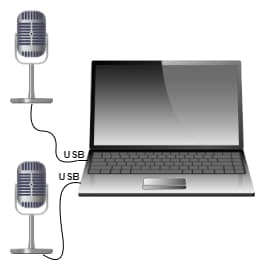
If you have several USB microphones, you can simply connect each one in to a USB port on your computer. As long as you have enough free USB ports for all the mics you want to connect, you are good to go.
It really is as simple as that. If the microphones require any driver software installing, you should be prompted when you first plug in the mic and the driver will probably install automatically.
This method is best suited to non-musical applications, as you don’t have as much control over the levels, balance and sound of the mics as you do with the other methods.
A great example is if you are recording a podcast with more than one person talking. There is not a huge amount of audio tweaking required here; as long as you can both be heard clearly that is all you need to worry about.
Using multiple headsets is actually a variation of this method. This would be ideal for a video call or conference, where two of you are using the same computer.
This method is the cheapest of the three discussed here.
Method 2 – Multiple audio interface XLR inputs
If you are connecting multiple microphones for any sort of musical purpose, the recommended method is to connect the mics to multiple XLR inputs on an audio interface.
Audio interfaces are specifically designed for applications like this, and will give you excellent sound quality. They come with high-quality audio drivers, and give you the most control over your sound out of all the methods discussed here.
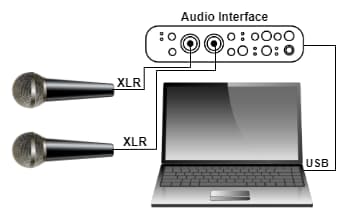
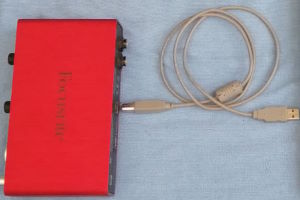
Your audio interface should be connected to your computer via USB or thunderbolt, and the driver software installed.
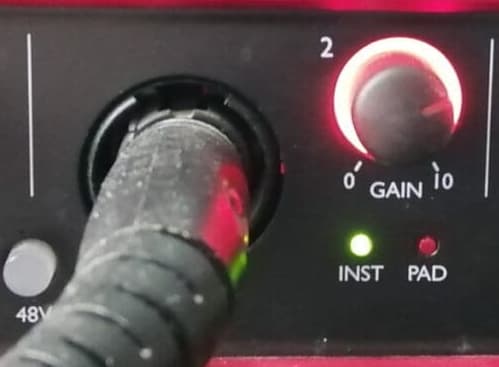
It’s then simply a matter of plugging each microphone into a free input on the audio interface using an XLR cable.
If you are recording, you should create a separate track in your recording software for each microphone. I recommend using DAW (Digital Audio Workstation) software for this – see the “Software setup for recording multiple microphones” section later.
Ensure that you select the correct microphone input for each track, so each mic gets recorded on its own track. This enables the huge benefit of this method – that you get each microphone isolated on a separate track, giving you full flexibility to mix the levels after you have done your recording.
Audio interfaces range widely in price; the more inputs they have, the more expensive they are. So if you need a lot of inputs (e.g. mic’ing up a drumkit, or recording a full band), this method can get costly.
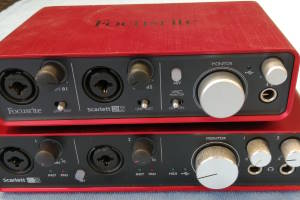
My personal choice for audio interfaces are the Focusrite Scarlett series. I have been using these for years, and they give great sounding recordings for not very much money. You can buy the Focusrite Scarlett 2i2 (affiliate link) with 2 XLR inputs, or the Focusrite Scarlett 18i8 (affiliate link) with 4 XLR inputs from Amazon for very competitive prices.
There are other models in the Focusrite Scarlett range, and there are factors other than just the number of inputs to consider when selecting one to buy. To help you decide, I have written a guide to choosing the right Focusrite Scarlett for you. It will help you make an informed choice based on your personal musical and recording needs.
Method 3 – Multiple mixer XLR inputs
This method is similar to the audio interface multiple inputs method. Instead of an audio interface, a mixer is used.
You plug your microphones into free XLR inputs on the mixer. The mixer is connected to the computer in one of the following ways…
- Connect the mixer’s USB output to a free USB port on your computer
- Connect the mixer’s stereo audio output to a stereo input on an audio interface connected to your computer
- Connect the mixer’s stereo audio output to a stereo input on your computer
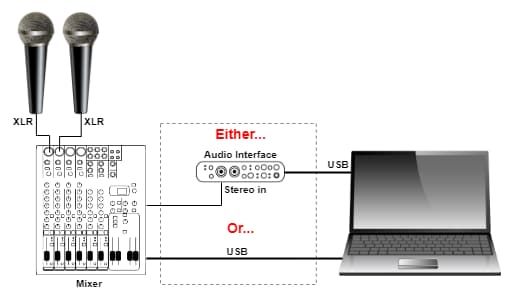
The third option is not recommended, as this will probably give you the worst sound quality. The second option is the most expensive, as you need a mixer and an audio interface. The first option is the easiest.
This method is best suited to live applications where you need a lot of microphones. For example, capturing a live band performance, or live streaming with several sound sources.
Unlike the audio interface method, you will not get all your microphones on separate tracks. You will have one stereo track in your recording software containing the audio from all the mics. So you need to get your mix right when recording, as you cannot change it afterward.
If you are looking for a mixer, I highly recommend Behringer mixers – I have owned one for years. They are solidly built, reliable, sound great and are inexpensive compared to the competition. For a USB mixer, you can’t go far wrong with the 4 XLR input Behringer Xenyx QX1204USB (affiliate link), available for a great price from Amazon.
Comparing multiple mics into computer methods
Here’s a quick summary of the advantages and disadvantages of the methods for connecting multiple microphones to a computer, with the applications they are each best suited to…
| Connection method | Advantages | Disadvantages | Best suited to |
|---|---|---|---|
| Multiple USB microphones | Cheap, Easy | Cannot change mix post-recording | Non-musical applications e.g. podcasts |
| Multiple audio interface XLR inputs | Full control of mix post-recording, sound quality | Can get expensive, a bit more setup required | Multi-track music recording |
| Multiple mixer XLR inputs | Can give you loads of inputs | Expensive, more setup needed, no control post-recording | Live applications needing lots of mics |
If you are looking to record multiple mics and are completely new to home recording, I highly recommend you check out my beginner’s guide to recording music at home. A huge amount of work has gone into this guide! It is a complete resource to take you from never having recorded before all the way through to making your first home recording.
Separate track for each mic or one track for all
With all the connection methods, it’s important to know how the sound from all the microphones will present itself in your computer. There are two basic options, and the methods we have discussed each lend themselves to one of these options.
For example, if you are recording your microphones, inside your recording software you could have…
- Each microphone recorded to a separate track
- One track containing the microphones all mixed together onto one track
Option 1 gives you the benefit of complete control. Even after the recording has taken place, you can still alter the balance between each microphone. You could turn one up if it is too quiet, and turn one down if it is too loud.
Option 2 is probably easier to set up. But once you have finished your recording, you are stuck with the balance of the mics; you can’t change it afterward. With this option, you need to get the balance right before you start recording.
Perhaps you don’t yet own any microphones, or need to buy another one. If you are looking for a great all-rounder, I highly recommend the Shure SM58 (affiliate link), available for a competitive price from Amazon.
This famous mic is most well-known for being a live mic, but it is also an excellent mic for recording. I have recorded many times with one in my home studio. For more information, you can read my article on using the SM58 as a recording mic.
Software setup for recording multiple microphones
It is worth taking a look at how you would use your recording software to record multiple mics. A DAW (Digital Audio Workstation) is the type of software usually used to record on a computer. If you are unsure what a DAW is, check out my article “What is music recording software?” which will teach you all you need to know to get started.
I’ll keep these instructions generic, as they will vary slightly from DAW to DAW. The general principles will be the same.
- Note which inputs on your audio interface the microphones are connected to.
- In your DAW, create a new track for each microphone you are recording.
- On each track in turn, select the input for each mic as noted in step 1.
- Enable recording on all the tracks.
- Press record in your DAW, and ensure you can see the incoming audio from all the mics in the DAW’s mixer or track window.
- Stop recording, and playback to check you have actually recorded what you wanted to.
Reasons to connect multiple mics to computer
Let’s take a look at the different reasons you might have for connecting several microphones to your computer. I’ll split these up into purely speaking applications and musical applications.
Multiple speaking voice applications
Here are some common examples of using microphones to capture several spoken voices…
- Recording a podcast with two or more people speaking
- Recording the audio for YouTube video with more than one voice
- Live streaming video with multiple voices
Multiple musical sound source applications
Using many microphones to record instruments or singers has been a very common thing to do pretty much since the invention of the recording studio. Here are a few common scenarios we might use in our home studios…
- Recording multiple sound sources, such as…
- Two or more singers
- Singer and acoustic guitar
- Multiple guitar amps (where the guitarist wants their tone to be a blend of the two amps)
- Mic’ing up a drumkit (e.g. one mic on each of snare drum, kick drum, toms, hi-hat, etc)
- Recording a full band
- As above, but for live streaming either audio or video
As a quick aside while we’re discussing connecting microphones…did you know you can run vocal microphones through a guitar amp?! It may sound crazy, but it’s actually an unorthodox way of getting a cool, unusual vocal sound, or saving some money on vocal amplification. Check out my article on running vocals through a guitar amp to learn how to safely do this, and some common mistakes to avoid.
Microphone bleed and positioning
Finally, one very important thing to consider when using several microphones in the same room is microphone bleed.
What on earth is microphone bleed…it sounds painful!
Microphone bleed is where a mic picks up sound from a source you didn’t intend it to. Imagine 2 people recording a podcast, with one microphone each. Mic 1 will mainly pick up the sound from person 1’s voice as intended, but it will also pick up a little bit of person 2’s voice – this is microphone bleed.
If you are recording everything to one track, then bleed doesn’t really matter.
If you are recording to multiple tracks, then ideally you’d want to minimize the bleed between microphones. You can do this with careful positioning of the microphones. For example, placing the microphones as far apart as you realistically can and setting them up back-to-back.
I recommend experimenting with a trial run before the actual recording, to find the positions that work the best for your application in your recording room.
For help with finding the best place to record and positioning your equipment, check out my guide on finding the best place to record at home.
Here is some of my favorite home studio gear…
Thanks for reading this article. I hope you found it helpful in your home music-making activities. Here are a few of the tools that I personally use in my home studio. These are affiliate links, so if you decide to use any of them I’ll earn a small commission.
Audio interface: My personal choice for audio interfaces are the Focusrite Scarlett series. I have been using these for years, and they have always given me great-sounding recordings. For a very reasonable price from Amazon you can buy the excellent Focusrite Scarlett 4i4, or if you don’t need MIDI capability the Focusrite Solo is a great choice.
Amp sim: Guitar amplifier simulator software has come on leaps and bounds in recent years, such that I record all my electric guitar parts using amp sims these days. One of the very best is the incredible Amplitube from IK Multimedia, which I have used on many of my songs.
Headphones for recording: My favorite headphones for recording are the Sony MDR-7506s, which I use for monitoring during all my recording sessions. They can also be found in many pro recording studios. Get the Sony MDR-7506 headphones from Amazon here.
General-purpose microphone: You can’t go wrong with a good ol’ Shure SM-57, one of the most versatile and ubiquitous microphones around. I’ve been using one in my home studio for as long as I can remember. Amazon offers the Shure SM-57 for a very competitive price.
To see all of my most up-to-date recommendations, check out this resource I made for you!